Instead of repeatedly typing reproduction steps into pull request comments, record the behavior with Zight and paste its shareable link beside the code change. This 2026 Zight GitHub integration workflow uses links in pull request descriptions and comments—not an assumed native connector or automatic synchronization.
- Use the Zight GitHub integration workflow to put screen recording links directly into pull request descriptions.
- Keep reproduction steps, expected behavior, and test results in GitHub; use video to show the interaction.
- Check recording access with a reviewer before requesting code review.
- Add a new recording after behavior changes, and label older evidence clearly.
Why this matters
A code diff explains what changed. A screen recording shows what the change does: an error disappearing, a form responding correctly, or a layout remaining stable through an interaction. Reviewers need both when behavior is difficult to describe in text.
Zight is best for engineering teams that need shareable screen recordings alongside GitHub pull requests. The trade-off is that a link-based workflow leaves you responsible for recording access, useful descriptions, and keeping the evidence current.
For your 2026 review process, treat recordings as supporting evidence, not a replacement for tests or written acceptance criteria. A working demonstration does not establish that every code path works.
Before you start
- Prepare access. You need a recording account, permission to capture the application, and GitHub access that allows you to create or comment on the relevant pull request.
- Prepare safe material. Use a test environment, synthetic records, and a clear reproduction path. Close unrelated tabs and hide credentials, tokens, notifications, and customer information before recording.
- Check the hidden dependency: viewer access. Repository access and recording access are separate. A reviewer who can open the pull request still needs permission to view the recording; test that before requesting review.
Choose the evidence format before you capture anything. Use the smallest format that answers the reviewer's question.
| Evidence format | Best for | Advantage | Limitation |
|---|---|---|---|
| Screen recording | Reproductions, transitions, and multi-step interactions | Shows sequence and visible behavior | Takes longer to review and can become outdated |
| Screenshot | Static layout defects and a single visible state | Makes one detail easy to inspect | Cannot demonstrate movement or interaction |
| Written steps | Commands, expected results, and repeatable checks | Keeps instructions searchable in the pull request | Can leave visual behavior unclear |
Pair a recording with written steps when sequence matters. Use a screenshot when a single frame answers the question. Neither format replaces a test that checks the underlying behavior.
Recording preparation
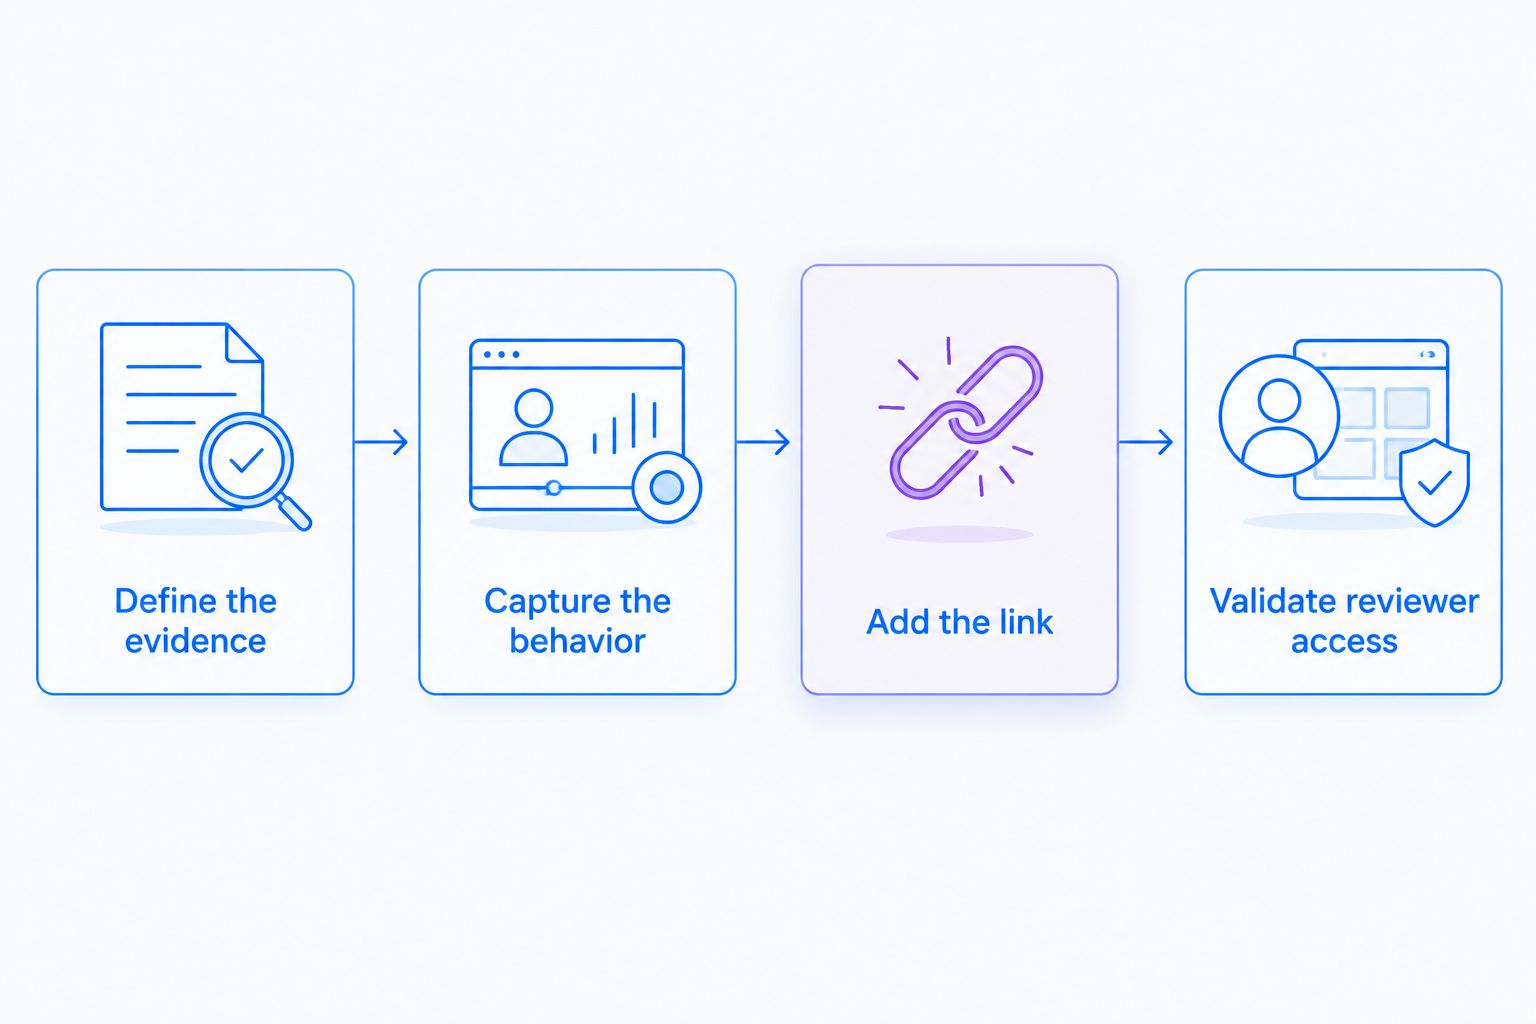
Define the evidence
- Open the branch or test environment you intend to demonstrate. Confirm that the visible behavior matches the code under review, rather than an unrelated local change.
- Write the review question before recording. For example: does submitting the synthetic form preserve the entered values after a validation error?
- Set a target of 60 seconds per recording for a focused interaction. This is an editorial target, not a software limit; split unrelated demonstrations instead of rushing through them.
- Decide what success looks like on screen. Include the starting state, the action, and the resulting state so the reviewer can follow the sequence without guessing.
Expected result: you have one review question and a repeatable demonstration tied to the pull request.
Capture the behavior
- Start a screen recording in Zight using the capture controls available in your installed app or browser environment. Record only the area needed to explain the change.
- Show the initial state before interacting. Move through the reproduction steps deliberately, and keep the final result visible long enough to inspect.
- Add spoken context only when it explains something the screen cannot show. Keep exact commands, identifiers, and acceptance criteria in the written pull request text.
- Finish the recording and play it back. Confirm that the relevant interaction is visible, any necessary narration is understandable, and no sensitive material appears.
- Copy the recording's shareable link. Keep a descriptive title or accompanying label that identifies the behavior, rather than a generic label such as “new video.”
Expected result: the recording shows the intended behavior from start to finish, and you have a link ready to place in GitHub.
For a broader capture process, use the screen recording for engineering teams guide. Keep the pull request version narrow: one review question, one demonstration, and the relevant result.
Pull request evidence
Add the recording link
- Open the repository in GitHub and select Pull requests. Open the existing pull request, or select New pull request if you still need to create it.
- For a new pull request, confirm the intended base and compare branches before continuing to Create pull request. Describe the code change before adding the visual evidence.
- Add a short evidence section to the description. Include the behavior shown, the recording link, the tested environment, and the revision or commit represented by the demonstration.
- Paste the shareable URL as a normal link. Do not depend on an inline player or preview; the workflow works when the reviewer can open the destination.
- Save the description using the control for your current create or edit flow. For evidence added to an existing discussion, paste the same structured context into a comment and select Comment.
Expected result: the recording link appears beside enough written context to explain why the reviewer should open it.
Use this copyable evidence format for your 2026 pull request template:
Visual evidence
Behavior shown: Describe the interaction and visible result.
Recording: Paste the shareable recording link.
Revision demonstrated: Enter the relevant commit or revision.
Environment: Identify the test environment and relevant browser or device.
Expected result: State what the reviewer should observe.
Checks performed: List the tests or manual checks separately.
The template deliberately separates “shown” from “tested.” A recording of a successful interaction is evidence of that interaction, not proof of every requirement.
Validate reviewer access
- Open the link from the saved pull request, not from your clipboard history. This catches a missing, truncated, or incorrect URL.
- Ask a representative reviewer to open the recording using their normal work account. Test the intended access boundary rather than weakening it to avoid a sign-in step.
- Confirm that the recording matches the current review question and contains no material outside the intended audience's authorization.
- Request review only after completing these 3 checks: correct destination, correct audience, correct revision.
Expected result: the reviewer can reach the intended recording and knows which code state it demonstrates.
The complete sequence is simple: prepare the demonstration, capture it, attach the link, and verify access. Keep ownership with the pull request author so a broken or stale recording has a clear person responsible for fixing it.
Updated-code workflow
Use a fresh recording when a review comment changes the visible behavior. Do not assume the original demonstration still represents the latest code.
- Reproduce the revised behavior on the updated branch or test environment.
- Capture only the changed interaction. Aim for 2 minutes or less when a longer explanation is genuinely necessary; move unrelated context into text.
- Add the new link in a pull request comment with the revision demonstrated and the review concern it addresses.
- Update the description so the current evidence is easy to find. Label the earlier recording as superseded if its surrounding discussion still matters.
- Repeat the viewer-access check before asking the reviewer to recheck the change.
Expected result: reviewers can distinguish current evidence from the history of the discussion.
For a 2026 team standard, make the author responsible for updating visual evidence whenever the demonstrated behavior changes. A fresh commit does not always require a new recording; a changed result in the recording does.
This variant remains manual. It does not claim that pushing a commit triggers capture, uploads a recording, or updates GitHub automatically. Define and verify any separate automation before making it part of your review policy.
Troubleshooting
The reviewer cannot open the recording
Check the destination URL and the recording's access settings. Confirm the reviewer is using the intended identity and has permission to view the content.
Do not make restricted material public as a shortcut. Resolve access through your organization's approved sharing process, then retest from the reviewer's account.
The link appears without a video player
Keep the normal hyperlink and its descriptive label. An embedded player is not a requirement for this workflow, and a preview is not proof that the reviewer can open the recording.
If your team requires viewing evidence without leaving GitHub, evaluate that requirement separately. Do not promise inline playback from a pasted link.
The recording shows the wrong behavior
Compare the demonstrated environment and revision against the pull request. A local build, old deployment, or different branch can make the recording misleading even when the link works.
Capture the correct state, replace the current evidence reference, and clearly identify the older recording as superseded. Explain what changed rather than silently leaving conflicting demonstrations in the discussion.
The reviewer still asks for reproduction steps
Add the initial conditions, exact action, and expected result to the pull request text. Keep copyable commands and error messages in text rather than requiring the reviewer to transcribe them from video.
Watch the recording once without narration. If the sequence is unclear, simplify the demonstration or add the missing context to its description.
Sensitive information appears in the recording
Stop sharing the recording and follow your organization's incident process. Replace it with a new demonstration using synthetic information, and follow your security procedure if credentials were exposed.
For healthcare application work, use synthetic examples only. Do not treat this guide as authorization to record protected health information; your organization must verify its agreement, configuration, access rules, and permitted workflow first.
Customize your workflow
Add an optional visual-evidence section to your team's pull request template. Ask authors to explain when a recording is useful, not to record every change regardless of relevance.
For frontend work, show the interaction that changed. For support escalations, connect the synthetic reproduction to the reported behavior without copying customer information into the recording. For operations documentation, keep reusable instructions separate from temporary review evidence.
Zight screen recording supports the demonstration; GitHub holds the review context. This division keeps the recording focused and leaves decisions, acceptance criteria, and test results where reviewers already discuss the change.
Evaluate the process on an actual review before expanding it across repositories. Check whether reviewers can identify the demonstrated revision, open the evidence, and repeat the written steps without asking for missing context.
FAQ
How do I use the Zight GitHub integration for pull requests?
Record the relevant behavior, copy its shareable link, and add that link to the GitHub pull request description or a comment. This guide describes a link-based workflow, not a verified native connector or automatic synchronization.
Can I put a screen recording in a GitHub pull request description?
Yes, you can place a shareable recording link in the pull request description. Add the behavior shown, the demonstrated revision, and the expected result so reviewers understand the evidence before opening it.
Will a recording link play directly inside GitHub?
This workflow does not depend on inline playback. Use a descriptive link and verify that reviewers can open the destination rather than assuming a preview or embedded player will appear.
Does access to a private repository also grant access to the recording?
No, repository access does not itself establish permission to view a separately shared recording. Check the recording's access settings and test with an intended reviewer.
Should I record every commit in a pull request?
Record again when the demonstrated behavior changes, not simply because another commit exists. Identify the revision represented by the current recording and label superseded evidence clearly.
Is a screenshot better than a recording for code review?
A screenshot is better for a single static detail; a recording is better for an interaction or sequence. Keep written steps and test results alongside either format.
Can healthcare engineering teams use this workflow in 2026?
Healthcare engineering teams should use synthetic examples for this workflow. Any use involving protected health information requires separate verification of the applicable agreement, configuration, access controls, and permitted recording and sharing practices.
One last thing
The most useful recording starts before the bug or fix appears. Show the initial state and triggering action, not just the final screen; otherwise, the reviewer sees an outcome without knowing how you reached it.
Before requesting review, ask one question: can someone connect this recording to the exact behavior this pull request changes? If the answer is no, fix the context before recording more footage.