
For screen recording on an HP laptop, the best screen recorder is necessary. However, finding a screen recording software is not easy for people who are unfamiliar with the recording software. Also, the same users may not be unacquainted with operating a specific laptop recorder. Regardless of your HP device model, you can easily record internal audio or webcam or select a specific screen area.
This guide will walk you through the different methods for capturing your screen on your HP laptop, from the simplest option to a more powerful tool for those who prefer customization and advanced features. Let’s dive in!
Does Your System Meet the Screen Recording Requirements?
Before diving into screen recording on your HP laptop, it’s essential to ensure that your system meets the requirements to support this functionality effectively, such as:
- Operating System Compatibility– Most HP laptops now run on Windows, like Windows 10 or newer versions. Ensure your laptop uses a compatible Windows version to smoothly access all the screen recording features.
- Hardware Specifications– Screen recording can be a bit demanding on your laptop’s resources, especially if you capture high-quality video. For a smooth screen recording experience, ensure your HP laptop has a decent processor, plenty of RAM (8GB or more), and a dedicated graphics card if possible.
- Available Storage Space-Ensure you’ve got enough room to store all those video files on your laptop’s hard drive or SSD. If you’re running low on space, consider tidying up your files or moving stuff to an external drive to make room for your screen recordings.
- Screen Resolution and Display Settings—Set your laptop’s display resolution to the sweet spot for recording—usually 1920×1080 (that’s Full HD) or higher for super-sharp recordings. And don’t forget to tweak display scaling and refresh rate settings to keep things looking smooth and flicker-free.
- Audio Input and Output– Screen recording often involves capturing audio alongside the video. Check that your laptop’s microphone and speakers are all good to go, ensuring they’re picking up sound loud and clear without any weird glitches.
- Software Compatibility and Updates– Ensure your screen recording software is compatible with your laptop’s operating system and hardware. Regular updates mean you’ll always have access to the latest features and fixes, keeping your screen recording game strong.
How to Screen Record on an HP Laptop
There are different ways one can learn how to screen record on an HP laptop, and they include:
1. Using Zight on Your HP Laptop
Zight is an all-in-one recording software designed to streamline the creation of top-notch videos, GIFs, and screenshots. Its screen recording feature proves particularly handy for training employees and assisting clients with troubleshooting.
Its user-friendly interface makes sharing screen recordings with clients a breeze. Moreover, it seamlessly integrates with the project-tracking tools and productivity apps your teams rely on daily. Utilizing the drag-and-drop functionality, your teams can effortlessly incorporate content into Google Docs or Microsoft Office or embed it directly into emails.
While the built-in tools and third-party tools offer functionality, Zight provides a user-friendly and feature-rich alternative perfect for anyone using an HP laptop. Here’s why Zight stands out:
- Simple and Intuitive Interface: Zight boasts a clean interface that’s easy to navigate, even for beginners. There’s no need to fiddle with complex settings—just a few clicks, and you’re recording!
- Recording Flexibility: Capture your screen, a specific window, or a custom region. Zight allows you to tailor your recording to your exact needs.
- Audio Options: You can choose to record system audio, microphone audio, or both. This is perfect for capturing narration or background music.
- Real-time Editing: Add annotations like text, arrows, and shapes to your recording while capturing. This is ideal for creating clear and concise tutorials.
- Versatile: It can be used for different uses including recording your gameplay with high-quality video and audio, creating how-to and instructional videos, hosting and recording webinars, showcasing your software or products with live demonstrations and also recording professional business presentations.
- Easy Sharing: Zight makes sharing a breeze once you’ve finished recording. Upload directly to popular platforms like YouTube or Vimeo, or save the recording to your computer or cloud services.
- Reliable Customer Support: Zight provides robust customer support, so you’re never left in the dark. Contact their support team for assistance if you encounter any issues or have questions.
Now, let’s explore how to install Zight and then how to screen record on HP:
Step 1. Download & Install Zight
If you haven’t already, sign up for Zight (up to 90-second recordings are FREE) and download the application or install the extension for Chrome on your HP.
Step 2. Launch Zight
Once you have Zight installed, launch the app from your application or toolbar. Click on the application icon and choose the Record option.
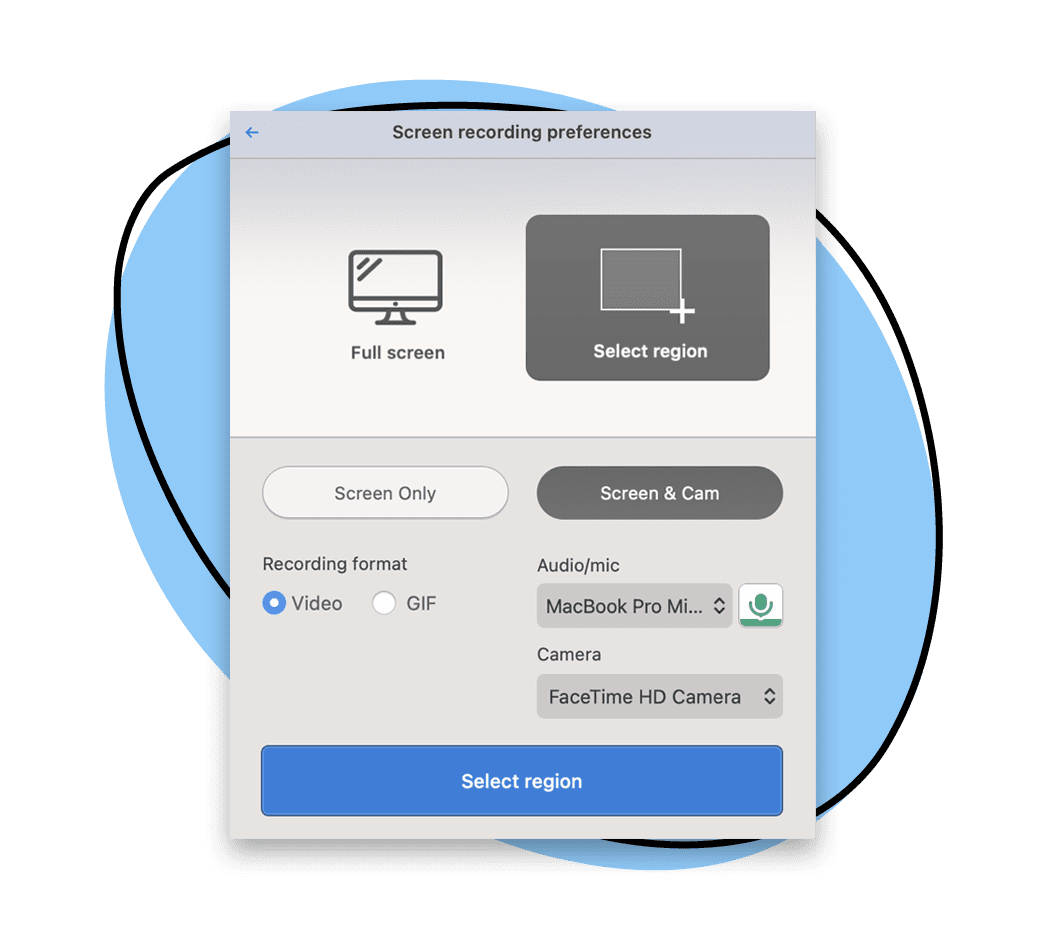
Step 3. Choose Your Screen Recording Options
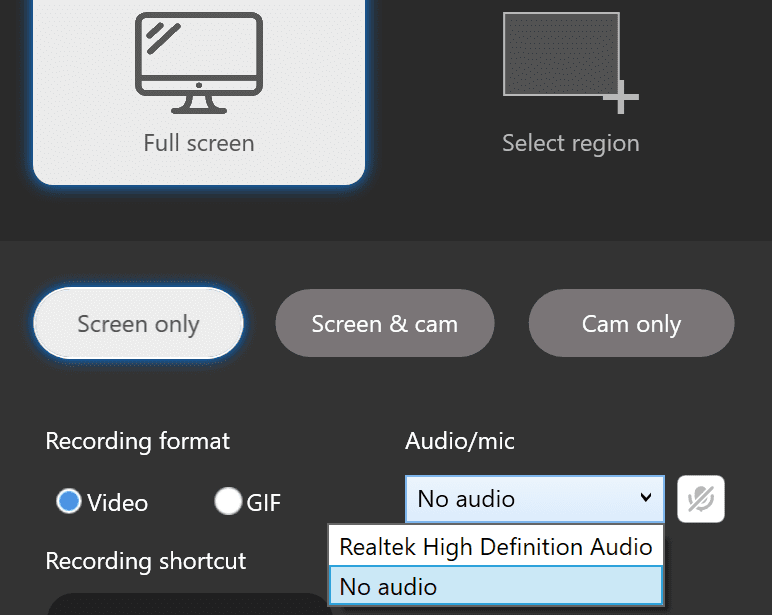
From the Record menu, select your screen recording preferences. You can choose to record:
- Your entire screen
- Record only a part of your screen
- Record just your screen or include a cam overlay
You can also select your recording format of a video or gif and choose your audio/mic preferences. Click the drop-down menu on Audio/Mic. This will be set to No Audio; you want to change that to your PC’s speakers, e.g., Realtek High Definition Audio.
Step 4. Start Recording
After you have chosen your preferences, click the “Start recording” button. A countdown prompt from 3-2-1 will show, and then your screen recording will begin. The toolbar will show you a recording timer and provide additional options to annotate, pause or finish your recording.
Step 5. Finish & Edit Screen Recording
Your recording will automatically process once you click the “Finish” button. Zight will have built-in editing features, so you can trim, crop, or enhance your recording as required.
Step 6. Easily Share via URL

Your webcam recording is now available in your Zight files. Keep it for yourself, or easily share it via an autogenerated link anywhere you can share a URL. You can also drag and drop items to save recordings into emails and chat apps.
Keyboard Shortcuts on Windows
With Zight, you control your screen recording experience, including customizing keyboard shortcuts to fit your style. Here’s how to get started:
- Open up your Zight app on your HP laptop.
- Want to start recording? Hit ‘Alt + Shift + 6’ on your keyboard to kick things off.
- Once the recording panel pops up, you can tweak settings like enabling your microphone and camera and even set a time limit for your recording. Ready to roll? Hit the big blue ‘Start’ button. When you’re all done, tap the red button to finish up.
- Ready to share your masterpiece with your team? Just hit ‘Ctrl + V‘ to paste the link, and let the collaboration begin!
2. Other Screen Recording Software
When Zight isn’t your go-to choice, consider these alternative browser extensions for your screen recording and editing needs:
1. Awesome Screenshot & Recorder
When Zight isn’t your preference, consider Awesome Screenshot & Recorder. It’s a well-known extension that offers comprehensive screen-capturing and recording capabilities.
This extension lets you easily capture or record your screen, including audio and webcam footage. Additionally, it provides convenient features like image and video editing tools and cloud storage for seamless access to your recordings from anywhere.
2. Loom
If you’re looking for simplicity and ease of use, Loom is an excellent alternative to Zight. This popular extension offers unlimited video recording for free, making it ideal for various recording needs.
Whether you’re capturing your screen, audio, or webcam, Loom makes the process effortless. Its intuitive interface and straightforward features ensure a hassle-free recording experience without cost limitations.
3. Screencastify
While Zight may not be your preferred choice, Screencastify offers a compelling alternative with its professional-grade features. Although it’s a paid screen recording software, Screencastify provides a free trial period, allowing you to risk-free explore its screen recording, webcam capture, and video editing capabilities.
Whether you’re a content creator, educator, or professional, Screencastify offers the tools to create polished and engaging videos easily.
4. Nimbus
When time is of the essence, Nimbus becomes a reliable alternative to Zight. This free extension offers a range of screen recording, video editing, and annotation tools, making it perfect for quick video creation and editing tasks.
Whether you need to capture your screen, add annotations, or edit your footage on the fly, Nimbus provides all the essential features in a user-friendly package.
3. Use the Built-in Game Bar (Windows 10 & 11)
While you might be searching for third-party software, your HP laptop has a hidden gem– a built-in screen recorder! The Xbox Game Bar is a handy tool pre-installed on most HP laptops running Windows 10 and 11, so you don’t need to download anything extra. The built-in screen recorder was originally designed for gamers to capture gameplay footage, but it’s also perfect for recording any on-screen activity.
This built-in option offers many HP laptop users a convenient way to capture on-screen activities. No extra software means no time wasted searching and downloading, and your recordings are saved directly to your device. However, it’s important to note that this recorder might be limited to capturing content within a single application window, offering less flexibility than other options. Here’s how to use it:
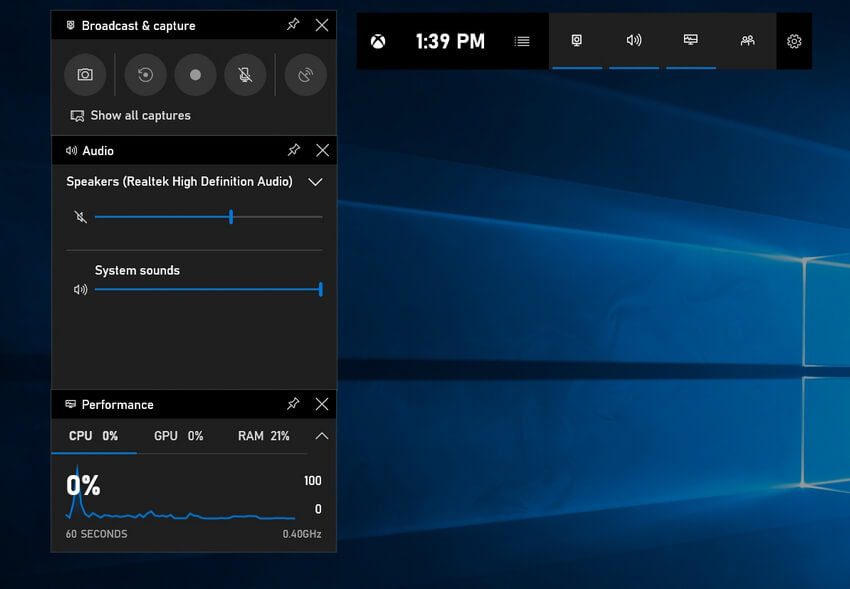
Step 1: Open the Game Bar on Your HP Laptop
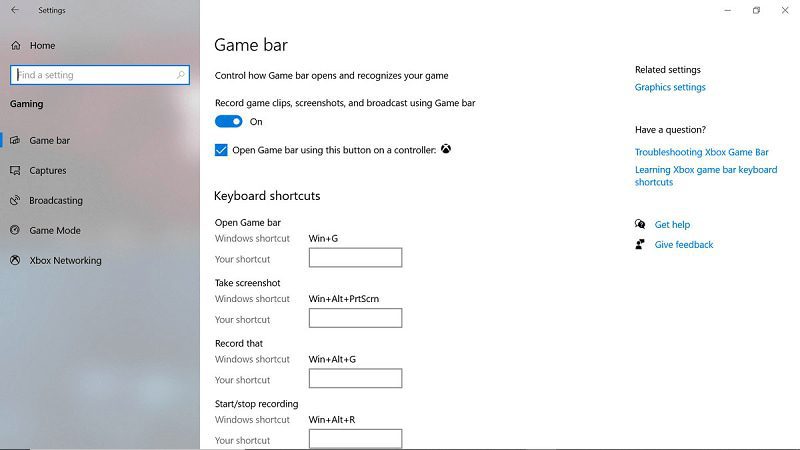
Press the Windows key + G simultaneously on your keyboard. This will overlay a menu on your screen. Your system may also ask permission to run the Game Bar application.
Step 2: Start Recording
Click the big red Record button in the center of the Game Bar. Alternatively, you can use the keyboard shortcut Windows key + Alt + R. A timer will indicate recording has begun.
Step 3: Capture Magic (or Frustration)
Play through your game, navigate that software tutorial, or perform whatever action you want to record. The Game Bar will discreetly capture everything on your screen.
Bonus Tip: Remember the Settings cogwheel icon in the Game Bar. Here, tweak recording quality for a smoother experience by enabling microphone recording for narration and adjusting other preferences.
Step 4: Stop Recording
Once you’ve captured everything you need, click the Stop button in the Game Bar, which looks like a square. The keyboard shortcut is also Windows key + Alt + R.
Step 5: Find Your Recording
Your masterpiece will be saved automatically in the Videos > Captures folder on your HP laptop.
Win+G Not Working? Here’s the Fix (No Xbox Needed!)
Are you trying to record your screen with the handy Win+G shortcut, but nothing happens? Don’t worry—there’s a simple solution!
The most likely issue is a missing Xbox app. The good news is that you can download it for free from the Microsoft Store, and you don’t even need an Xbox account to use the screen recording feature.
So, grab the Xbox app, and you’ll be back to capturing those on-screen moments in no time!
4. Snipping Tool with a Twist (Windows 11 Only)
If you’re using a Windows 11 HP laptop, you might be surprised to learn the humble Snipping Tool has a hidden talent: Screen recording!
Step 1: Open the Snipping Tool
Search for “Snipping Tool” in the Start Menu and launch the application.
Step 2: Video Mode
Look closely! You’ll see a new icon next to the usual snipping modes – a downward-facing arrow. Click this to reveal a hidden menu, and then select Video.
Step 3: Capture Time
Click the New button, and your screen will dim slightly to indicate recording is about to begin.
Step 4: Record Away
Perform the screen actions you want to capture. The recording timer will tick away in the top corner of your screen.
Step 5: Stop and Save
When finished, click anywhere on your screen to stop recording. A window will pop up, allowing you to trim the recording (if needed) before saving it to your chosen location.
5. How to Screen Record on an HP Computer with PowerPoint
Powerpoint is another way to screen record on HP, and although it’s not the main purpose of the program, it does the work. It has a built-in screen recorder for HP computers, enabling you to capture videos for integration into presentation slides. This feature allows for the inclusion of videos in PowerPoint presentations and facilitates sharing files on social media platforms.
By utilizing the “Screen Recording” feature in PowerPoint, you can capture screenshots of your screen to incorporate into presentation slides. Depending on your preferences, you can record the video with or without audio.
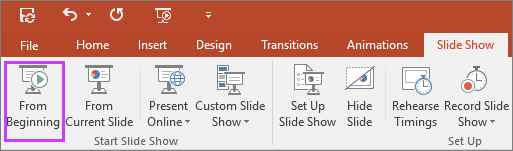
When it comes to video screen capture, setting up the window you intend to record before you start is necessary. In PowerPoint, you can easily insert a screen recording into your slide using the “Incorporate” tab on the Ribbon. Here’s how:
Step 1: Launch PowerPoint and Insert Media
- Search for and launch MS PowerPoint.
- Navigate to the Insert tab on the top horizontal menu.
- Click on “Screen Recording” under the “Media” button group in the Incorporate tab. This will bring up a small toolbar at the bottom of the screen. Typically, it’s a good idea to include the mouse pointer in your video for clarity. You can also choose whether to include audio.
Step 2: Select Recording Area
- Once you’ve initiated the screen recording, you’ll be prompted to select the area you want to record.
- Drag and drop one edge of the cropping tool to set a custom recording area.
- Use the “Select Area” button to mark the screen area you want to capture with the cursor changing to a crosshair symbol. Drag from the upper-left corner to the lower-right corner to define the recording area.
Step 3: Start Screen Recording
- In the recording menu, you’ll have the option to disable mouse and microphone inputs if needed.
- When ready, click the circular recording button to start. The menu will disappear from the screen to avoid being captured in the recording.
- To display the recording on the current slide of your presentation, press the Windows key + Shift + Q. You can right-click and select “Save as Picture” to save the recording as a separate file. Alternatively, you can choose to save the recording directly from PowerPoint.
Step 4: Save Recording
- Once you’ve finished recording, bring your cursor to the top to reveal the controls and hit “Stop.”
- Right-click on your screen recording and select “Save Media As” to save the recorded video to a convenient location. You can save it within the PowerPoint presentation or as a standalone .ppt file.
Conclusion on How to Screen Record on HP Laptop
The best screen recording tool depends on what you are looking for. The Xbox game bar will suffice if you are looking for a basic way to screen record on an HP laptop screen. It’s a great option for users interested in recording and uploading their screenplay. Luckily, it’s built-in and free, so it has no cost to set up. However, it doesn’t support much beyond gameplay. That’s where Zight comes in.
Whichever recording screen method you choose, ensure that your audio input and output devices are configured correctly in the settings before you start recording. Zight also works great for screen recording on Mac, so you’re covered regardless of your platform. Then, all you have to do is start recording and have fun! Why not start now?


