
According to statistics, visual communication is more effective than text, proving you need the best screen recording software to share your thoughts with your colleagues or customers quickly. Zight’s screen recording tool helps teams share ideas, communicate thoughts, and collaborate through personalized videos.
Not sure how to use it? You’re in luck! In this article, we’ll show you how to record your screen on Windows and save time by sharing your thoughts with HD video and webcam recordings.
Zight screen recorder is available for Mac, Windows, Chrome, and iOS, with an easy and fast installation process. But for today’s purposes, simply download the Zight App from the Microsoft Windows store for your Windows 10 or 11 PC. You can also go to the Chrome Webstore and add the extension for your Chrome browser!
How to Record Your Screen On Windows PC With Zight

Zight is a screen recording software that provides an easy and quick way for your teams to capture HD videos, GIFs, and screenshots.
With the screen record feature, you get an easier way to train your employees and troubleshoot for your clients.
Zight allows you to share screen recordings with clients, and you can use it with project tracking tools or productivity app integrations your teams use in their everyday workflows. Using the drag and drop feature, your teams can easily add content into Google Docs or Microsoft Office or embed it in email.
Let’s take a look at how to record your computer screen on Windows using Zight:
How To Screen Record on Windows PC
To start screen recording on Windows 10 or 11:
- Download and Install the Zight app on your PC. Alternatively, you can install the Chrome extension and pin it to the right of the address bar.
- Open your Zight app or extension and click Record.
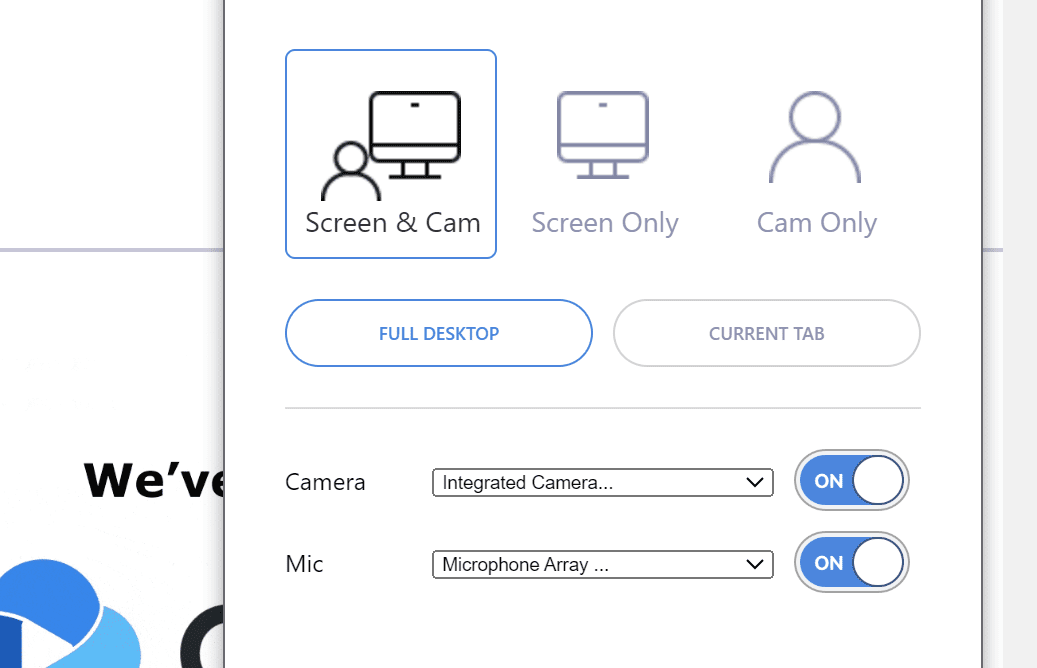
- Next, select your recording preferences, including whether to record the entire screen (Full Screen) or Select Region. Click your mouse once to choose fullscreen recording, or click and drag the mouse to select an area.
- You’ll also need to select how to record – Screen & Cam or Screen Only or Cam Only. The last option does not record your screen, so if you want to record both the screen and your webcam, you can select Screen & Cam.
- Click start recording to start. If you need to highlight sections, click the annotate feature on your recording menu. Zight lets you annotate the video as you record – so you can add various elements and shapes and even choose the duration and color for each annotation. When done, click the Red button to finish recording.
- The screen recording will be uploaded to the Zight cloud, where you’ll be able to edit the video and copy the shareable link to send to your team.
Using the Keyboard Shortcuts on Windows

You can set and use various keyboard shortcuts on your PC that are available in the app settings. For recording the screen:
- Open your Zight app
- Press the keyboard shortcut Alt + Shift + 6 to select Record
- When the recording tab appears, you can set the mic and camera on and also set a time limit. Then, click the blue Start button to begin recording and the red button once done.
- Finally, use Ctrl + V to paste the link to your team once the file is ready for sharing.
How to Record Your Screen with Sound using Zight on Windows PC
Are you wondering how to capture audio with the screen on Zight? Don’t fret; you can do so on all your Windows devices.
You’ll be able to record the screen with audio on a Windows PC by following these steps:
- Open the Zight app or Chrome extension
- Select Record, then choose your preferences – full screen or selected region. You can also choose between Screen Only or Screen & Cam.
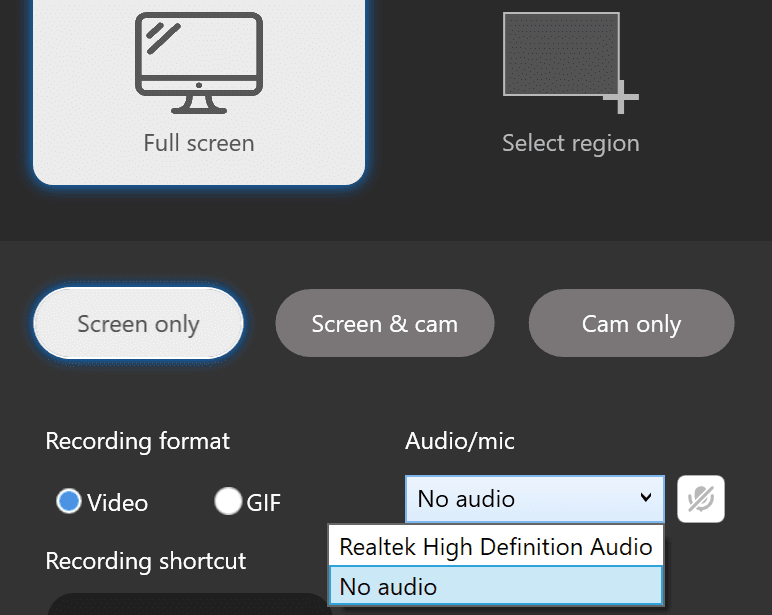
- On the Zight Windows app, click the mic feature to turn it on to record audio (you will know it’s on if it changes from grey to green). Click the drop-down menu on Audio/Mic – it will be set to No Audio, but you want to change that to your PC’s speakers, e.g., Realtek High Definition Audio. If you’re using the Zight extension on Chrome, select your recording preferences, then ensure the mic is on before you start recording. You can also choose your ideal mic from the drop-down menu.
- Click the record button, then the Red button to finish the recording once done. Your recorded video will play with sound, and you can share that with your team.
Zight is a straightforward native free screen recorder app that allows teams to communicate ideas, share feedback, and collaborate with co-workers and friends.
The world’s best companies love Zight on G2 Crowd because of the powerful and easy-to-use screen and video capture features. Create a free Zight account to get started!
How to Screen Record with Windows Native Tools
Suppose you can’t access the Zight screen recording feature for any reason. In this case, you can try other free options on the devices you have. Some popular options are the Windows Snipping tool and Xbox Game Bar for Windows PCs.
1. How to Use the Snipping Tool Screen Recording Software
This video recording feature only works on the Windows 11 OS – you can check your current version and update it if necessary.
Here are the steps on how to record screen on Windows 11:
- Set up the region or window you want to record.
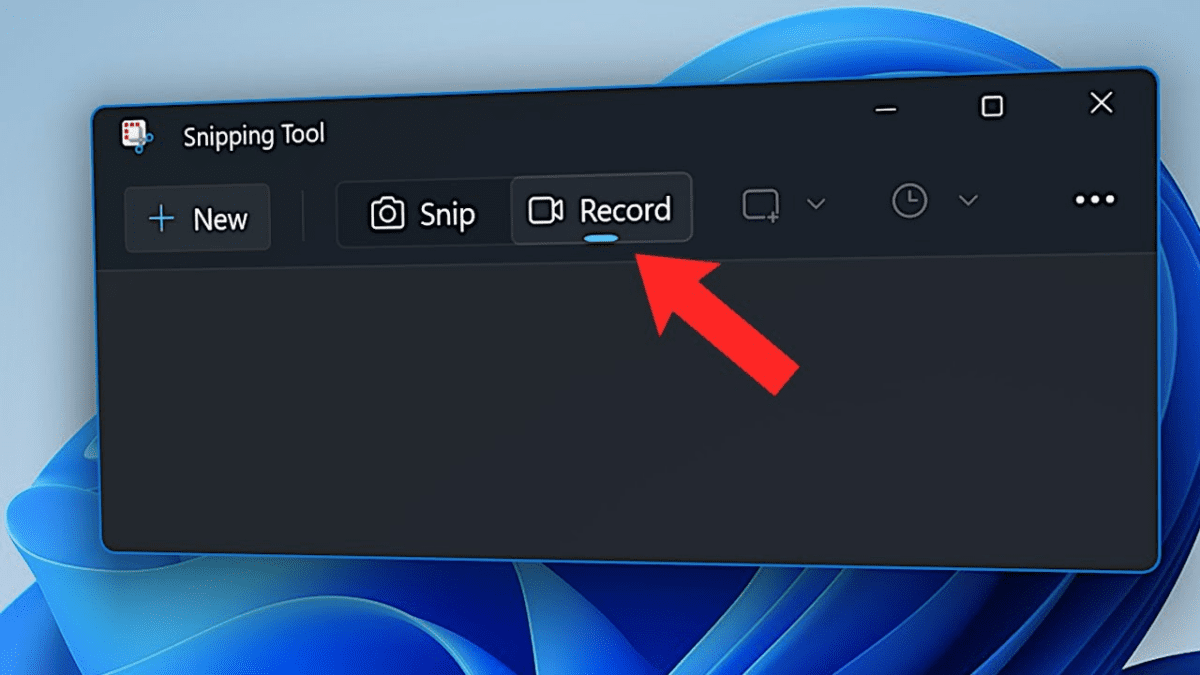
- Open the Snipping Tool app, or use the Win + Shift + S shortcut.
- Next, click on its video camera icon, then click click New.
- From the recording toolbar, select your recording preferences, then click Start. You can click Pause if you need to change something on your screen, then resume when you sort everything.
- Once done, click Stop, then Save.
Unlike the Zight tool, you’ll need to save this recording as an MP4 file to share it with your teams later. In addition, you cannot annotate your recordings as you can with the Zight app.
2. How to Screen Record using the Xbox Game Bar
The Xbox Game Bar is a built-in feature designed to record any Windows game clip – but useful when you need to record your screen with system audio. Here’s a straightforward guide to using the Xbox Game Bar for screen recording:
- Enable Xbox Game Bar. Go to Settings by pressing Win + I then click Gaming to access the gaming features. Ensure that the Xbox Game Bar is turned on by toggling the switch under “Enable Xbox Game Bar for things like recording game clips, chatting with friends, and receiving game invites.”
- Open Xbox Game Bar by pressing Win + G on your keyboard. This shortcut brings up the Xbox Game Bar overlay.
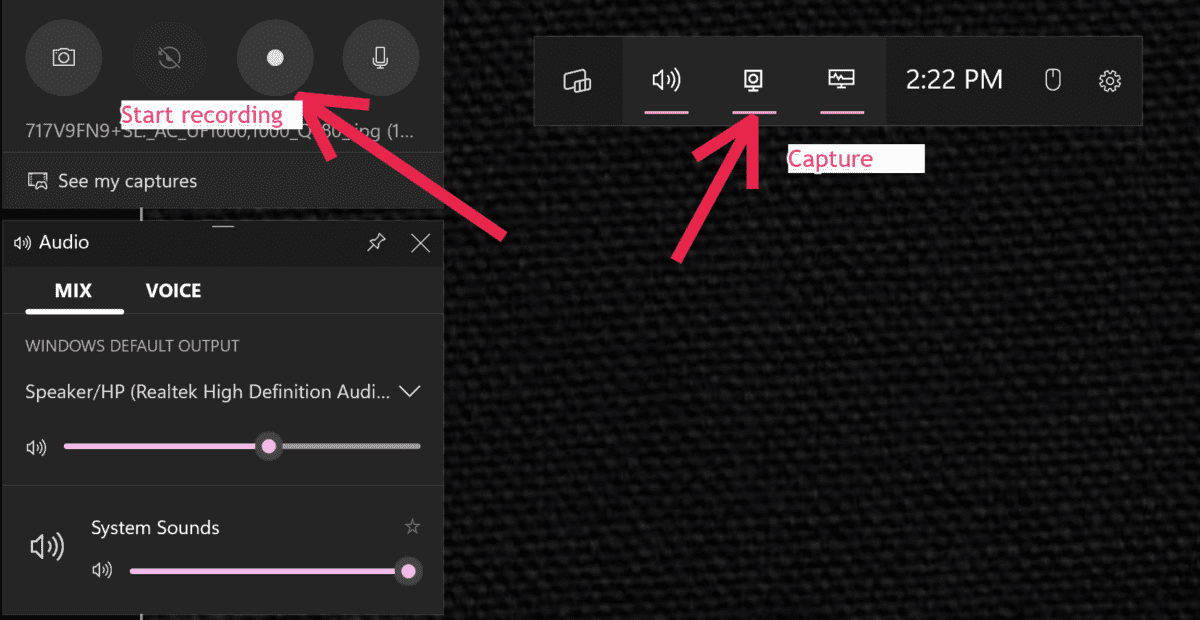
- Once the Xbox Game Bar is open, start recording by clicking the Capture widget, which looks like a camera icon. If you don’t see it immediately, you might find it by clicking on the Widgets menu. Inside the Capture widget, click the Start recording button (the circle with a dot inside) to begin recording your screen activities.
- The screen recording will capture the active window, and you will see a small recording timer bar, which also allows you to stop recording when you’re finished.
When you stop the recording, the file is automatically saved in the Videos folder, under the Captures subfolder. You can access and manage these recordings directly through the Xbox Game Bar or by navigating to the folder in File Explorer.
Frequently Asked Questions
1. How do you video record your screen?
You can easily video record your computer screen using the Zight screen recorder software. Zight allows you to video record the screen on Windows 10 and 11 easily.
You only need to download and install the Zight app or extension for Chrome. Then, open the software and select Record. With this feature, you can record a full screen or a region of your screen. You can also record with sound and choose whether to use the screen and cam when you want to appear in the video.
Besides video recording, you can also record screenshots and GIFs and annotate the recordings for better communication. If you’re unsure whether you need a video or a static image, learn about the key differences between screen recording vs screen capture.
For a more engaging approach, you can even use the final video to create a pre-recorded livestream, turning a simple tutorial into a scheduled live event.
2. Which app can record the screen with audio?
Zight is your best screen recorder that also supports audio recording. You can use it to record the screen with audio on Windows PC – just ensure the mic is on as you record for these devices. Open the software, select your recording preferences, then start recording with system audio. Once you’re done, you can edit your screen recording to trim, crop, or refine the final result before sharing.
3. How do you record the entire screen on Windows?
When using Zight to record a computer screen on Windows, you can use the app or the Chrome extension. In both cases, you only need to open the software, select Record, then Full Screen to capture the entire screen.
4. What is the screen record shortcut for PC?
When using Zight on a Windows PC, you can open the software with the shortcut – Alt + Shift + 6 to create a new screen recording. Then, when you finish recording and Zight generates the link to share with your team, use Ctrl + C to copy and Ctrl + V to paste it to recipients.


