
In a fast-paced world where effective connection is paramount, visual communication is the ultimate game-changer. Luckily, you can record your screen on Mac in easy steps.
From jaw-dropping presentations to step-by-step training videos, recording your screen opens a world of possibilities to supercharge your work. And, it’s not only the businesses that benefit. If you are an educator, you can also record your Mac screen for engaging tutorial videos, demonstrations, and other invaluable resources.
Luckily, the options for screen recording on Mac are endless. Among the contenders, the Zight screen recorder app and QuickTime Player take center stage, offering user-friendly and potent tools to capture your screen and external audio in perfect harmony instantly.
Dive in as we explore how to record screen on Mac with audio in more detail!
1. How to Screen Record on Mac Using Zight: Highly Recommended Method
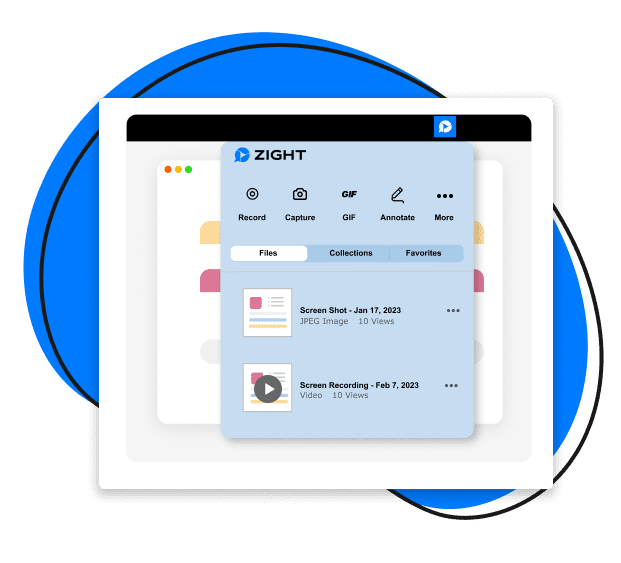
Zight is a comprehensive video and photo-sharing platform that allows you to capture screenshots and record your screen as a video, along with internal and external audio.
It also helps businesses and entrepreneurs create more engaging messages by pairing them with high-quality visuals when sharing information between teams or presenting to customers.
App users can choose to customize their screen recordings with features such as annotated screenshots and HD GIFs.
Zight is also a cloud-based platform. All data is stored in a centralized, password-protected location and can be easily shared with others. It lets users create HD screen recordings on their Mac devices and allows for simultaneous audio recording through its innovative screen recorder.
In addition, it exports a high-quality recorded video, allows cursor following, and you can share it through the cloud. This means you won’t need to worry about what file type to export.
These features make it a more versatile and convenient option than QuickTime Player, especially if you need to share high-quality videos with non-Mac users.
How to Record Screen with Audio on Mac Using Zight
With a few steps, you can easily record your screen with audio using one of the best screen recording software on the market. Follow these steps:
- Open Zight on your Mac device.
- Select “Record.”
- Select the area you wish to record – it can be full screen, or click and drag your mouse to select a region on your screen. Then, click the “Start Recording” button.
- As you screen record, you can pause to annotate your video. This is particularly good for video tutorials or instructional videos for your customers and teams. You can add invaluable elements like the arrow, line, ellipse, pen, and rectangle to highlight important sections in your recordings.
- Click the”Finish” when you’re done to stop recording. Zight automatically saves your recording on the cloud. Open the link and edit the video, then share the video link with your team immediately. If you need help, here’s how to stop a screen recording on Mac.
Key Features of Zight
- Easy to Download – Zight is super easy to download on Mac. You can install Zight on your Mac by entering your email and password or signing up directly through an existing Google account. Once you’ve installed the app, you can add it to your Dock for easier access in the future. Add Shapes and Diagrams – Using shapes and diagrams, you can explain concepts in your video more clearly or provide better instructions. This feature also comes in handy when simplifying or summarizing a complex topic, such as a product demonstration. It is one of the many reasons product developers use Zight.
- Webcam Recording Option – With Zight, you can even add your webcam to personalize and narrate your screen recording so your audience can see you explaining in real time.
- Share Files Easily on the Cloud – When you stop recording, your file is saved. A link is then automatically generated and copied to your clipboard. You can easily share your video using this link or drag and drop the file into any collaboration app or social media platform.
- Equipped for Video Editing – Zight is equipped with all the tools you need to capture, edit, and share visual materials. Once you upload the video to Zight, find it in your Zight dashboard and double-click to open it. From there, you can start trimming and cutting your recording as needed.
- Multiple Integrations – Zight integrates with the most common business apps, such as Slack, JIRA, and Google Docs. It stays true to its all-in-one identity. So you can stop switching between multiple tabs and windows – no more browser extensions needed!
With companies constantly seeking to hone their digital transformation strategies to stay a cut above the rest, sharpening communications with new tools is one key area they should focus on.
Screen recordings with audio are becoming an increasingly popular way of sharing information, automating the hiring and onboarding process, and interacting with potential customers.
If your employees use Apple devices, creating these videos in an easily shareable format can be challenging. However, if your team uses Zight, they can record their screen with audio on a Mac and start sharing videos in no time.
Pro Tip: Zight is your best screen recorder if your team is spread across the globe. This is because your remote employees can collaborate on a screen recording online – thus eliminating the need to hold more virtual meetings or correspond through long email threads. Here’s more on team collaboration and the collaboration tools you need to increase engagement and productivity!
2. How to Record Screen with Audio on a Mac using QuickTime Player

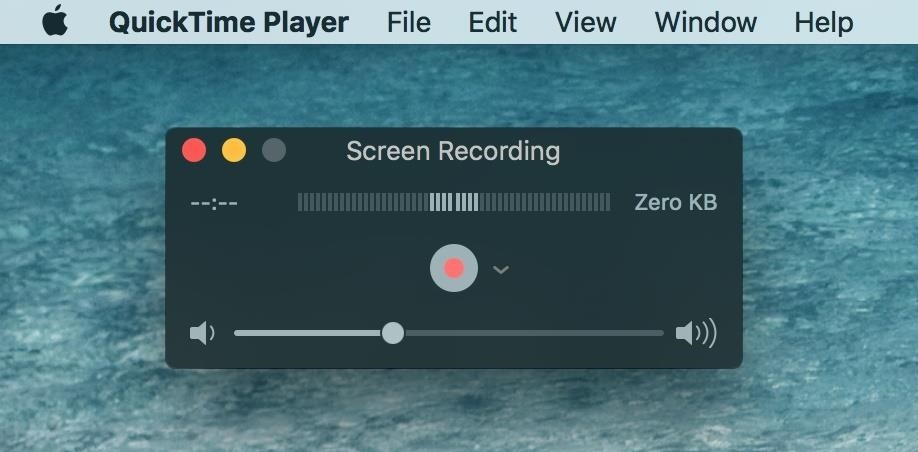
For all versions of MacOS up through Catalina, you can easily record your screen and external audio with QuickTime Player. The app comes built-in with all MacOS devices, and its simplicity makes it very user-friendly and easy to use.
It takes just 5 steps to record your screen using QuickTime Player:
- Open QuickTime Player from your Applications folder, Dock, or Launchpad.
- Select “File” and select “New Screen Recording” from the drop-down menu.
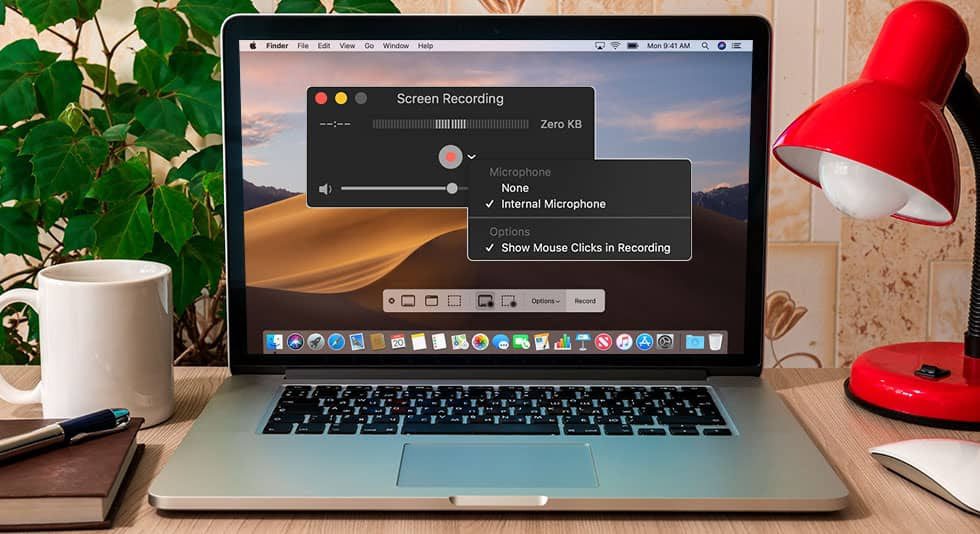
- Click the “Record” button in the window that opens. This will open up a dialogue box that allows you to record your entire screen or just a specific window.
- Click anywhere on the screen if you want your entire screen to be recorded. If you want to record only a part of your screen, click and drag over the section you want, and click “Start Recording” once the area has been drawn.
- When you want to stop the Quicktime recording, click the “Stop Recording” button on the upper right corner of the menu bar. The recording file will then pop up on your screen for you to review and save.
Unfortunately, QuickTime Player doesn’t record on Mac with audio playing on your screen.
If you require the audio and visuals from your screen, you can try to raise the volume on your device. Hopefully, the built-in microphone on your Mac captures the sound audibly.
However, it’s a big letdown in quality, especially if what you’re recording has music. It’ll undoubtedly come out distorted or muffled.
Unfortunately, the only default option is to use the built-in microphone for your Apple device unless you download another screen recording software or plugin. If you need to capture system sounds, learn how to record internal audio on Mac with the right tools.
For those creating demo videos or guides, you can record audio separately and edit your video to sync with the recording. Even so, this requires a lot more time and effort.
So, while QuickTime Player is fairly simple to use, its simplicity also limits the purposes you can use it for.
Here are more limitations when using QuickTime Player for screen recording:
1. Low-Quality Export
QuickTime Player uses real-time encoding to H.264. While there are advantages to H.264, such as delivering real-time video content at 50% less storage, it may lead to low-quality frames.
This is because H.264 videos naturally have reduced quality as part of the compression scheme to make the file size small.
If you’re going to edit your video using software like Final Cut or Affinity Video Editor, this will cause further quality loss.
QuickTime Player allows you to pick a maximum quality mode, but you can expect the file sizes of these recordings to be unrealistically large to work with.
2. Few Export Options
QuickTime Player does not have native support for some common formats, such as DivX, .wmv, and .mkvs.
In fact, it can only export videos as .mov, a file type that works only specifically on QuickTime Player.
Additionally, it has limited dimensions – 480p, 720p, or 1080p. You can’t be specific with your dimensions, meaning you can’t scale by percentage or control aspect ratios.
3. Poor Mouse & Keyboard Display
For those creating guide videos, seeing what’s on the screen may not be enough for your audience.
Your video may require showing the mouse hovering over what to press or specific command options entered on the keyboard.
QuickTime Player will show you when you click the mouse. However, it doesn’t allow you to see exactly which button was selected or what command you entered on your keyboard.
4. No Cursor Following
QuickTime Player doesn’t support cursor following.
This is particularly troublesome when you’re recording only a specific area of your screen, but your video requires showing certain buttons to press outside of the box you’ve drawn.
Any cursor movement outside the recorded area will not be seen as long as the recording is ongoing.
QuickTime Player is a free, efficient option for users after a quick and easy way to record their screen with audio on a Mac.
But for serious content creators, QuickTime Player fails to provide certain essential features and options. Not recording computer audio simultaneously is a big limitation for many users.
Luckily, other tools, like Zight, allow you to record your screen and audio without these limitations.
3. How to Record Your Screen with Audio on a Mac Using Screenshot Toolbar
To learn how to record your screen on a Mac using the screenshot toolbar, follow these step-by-step instructions:
1. Press Command + Shift + 5 on your keyboard to open the screenshot toolbar.
2. In the screenshot toolbar, you’ll find options to capture the entire screen, a selected portion, or a particular window. However, you must use the screen recording feature to record your screen with audio.
3. Click the “Record Entire Screen” or “Record Selected Portion” button in the screenshot toolbar.
- If you choose “Record Entire Screen,” the recording will capture everything displayed on your screen.
- If you choose “Record Selected Portion,” your cursor will turn into a crosshair pointer. Click and drag to select the area of your screen you want to record.
4. Once you’ve selected, click on the “Record” button or press the R key to screen record on Mac.
5. After starting the recording, a small menu bar will appear at the top of the screen. This menu bar allows you to control the recording process.
- To include audio in the screen recording, click the small arrow next to the recording button on the menu bar. In the drop-down menu, ensure that the “Built-in Microphone” or your desired audio source is selected. You can also adjust the input volume by dragging the slider.
6. Perform the actions you want to capture on your screen in the recording.
7. To stop the recording, either click the “Stop” button or press Command + Control + Esc on your keyboard.
8. After stopping the system audio recording, a thumbnail of the recording will appear in the bottom-right corner of your screen.
- If you click on the thumbnail, you can review the recording and make adjustments. You can trim the beginning or end of the recording or choose to save it as it is.
- If you don’t click on the thumbnail, the recording will automatically be saved to your designated location, typically the desktop, with the filename in the format “Screen Recording [date] at [time].mov.”
That’s it! You have successfully recorded your Mac screen with audio using the screenshot toolbar. The resulting recording will be saved as a .mov file, and you can share, edit, or use it as needed.
4. How to Record Your Screen with Audio on a Mac Online
You can download the Chrome extension to be able to record your screen directly from your browser. Here’s a step-by-step guide on how to install Zight for Chrome and record your screen:
- Open the Chrome browser on your Mac and go to Chrome Web Store
- In the Web Store search bar, type “Zight” and press Enter.
- Look for the Zight screen recording extension and click on it to open its details page.
- On the Zight extension page, click the “Add to Chrome” button.
- A confirmation dialog will appear. Click on “Add extension” to proceed with the installation.
- Once the installation is complete, you’ll see the Zight icon in your Chrome browser’s toolbar. Sign up for a free Zight account or log in to yours.
Now that you have the Zight extension installed, here’s how to screen record on Mac:
- Click the Zight icon in the Chrome toolbar to open the Zight popup window.
- In the Zight popup, click on the “Record” button to start recording your screen.
- A permissions dialog will appear, asking for permission to capture your screen. Click on the “Share” button to grant permission.
- In the next dialog, Zight will ask for permission to capture audio. Choose the appropriate audio source you want to record: “Tab Audio” captures audio from the current tab, “Microphone” captures audio from your device’s microphone, or “No Audio” records without sound.
- Choose the screen preference you want to record – between Screen Only and Screen & Cam. Next, turn on your mic and camera (if necessary), and choose the screen preference you want to record – between Screen Only and Screen & Cam. Then, choose whether to record the Chrome Tab, window, or the entire screen. After selecting your preferences, click “Share” to start recording.
- Zight will now record all the actions on your screen. You’ll see a small toolbar at the bottom of your screen with options to pause, stop, or cancel the recording. If you need to pause the recording temporarily, click the pause button in the Zight toolbar.
- Once you’re done recording, click on the stop button in the Zight toolbar to end the recording.
- Zight will automatically upload the recording to the cloud and open the video link in a new tab. From the link, you can watch, edit, and share the video.
- To save the video, click the “Save” button in the Zight link. You can choose the destination folder and provide a name for the video file.
- Share your video by clicking the “Share” button or copy the link to send it to anyone you want.
Ready to chat with us about how to save time and money and help your team communicate better?
Create your Zight account for free today!
Frequently Asked Questions on How to Screen Record with Sound on Mac
1. How can I screen record on Mac fast?
Want to know how to record screen on Mac easily? You only need the Zight app – download the app here first. Then, follow these simple steps:
- Launch the app and hit “Record.”
- Select the area you want to record. Zight allows you to record full-screen, but you can click and drag your mouse to select a preferrable region.
- Choose to record your screen only or record your screen and webcam simultaneously. For the latter, be sure to turn on the mic and camera.
- Hit “Start Recording” to start. You can pause the recording to annotate.
- When you finish recording, your video will be uploaded to the cloud – follow the link to edit or share the video!
2. How can I record my Mac screen easily without QuickTime Player?
It’s easy. Just use the best third-party app like Zight to screen record on Mac. The software is easy to use, and you can even get the Chrome extension to record your Chrome workflows fast without switching apps.
3. What’s the best way to record my Mac screen with audio?
Unfortunately, QuickTime Player does not automatically record screens with audio unless you have an external microphone set up. And even still, you will need to check your settings to ensure the microphone will work just fine- especially without distorting the audio quality.
But we can tell you how to record screen with audio on Mac using Zight! Just launch the app, choose the screen recording feature, and select a few preferences. These include the area to screen record and the format between recording Screen Only and Screen & Cam.
To ensure you capture audio from the computer and on your mic, be sure to turn on the mic/audio feature before you start recording. You can turn the mic on and off when recording from the Zight recording bar on your screen.
This way, you will capture the best audio to accompany your video. And if you don’t like the audio post-recording, you can mute it when editing the video from your Zight dashboard!
4. How can I Screen record with the Mac native tool?
You can use the QuickTime Player in a few steps as follows:
- Launch the app.
- Go to File, and select New Screen Recording.
- Click the icon, the Record.
- After recording, click Stop. The recording will be saved on your computer where you can watch and share from.
5. How can I screen record on Mac without launching an app?
Don’t have time to navigate to your apps to find your best screen recorder? If so, you can use a few Mac shortcuts to record your screen.
- Press Cmd + Shift + 5 simultaneously.
- Then, choose between Record Entire Screen or Record Selected Portion.
- Click Record to get started, and Stop when done.
If you have Zight installed on your compuetr but don’t have time to search for it;
- Press Cmd + Shift + 6 at the same time to launch the screen recording preferences.
- Select the area of the screen to record, and turn on the camera and mic if necessary.
- Click Start Recording. If necessary, pause the recording to annotate.
- Click Finish when done, and the video will upload to the cloud.
6. How do I use the screenshot toolbar with audio on Mac?
To use the screenshot toolbar with audio on Mac, follow these steps:
- Press Command + Shift + 5 on the keyboard to open the screenshot toolbar.
- In the screenshot toolbar, you’ll see options for capturing the full screen, a selected portion, or a specific window.
For more advanced features and editing capabilities in your screen recording software, consider using Zight as your Mac screen recorder. Zight provides a comprehensive set of tools for capturing high-quality screen recordings with audio and offers advanced editing features to enhance your recordings further.
7. What is the shortcut for screenshots on Mac?
The shortcut for taking screenshots on Mac is as follows:
- To capture the full screen, press Command + Shift + 3, and your screenshot will be saved on your desktop.
- To capture a selected screen portion, press Command + Shift + 4. Your cursor will shift into a crosshair pointer. Click and drag to pick the area you want to capture. Release the mouse button to take the screenshot.
- To screen capture a specific window or menu, press Command + Shift + 4, then press the Spacebar. Your cursor will switch to a camera icon. Move the camera icon over the desired window or menu, and click to capture it.
8. How do you take a screenshot on a Mac without pressing the buttons?
To take a screenshot on a Mac without pressing the buttons, you can use the Grab application. Here’s how to go about it:
- Open the Grab application. You can find it in the “Utilities” folder within the “Applications” folder.
- In the Grab menu, click on “Capture” and choose the type of screenshot you want to take (e.g., “Selection,” “Window,” or “Screen”).
- Follow the on-screen instructions to capture the screenshot without pressing any buttons. The screenshot will be displayed in a new Grab window, where you can save it.
9. Why can’t a Mac screen record on Mac with audio?
Mac computers have built-in privacy settings that restrict screen recording with audio by default. This protects user privacy and prevents unauthorized access to microphone input. When you attempt to screen record on Mac, the audio recording is disabled unless you explicitly grant permission.
To enable screen recording with audio on a Mac, you must provide permission for the Mac screen recorder to access the microphone. This additional step ensures that users can control which applications can capture audio.
When you initiate screen recording on a Mac, a permissions dialog will appear, asking permission to record the screen and capture audio. You can allow or deny access to the microphone for the Mac screen recorder. If you deny access to the microphone during the initial permissions prompt, you will record screen without audio.
To modify the permissions to screen record on Mac:
- Go to the Apple menu and pick “System Preferences.”
- In this system preferences window, click on “Security & Privacy.”
- Navigate to the “Privacy” tab.
- In the left sidebar, click on “Microphone.”
- Scroll through the list of applications and ensure that the screen recorder you want to use is checked.
- If the application is not listed, you may need to click on the lock icon at the bottom left corner of your window and enter your administrator password to make changes.
- If the Mac screen recorder is not checked, click the checkbox next to it to allow microphone access.
Generally, you can record your Mac screen with audio by granting microphone access to the screen recorder in the privacy settings. Remember to adjust the audio input source in the recording application to capture the desired audio input, such as the built-in microphone or an external device.


