In today’s digital age, taking screenshots has become an essential skill for both personal and professional purposes. Mac users have a built-in tool called Grab that makes it easy to capture and annotate screenshots. Whether you want to capture a specific area, an entire window, or even record a video of your screen, Mac offers a range of options.
In this comprehensive guide, we will walk you through the process of taking screenshots on a Mac, as well as how to annotate and enhance them using native and third-party tools.
- Capture or record your screen
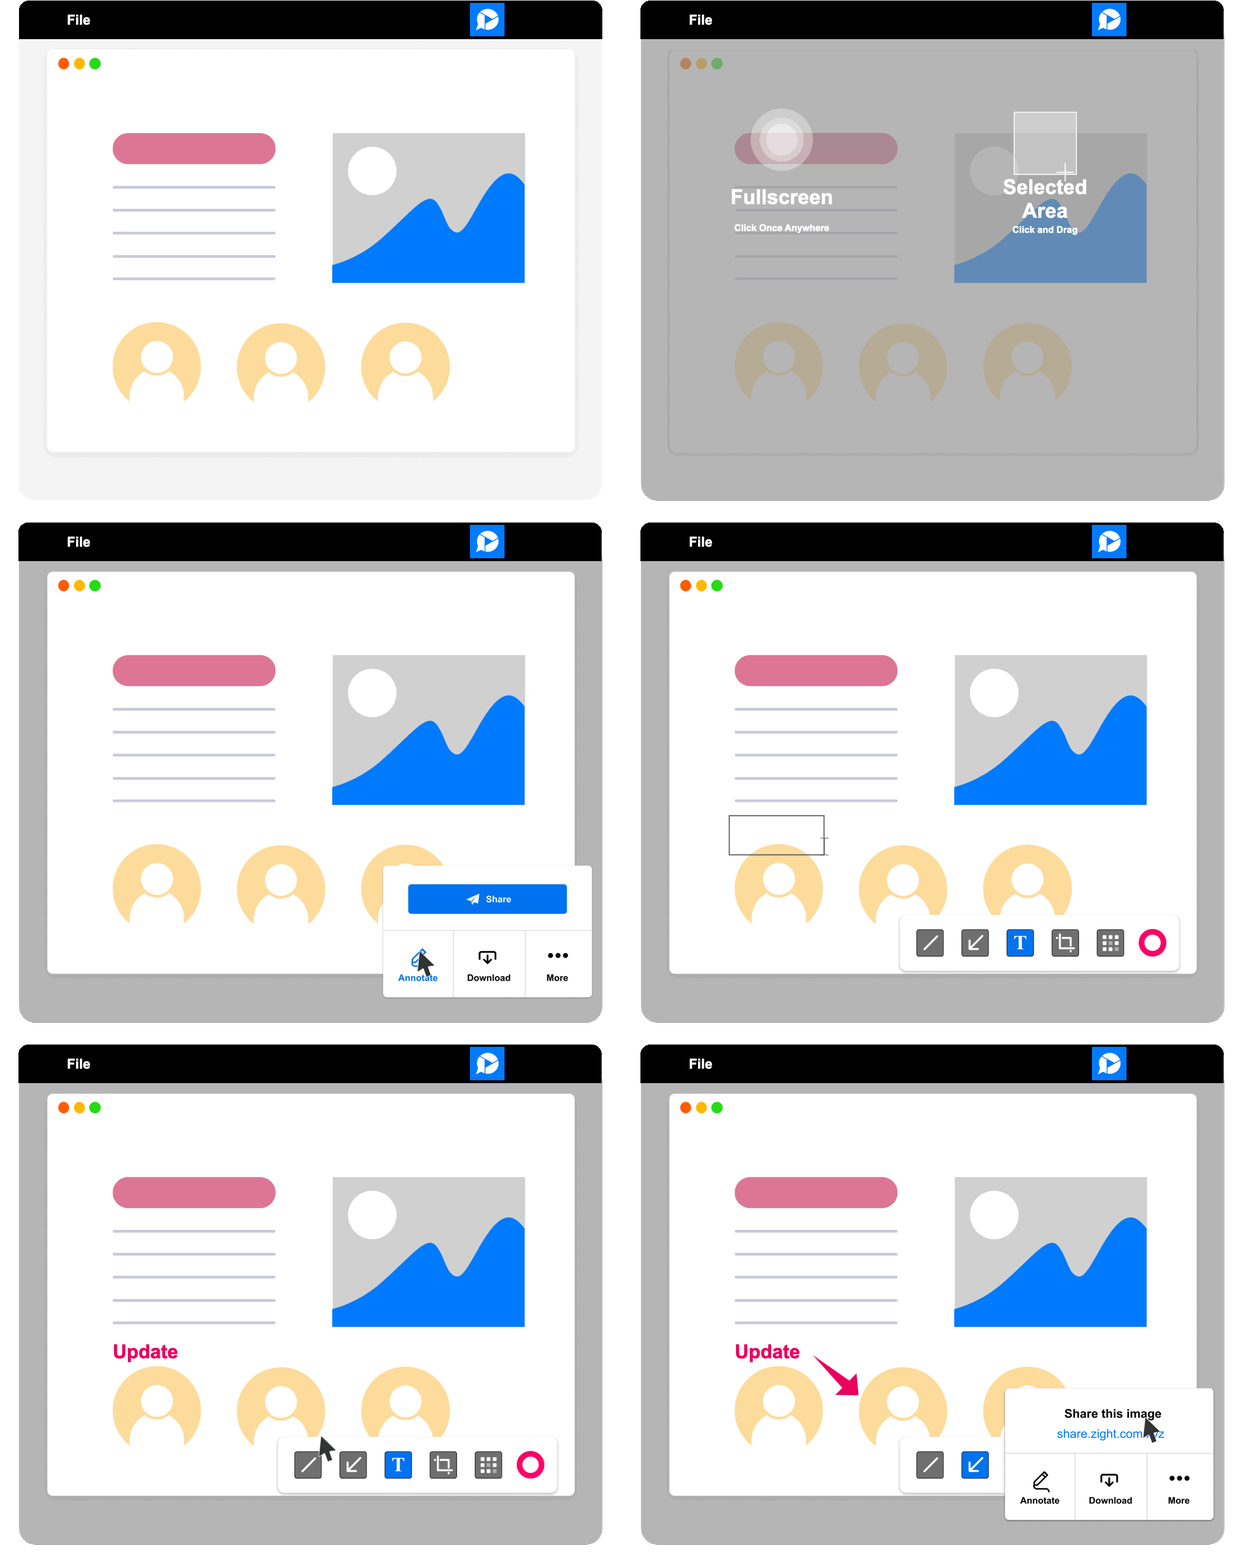
- Annotate your screenshots or screen recordings with text, arrows, lines, and blur
- Instantly share with a link
Understanding Different Types of Screenshots on Mac
Before we dive into the specifics, it’s important to understand the various screenshot options available on your Mac. Mac provides four primary types of screenshots: full-screen, specific area, window, and screen recording. Each type serves a different purpose, allowing you to capture exactly what you need.
How to Take a Full-Screen Screenshot on Mac
To capture the entire contents of your screen, including the menu bar and dock, Mac offers a simple keyboard shortcut. By pressing Command + Shift + 3 simultaneously, you can take a full-screen screenshot, which will be saved as a PNG file on your desktop.
How to Capture a Specific Area on Mac
If you want to capture only a portion of your screen, Mac allows you to specify the exact area you want to screenshot. Using the keyboard shortcut Command + Shift + 4, you can activate the crosshair cursor, which lets you drag and select the desired region to capture.
How to Take a Screenshot of a Window on Mac
When you need to capture a specific window or dialog box on your Mac, the keyboard shortcut Command + Shift + 4 followed by the Spacebar comes in handy. This shortcut changes the cursor to a camera icon, allowing you to click on the window you want to screenshot.
Recording a Video of Your Mac Screen
Sometimes, a static screenshot may not suffice, especially when you need to demonstrate a process or create a tutorial. In such cases, Mac’s built-in screen recording feature proves invaluable. By pressing Command + Shift + 5, you can access a menu with screen recording options and settings.
Annotating and Enhancing Screenshots on Mac
Once you’ve captured a screenshot, Mac offers a variety of annotation tools to enhance and customize your image. From adding text, shapes, and arrows to highlighting specific areas, the Markup feature in Preview allows you to annotate your screenshots effortlessly.
Why Should You Use Annotated Screenshots?
Annotated screenshots have the power to supercharge your workday by enhancing communication, improving clarity, and streamlining collaboration. When you annotate a screenshot, you can draw attention to specific areas, highlight important details, and provide clear visual instructions. This level of visual communication reduces ambiguity, eliminates misunderstandings, and ensures that everyone involved in a project is on the same page. Annotated screenshots can be particularly valuable when working remotely or in teams spread across different locations, as they bridge the gap of physical presence and allow for efficient information sharing. By incorporating annotated screenshots into your workday, you can save time, minimize errors, and foster better collaboration among team members.
Moreover, annotated screenshots bring a new level of efficiency and professionalism to your work processes. Instead of relying solely on written instructions or long email threads, annotated screenshots provide a concise visual representation of your ideas or feedback. This not only saves time, but also makes it easier for others to understand and implement your suggestions. Annotated screenshots can be especially useful when providing feedback on designs or troubleshooting issues. They allow you to pinpoint specific areas, offer precise recommendations, and illustrate solutions visually. By leveraging the power of annotated screenshots, you can elevate the quality of your work, streamline your workflows, and enhance overall productivity throughout your workday.

How to Take a Screenshot and Annotate it on Mac with Zight
While Mac provides built-in screenshot options, using third-party tools can offer additional features and convenience. Zight is a popular cloud-based platform that allows you to capture, annotate, and share screenshots effortlessly. Here we will walk you through the process of taking full-screen screenshots on a Mac using Zight. With its intuitive interface and powerful features, Zight is a valuable tool for anyone seeking a seamless screenshot experience.
Setting Up Zight on Mac
To get started with Zight, you need to download and install the Zight application on your Mac. Simply visit the Zight website, create an account, and follow the instructions to install the app. Once installed, sign in to your Zight account to access the full suite of features.
Capturing Full-Screen Screenshots with Zight
Using Zight, taking a full-screen screenshot on your Mac is a breeze. After setting up Zight, you can use the keyboard shortcut Shift + Command + 6 to capture the entire screen. Zight automatically saves the screenshot to your account and provides a convenient link for sharing.
Annotating and Enhancing Screenshots with Zight
Zight offers a comprehensive set of annotation tools that allow you to enhance your screenshots. Once you’ve captured a screenshot, open it in the Zight application and click on the “Annotate” option. From there, you can add text, shapes, arrows, and other visual elements to highlight important details.
Sharing and Collaborating with Zight
Zight simplifies the process of sharing your screenshots with others. After capturing and annotating a screenshot, you can quickly generate a shareable link or directly share it via email, Slack, or other communication platforms. Zight also enables collaboration by allowing multiple users to view, comment, and annotate screenshots in real-time.
Why Should You Choose Zight As Your Mac Screenshot Tool?
Zight stands out as a superior Mac screenshot tool due to its exceptional features, user-friendly interface, and seamless integration with your workflow. Here’s why you should choose Zight over other alternatives:
- Powerful Annotation Capabilities: Zight offers a comprehensive range of annotation tools that allow you to customize and enhance your screenshots with ease. From adding text, arrows, and shapes to highlighting specific areas, Zight provides you with the flexibility to annotate your screenshots in a way that suits your needs.
- Easy-to-Use Interface: Zight is designed with a user-friendly interface, ensuring a smooth and intuitive experience. With its simple and accessible controls, even beginners can quickly grasp the tool’s functionalities and start capturing and annotating screenshots effortlessly.
- Seamless Integration: Zight seamlessly integrates with your existing Mac workflow, making it a convenient choice. Whether you want to capture screenshots directly from your browser, a specific application, or your entire screen, Zight provides quick access and integration options that streamline the process.
- Cloud Storage and Sharing: Zight simplifies the storage and sharing of your screenshots. By leveraging cloud storage capabilities, you can securely save your annotated screenshots and access them from anywhere. Additionally, Zight offers easy sharing options, allowing you to instantly share your screenshots with colleagues, clients, or collaborators.
- Customizable Settings: Zight allows you to customize various settings according to your preferences. From choosing file formats and naming conventions to defining keyboard shortcuts, Zight offers flexibility and personalization options to tailor the tool to your specific needs.
Conclusion
Taking screenshots and annotating them on your Mac is a straightforward process thanks to the native tools provided. Whether you’re a student, professional, or simply want to save important information for later, mastering the art of capturing and annotating screenshots on your Mac will undoubtedly boost your productivity. So go ahead, give it a try, and take your screenshot skills to the next level!
