We all know that irresistible feeling when we stumble upon a video with cheeky, clever edits – the kind that makes us laugh, cry, or say, “Wow, how did they do that?” Whether it’s the smooth transitions, the perfectly timed cuts, or the special effects, video editing is the sauce behind those moments.
It’s no longer just for professionals and has become essential for everyone to learn how-to. However, as a content creator, video marketer, or simply someone who wants to edit their videos, how do you learn to edit them? Our guide is all you need. You will never need to ask friends, hire out, or bombard your design team asking for help with basic video editing needs. So, let’s get started.
The Before of Editing Your Video
Before you embark on your editing journey with Zight, it’s crucial to have a clear vision of what you want to achieve. You can do this by:
1. Setting Clear Goals
Defining your goals is important before picking up a camera or launching a video editing software. Knowing the purpose of your video will guide your editing decisions. Here are some common video goals:
- TikTok Video for Marketing: If your goal is to promote a product or service on TikTok, you will edit TikTok videos by creating engaging, short-form content that quickly grabs viewers’ attention.
- Highlight Video for Instagram Reels: Highlight videos on Instagram Reels aim to showcase the best moments of an event or experience. Your editing style will be fast-paced and energetic.
- Explainer or How-To YouTube Video: If you’re creating educational content or want to edit YouTube videos, your editing should be clear and concise, ensuring your message is easily understood.
- Personal Use, Fun, or Client Project: Personal and fun videos allow for creative freedom, while client projects may require a more structured and professional editing approach.
By identifying your video’s purpose from the outset, you’ll make informed decisions about equipment, tools, music, and sound effects. Your goals will also influence the style and complexity of your editing process.
Will your video be high-energy with multiple cuts, or will it follow a more streamlined and relaxed pace? How many rounds of edits will you need? Defining your objectives early on sets the tone for a successful video creation process.
2. Get Organized
Effective video editing starts with proper organization, where a good organization can make or break your editing experience. Your editing process will be more efficient if you set the stage for success. Here’s how to get organized:
- Use a Script or Storyboard: Even if it’s a rough outline, having a video script or storyboard is invaluable during shooting and editing. It keeps your project on track and ensures you capture the necessary shots.
- Log Your Shots: While filming, label your files accurately to reflect the scene and take. Organize these files into folders based on themes or content, making locating them easy during editing videos.
- Use a Systematic File Naming: Create a naming system for video files, audio files, still images, and other media. For instance, follow the format TITLE>DATE>VERSION. This standardizes file names and simplifies project management.
- Effective Folder Structure: Use folders wisely. Have a main folder for each project containing subfolders for footage, music, images, and other assets. Storing everything on the same drive ensures easy access.
3. Choosing the Right Video Editor
Before you begin editing, you’ll need to find the best video editing software. Your choice of software can significantly impact your editing experience; hence, you should use one of the most powerful editing tools. Luckily, Zight is not just a video editing software; it’s a comprehensive communication platform that prioritizes efficient information sharing.
Here’s how Zight can enhance your video editor experience:
- Edit Videos with Ease: Zight provides a user-friendly interface for video editing. You can effortlessly edit videos by creating, annotating, and sharing screenshots, screen recordings, and more. This approach simplifies the editing process, even for those new video editors.
- Screen Recordings and GIFs: Zight empowers you to capture screen recordings and create GIFs. This is invaluable for tutorials, presentations, and providing support and troubleshooting solutions.
- Contextual Communication: Zight allows you to add context and clarity to your videos, which is essential for distributed teams and customers who are challenging to connect with. Video recordings and screen captures are excellent tools for conveying information effectively.
- Efficient Communication: Zight’s visual context and clarity tools enable you to convey information more effectively. This reduces the need for lengthy meetings, allowing you to communicate efficiently with your team or customers.
- Remote Collaboration: Zight’s features make collaborating with distributed teams and remote customers easier. You can build relationships and provide regular updates or presentations without face-to-face meetings.
4. Have a Backup Plan
Backing up your work is a step that cannot be stressed enough. Save your project frequently, and consider following the 321 rule: maintain three copies of every file in at least two different places, such as an external hard drive and a cloud-based service like Google Drive.
Additionally, note the date and time of each version to ensure easy retrieval in case you need to revert to a previous version.
How to Edit a Video – Zight!
Zight stands out in video editing software by focusing on enhancing communication and productivity. With Zight, you can take your communication to the next level by seamlessly integrating visual context into your messages.
Why Does Zight Stand Out?
Zight is not your average video editing tool. It’s a platform that goes beyond conventional video editing. It works to better communication, happier and more productive people. It enables users to share information faster with visual context, adding clarity to their messages.
With Zight, you can create, annotate, and share screenshots, videos, screen recordings, GIFs, and more. The goal is to make your communication more efficient and effective, allowing you to win back your calendar and stop wasting time in unnecessary synchronous meetings. Zight provides the context and clarity needed to convey your message without the hassle of coordinating schedules.
Zight is particularly beneficial for editing video footage of various scenarios, including training and onboarding, support and troubleshooting, giving regular updates or presentations, and building relationships with distributed teams and hard-to-connect with customers.
Now, let’s dive into how to edit videos using Zight and leverage its video editing features for outstanding results. Follow this step-by-step guide to learn how to use this user-friendly video editing software and begin editing your amazing videos.
Step 1: Getting Started with Zight
Start by visiting Zight’s official website and downloading the software for your operating system (Windows or macOS).
Once the download is complete, run the installer and follow the on-screen instructions to install Zight on your computer.
You’ll be prompted to create a Zight account. Enter your email address, choose a strong password, and complete the registration process.
Step 2: Record Your Video or Screen
Before you can start editing, you need video footage. If you haven’t already recorded your video or screen, here’s how to do it with Zight:
- Launch Zight on your computer.
- Click on the “Record” button.
- Select whether you want to record your screen or use your webcam for video recording.
- Configure your recording settings, such as screen area, audio sources, and video quality.
- Click the “Start Recording” button to begin your recording.
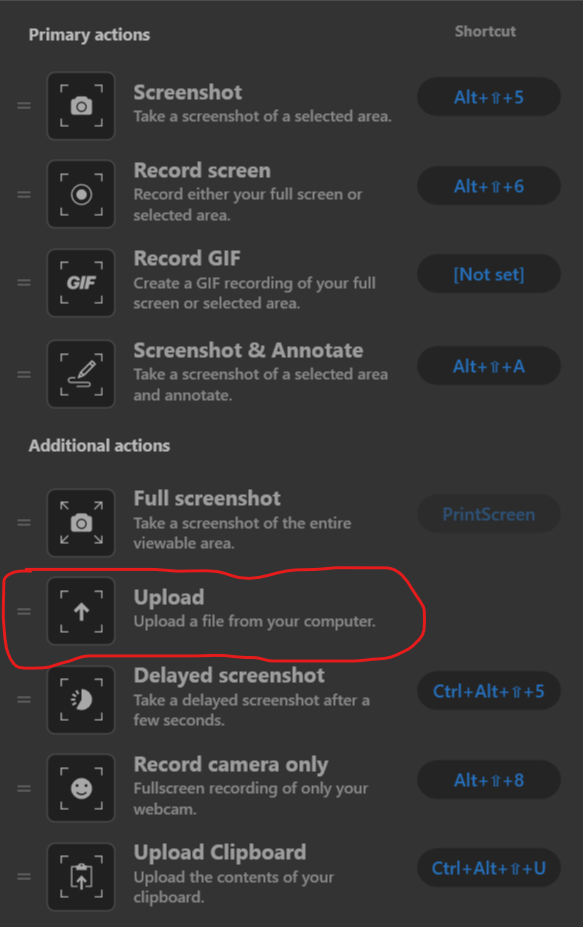
Step 3: Import Your Video Footage
Once you have your recorded video or screen capture, it’s time to import it into Zight for editing:
- Open Zight if it’s not already running.
- Click the “Import” or “Add Media” button in the main interface. This will open a file dialog box.
- Navigate to the location where you saved your video footage and select the file.
- Click “Open” to import the video into your Zight project.
Step 4: Understand Zight’s Timeline-Based Editing
Zight’s timeline-based editing provides a flexible and precise way to edit your video. Here’s an overview:
- You’ll arrange the timeline’s video clips, audio, and other media elements.
- Each video clip is represented as a block on the timeline.
- You can click and drag these blocks to adjust their position and duration.
- Trimming and splitting video clips can be done directly on the timeline.
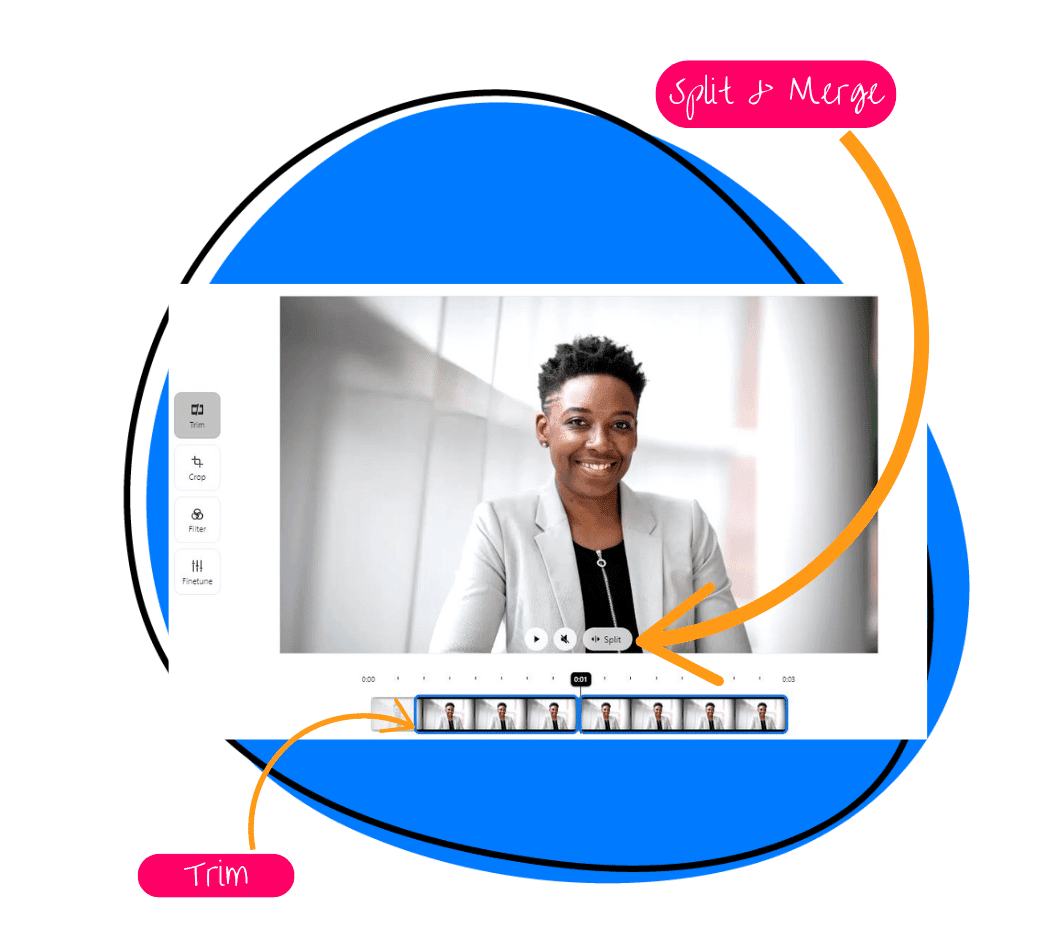
Step 5: Trim or Split Video Clips
Now, let’s perform basic edits on your video clips:
To Trim a Video Clip:
- Select the clip you want to trim by clicking it in the timeline.
- A selection border will appear around the clip. You’ll see handles at the beginning and end of the clip.
- Click and drag these handles to adjust the start and end points of the clip. This trims the clip to the desired length.
To Split a Video Clip:
- Position the playhead (the vertical line on the timeline) at the exact point where you want to split the clip.
- Right-click on the clip at that point and select “Split” or “Cut.” This divides the clip into two separate segments that you can edit independently.
Step 6: Apply Transitions and Overlays
To make your video more engaging and dynamic, you can apply transitions between video clips and add overlays or annotations:
To Apply Transitions:
- Drag your video clips closer to the timeline to overlap them slightly.
- Click on the “Transitions” tab in Zight’s editing tools.
- Browse the available transition effects and drag the one you like between the overlapping clips.
To Add Overlays or Annotations:
- Click on the “Overlays” or “Annotations” tab in Zight’s editing tools.
- Choose the type of overlay or annotation you want to add, such as text or graphics.
- Drag and drop the overlay onto the preview window. You can then adjust its position and duration as needed.
Step 7: Real-Time Preview and Efficient Editing
One of Zight’s key features is its real-time preview, which allows you to see your changes as you edit instantly. Here’s how to use it efficiently:
- While editing, keep an eye on the preview window.
- You’ll see the results in real-time as you change your video. This feature enables you to fine-tune your edits quickly and accurately.
- You can play your video from different points on the timeline to review specific sections.
Step 8: Save and Export Your Edited Video
After you’ve made the desired edits, it’s time to save and export your edited video:
- Click on the “Export” or “Save” button in Zight.
- Choose your preferred export settings, such as video resolution and format.
- Select the destination folder where you want to save the edited video.
- Provide a name for your video file.
- Click “Export” to initiate the rendering and saving process.
Bonus Video Editing Tips
Apart from understanding Zight’s editing features, here are some bonus video editing tips and tricks that you can tuck in your sleeve to elevate your content to the next level:
1. Trim Unnecessary Footage
Keep your audience engaged by removing irrelevant or dull moments from your video. Suppose you’re creating a product review video. Eliminating lengthy pauses or irrelevant tangents can make your video more concise and viewer-friendly, increasing the likelihood of retaining your audience’s attention.
2. Use Sound Effects
Enhance the viewing experience with sound effects that match the mood of your video. You can find a tool that provides a library of sound effects. Think of a short film you’re working on. Adding sound effects like footsteps, door creaks, or dramatic music can significantly impact your story’s immersion and emotional resonance.
3. Maintain Aspect Ratio
To ensure your video looks professional, stick to a consistent aspect ratio. This is especially important if you edit content for platforms like YouTube, TikTok, or Instagram.
If you’re repurposing your video content for various social media platforms, adhering to specific aspect ratios for each platform ensures that your video appears correctly on all devices. This particular attention to detail can significantly improve your video’s presentation and viewer experience.
4. Optimize for Mobile Devices
With the rise of mobile viewing, make sure your video looks great on smaller screens. Zight allows you to preview and adjust your video’s mobile compatibility.
In today’s mobile-driven world, your content must look just as stunning on smartphones as on desktops. Optimizing your videos for mobile ensures a seamless viewing experience for your audience, increasing engagement and shareability.
5. Utilize Cloud Storage
To prevent data loss and facilitate collaboration, consider using cloud storage or services like Google Drive to save your video projects. This ensures that your creative efforts are always accessible and secure. Zight integrates with these platforms, making saving and sharing your video projects easy.
If you’re a part of a video production team. Collaborating on a project is simplified with cloud storage, as team members can access and work on the latest project version from anywhere, streamlining collaboration and eliminating version control issues.
Why you should edit your videos.
Editing videos can be a game-changer for various reasons. Whether you’re a content creator, marketer, or just someone looking to enhance personal videos, here are five compelling reasons why you’d want to edit video:
1. Enhance Storytelling
Editing allows you to shape your narrative and ensure your story is told the way you want. You can sequence your clips to build suspense, create emotional peaks, and guide your audience through a cohesive story. For example, in a travel vlog, you can combine scenic shots with personal commentary to make viewers feel like they’re on the journey with you.
2. Improve Engagement
Engaging videos are more likely to retain viewers and encourage interaction. By adding elements like music, sound effects, and transitions, you can make your videos more dynamic and interesting. For instance, a product review video with engaging edits can hold a viewer’s attention longer and increase the likelihood of them purchasing the product.
3. Professionalism
Editing your videos can significantly enhance their professional appeal. Clean cuts, smooth transitions, and high-quality visuals contribute to a polished final product. This is particularly important for business presentations, promotional content, or educational videos where professionalism can impact your credibility and brand perception.
4. Customization and Personalization
Editing gives you the flexibility to tailor your videos to different audiences and platforms. You can create multiple versions of the same video, each optimized for specific social media channels like Instagram, TikTok, or YouTube. For example, you might create a quick, eye-catching teaser for Instagram and a more detailed version for YouTube.
5. Correction and Enhancement
Raw footage often includes errors such as unwanted background noise, poor lighting, or shaky camera movements. Video editing allows you to correct these issues and enhance the overall quality. Tools for color correction, audio balancing, and stabilization ensure your video looks and sounds its best. This is crucial for maintaining a high standard, especially when creating professional or client-based content.
Conclusion
Video editing is an indispensable skill that can elevate the quality and impact of your videos, regardless of your purpose. With tools like Zight, you can effortlessly enhance your storytelling, improve viewer engagement, maintain a professional standard, customize content for various platforms, and correct and enhance your footage. So, dive into the world of video editing and transform your raw footage into captivating and polished content. Happy editing!
Conclusion on How to Edit a Video
And there you have it, the final cut, the last frame, the moment you’ve been waiting for. Video editing is the art that allows you to transform raw footage into a masterpiece, and you’ve just learned the ropes.
Embrace the power of editing software like Zight to bring your ideas to life, but never forget that the real magic lies within you. The dedication, creativity, and attention to detail you bring to your edits will set your videos apart.
Since the editing canvas is yours to paint, make it a masterpiece. Happy editing!
Frequently Asked Questions
1. What are the primary use cases for Zight’s video editing features?
Zight’s video editing features are ideal for training, onboarding, support, troubleshooting, presentations, and relationship building. It allows a video editor to edit videos with added context and clarity, making it a versatile tool for various communication needs.
2. What if I have slightly different editing requirements for different videos?
Zight’s versatility caters to a range of editing requirements. Whether it’s a TikTok video, a YouTube channel, or your collection, Zight has the tools and features to meet your unique needs. Also, Zight’s adaptability ensures that you can address the specific demands of each project, whether you’re an influencer, filmmaker, or business owner.


