What is Video Cropping?
Imagine trimming a photo to remove that random photobomber in the corner, video cropping works the same way but for moving images. Video cropping is a common editing technique used to remove unwanted portions from the outer edges of a video file, focusing on a specific subject or area, and optimizing videos for different social media formats. You can crop photos, freeze frames, and movie clips to enlarge interesting subjects or eliminate unnecessary areas. Cropping is also useful when your photos or video clips don’t match the aspect ratio of a film, especially if your video is converted from an old standard-definition camera and you want to integrate it with a high-definition movie project. In this case, you can crop the photos or video clips to fit. Here are some ways cropping your video can be helpful:- Fix Unwanted Elements: Caught a copyrighted logo sneaking into your shot? Or maybe there’s a random object photobombing your video clip? Just crop your video to clean it up before sharing.
- Remove Distractions: Get rid of Zoom menus, cluttered browser tabs, or any unwanted elements that take focus away from your content. A quick trim with the crop tool click can make your edited video look much cleaner.
- Resize for a Better Fit: Working with old video files in a 4:3 aspect ratio but need a widescreen look? Cropping helps match specific aspect ratios, so your video online or on YouTube looks polished with no awkward black bars.
- Get Creative: Want to add flair? Zoom in for a dramatic close-up or crop different sections of your video clip to create unique perspectives. Perfect for making engaging YouTube Shorts, Instagram Stories, or repurposing a new video from an old one.
Splitting, Trimming, and Cropping a Video Clip: What’s the Difference?
If you’re just getting started with video editing, terms like trimming, splitting, and cropping might seem interchangeable. However, each editing technique serves a unique purpose. Let’s quickly look at the differences between crop, trim, and split.a). Trimming
Trimming involves cutting out the beginning or end portion of a video file to reduce its length and keep the desired content. By eliminating the unnecessary content, you’re more likely to capture and retain attention so people watch till the end.b). Splitting
Splitting is like trimming except you can do it on any part of the video. Here’s what we mean. While trimming occurs at the start and end points, splitting is literally splitting the video at any point between the start or end. By splitting videos, you can efficiently work on bite-size clips, place a transition between multiple sections, spot errors, and cut out the parts you don’t need. This is especially useful with short-form videos where you need a clip to be no more than a few seconds.c). Cropping
Trimming and splitting happen on the actual video timeline where your video frames live. Video cropping is when you resize the actual video footage on your canvas. Cropping lets you remove unwanted areas from your footage or adjust the dimensions to fit within a specific aspect ratio. With cropping, you’re able to adjust the edges (top, bottom, left, and right) and corners of your video clips. Not only that, but you can resize your video to fit recommended dimensions for different platforms like desktop, mobile, blog, and social media.1. Crop a Video Like a Pro Using a Dedicated Video Editor- Zight
You don’t need to be a pro to crop videos. What you need is an app that lets you crop them like one. Zight is a versatile video cropper tool that enables users to crop videos through two primary methods: uploading an existing video or creating a new screen recording. Below is a detailed step-by-step guide for both approaches.
 a). Cropping an Uploaded Video
Step 1: Download Zight
Visit the Zight website to download the app. Zight is available for Mac, Windows, and also as a Chrome extension. Click the Download button and install. Once installed, open Zight and log in or sign up for an account to access all features.Step 2: Upload Your Video
 Once logged in, click on the “Upload” button located at the top-right corner of the dashboard. Select the video file you wish to crop from your device and click “Open” to upload it into Zight.
 Step 3: Access the Video Editor
 After the upload is complete, the video will appear in your library. Click on the video thumbnail to open it. Then click on the “Edit” button to launch the Zight video editor.
 Step 4: Crop your Uploaded Video

- In the editing interface, select the “Crop” tool.
- Adjust the cropping frame to your desired dimensions, focusing on the essential parts of the video.
- Preview the cropped area to ensure accuracy.
Step 5: Save and Export
Once satisfied with the cropping, click “Save” to apply the changes. The edited newly cropped video will be saved in your Zight library, ready for sharing or downloading.b). Cropping a Screen-Recorded Video
Whether you have an existing screen recording that’s ready to upload or you have yet to create your screen recording, you can follow some easy steps to crop videos.Step 1: Install Zight
Download and install the Zight application suitable for your operating system (Mac, Windows, or Chrome). For Mac users, refer to the Zight Screen Recorder for Mac guide.Step 2: Initiate Screen Recording
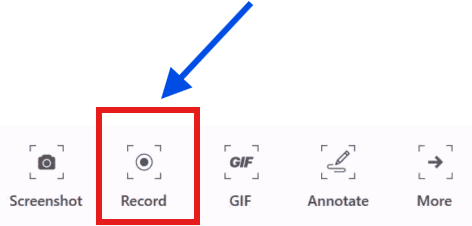
- Open the Zight application.
- Click on the “Record” button to start a new screen recording.
- Select the area of the screen you wish to record from your recording preferences: full screen, a specific window, or a selected region.
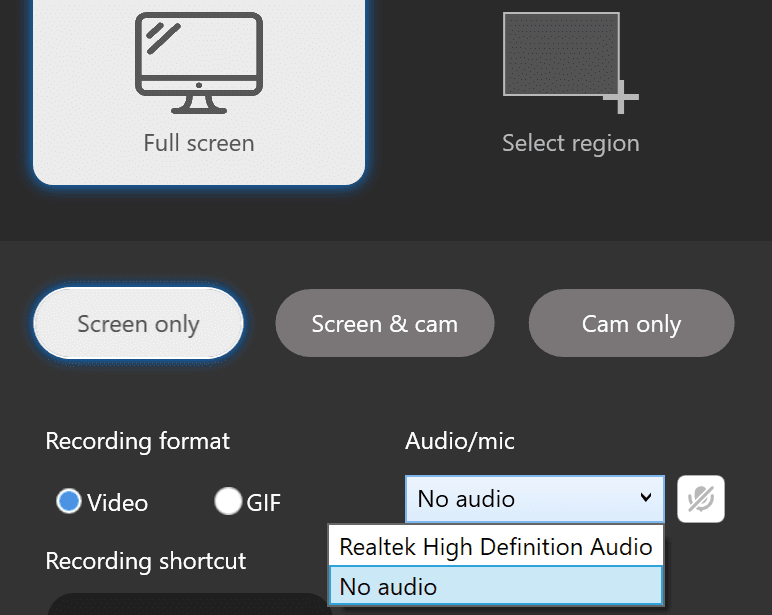
- Enable audio or webcam recording if necessary.
- Click “Start Recording” to begin capturing your screen.
- Use Zight’s annotation tools (arrows, shapes, text) to highlight key areas while screen recording
Step 3: End your Screen Recording
- Once you’ve captured the desired content, click “Stop” to end the recording.
- The recorded video will automatically upload to your Zight library.
Step 4: Access the Video Editor
- Navigate to your Zight library and select the newly recorded video.
- Click on the “Edit” button to open the video editor.

Step 5: Crop Your Video
- Within the editor, choose the “Crop” tool.
- Define the area you wish to retain by adjusting the cropping frame.
- Preview the selection to ensure it captures the necessary content.
- Crop your screen-recorded video and remove unwanted sections e.g., browser tabs, system bars
Step 6: Enhance, Save and Share
- Apply additional edits like trimming, filters, or fine-tuning.
- After finalizing the crop, click “Save” to apply the changes.
- The edited screen recording will be available in your Zight library for sharing or downloading.
Why is Zight the Best Video Cropper Tool?
For starters, unlike some professional video editors, Zight has a very shallow learning curve making it perfect for beginners and pros alike. Other solid reasons to have a Zight video editor include:1. Other Editing Tools
Zight isn’t just a video cropping tool but a full editing suite. You can also use it to:- Trim & Split: Cut out awkward pauses, errors, or unwanted sections. Accidentally split a clip? Use Merge to fix it instantly.
- Fine-Tune Quality: Adjust color settings (contrast, saturation, exposure) to sharpen blurry footage or correct lighting.
- Filters & Effects: Enhance the visual appeal of your video clip with professional-grade filters.
2. Bonus Features
- AI Smart Actions: Automate repetitive tasks (e.g., trimming silences, adding captions and even creating titles and summaries) to save time.
- Custom Branding: You can easily add your logo, set up custom domains or redirect URLs, and adjust on-screen elements like CTAs. This is especially important if you need your videos to reinforce your brand’s identity every time you share your video clip.
- Instant Sharing: Generate shareable links, embed videos in emails, or export to apps like Slack.
- Collaboration Tools: Share videos securely with password protection, track views with built-in analytics, and store edits in Collections.
2. Crop a Video Online
Sometimes, you’re on a device that doesn’t have your dedicated video editor installed, leaving you searching for a quick fix. That’s where an online video cropper comes in handy. You can simply upload your video files, adjust the crop area, and trim out unwanted elements with a crop tool click. While these tools are convenient, they often lack advanced options like custom dimensions, background music, and professional video adjustment features. Security is another concern. Uploading your video online means storing it on cloud storage, which may not always be secure. Some free video editors could even expose your device to malware. Whether you’re editing for Instagram Stories, YouTube Video, or Shorts, or adjusting the aspect ratio for a new video, always choose a trusted video cropper tool that prioritizes quality and safety.3. Crop a Video in Mobile Devices
For mobile devices, apps like Google Photos offer a quick way to start cropping videos:- Open the Google Photos app and select the video you want to crop.
- Tap Edit, then select the Crop Tool Click option.
- Adjust the crop area using the crop handles.
- Tap Save Copy to store the new video in your gallery or Google Drive.
a). iPhone
Most iPhones come with a built-in video editor that crops to perfection. Here’s how to crop videos with the built-in video editor: Step 1: Open Photos and tap the video you’d like to crop. Step 2: Next, tap Edit in the top-right corner of your screen. Step 3: Click on the Crop/Rotate icon located right at the bottom of your iPhone screen. Touch and hold each corner of the video clip on the canvas. Then drag each of the edges inwards till you get your desired dimension. Repeat the same process with other corners till you’re satisfied with your desired area. Step 4: Lastly, when you’re satisfied with the look and feel of your newly cropped video, click on Done at the bottom-right corner to save the video to your iPhone.b). Android device
Cropping videos on an Android device is straightforward for some devices but some might need to rely on a third-party video editing app to crop your video. For Samsung Android users, it is simple. Step 1: Open Photos and tap the video you’d like to crop. You will see such an interface.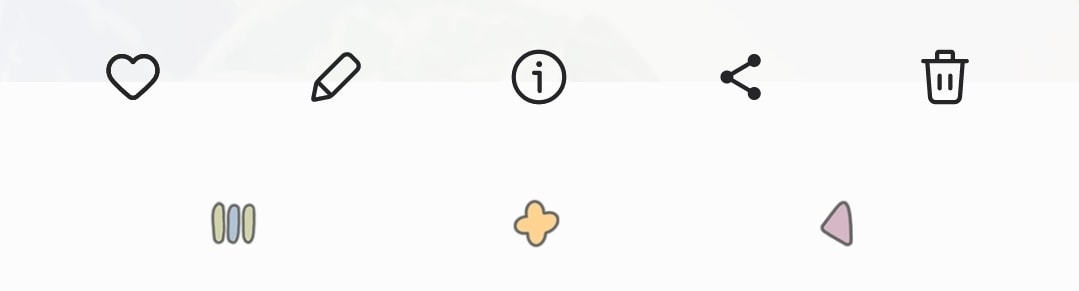 Step 2: Click the pencil icon that symbolizes editing which will open different editing options such as cutout, cropping, filters, picture adjustments, annotations (use stickers, draw or write text), and sound adjustments.
 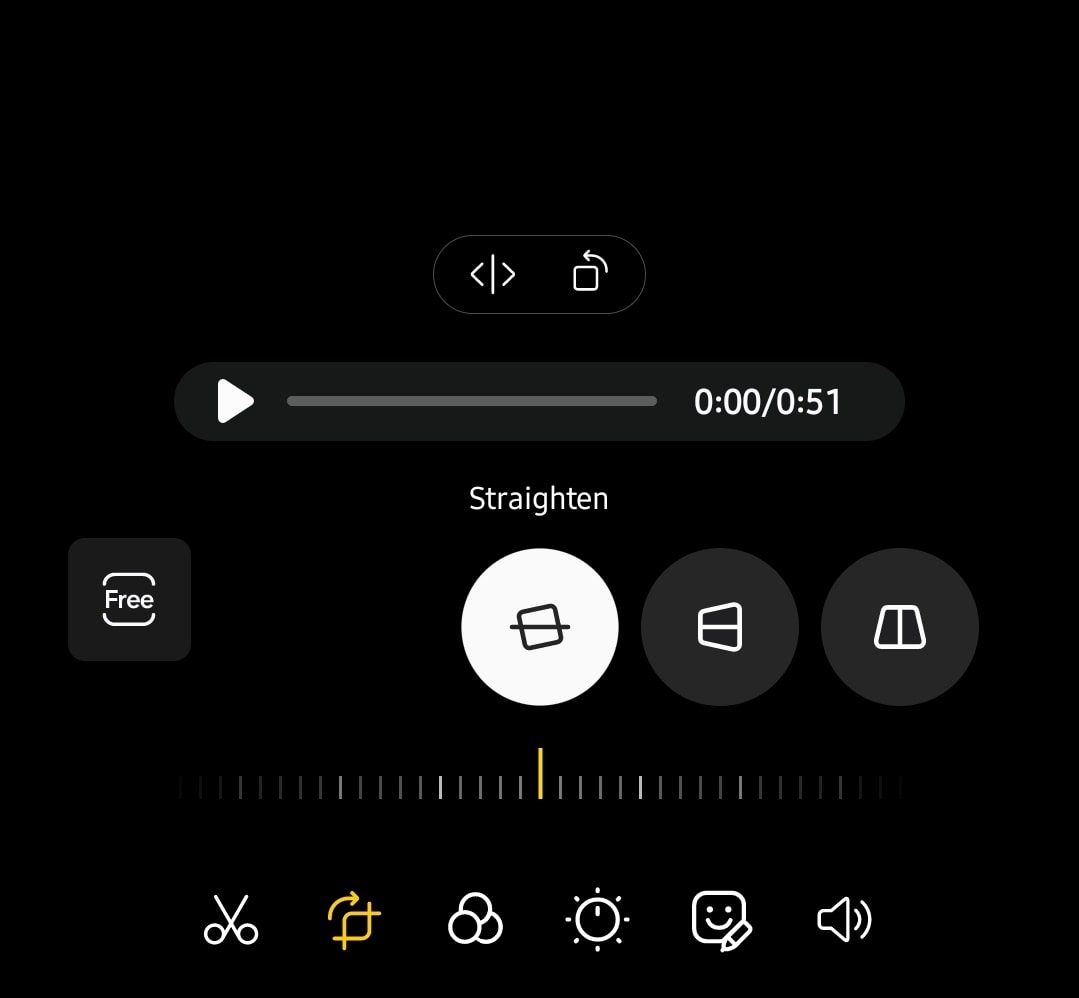 Step 3: Click the crop videos icon which opens an interface with different aspect ratios to crop videos such as free, 1:1, 4:3, 16:9, and full screen. Crop and edit your video as desired.
 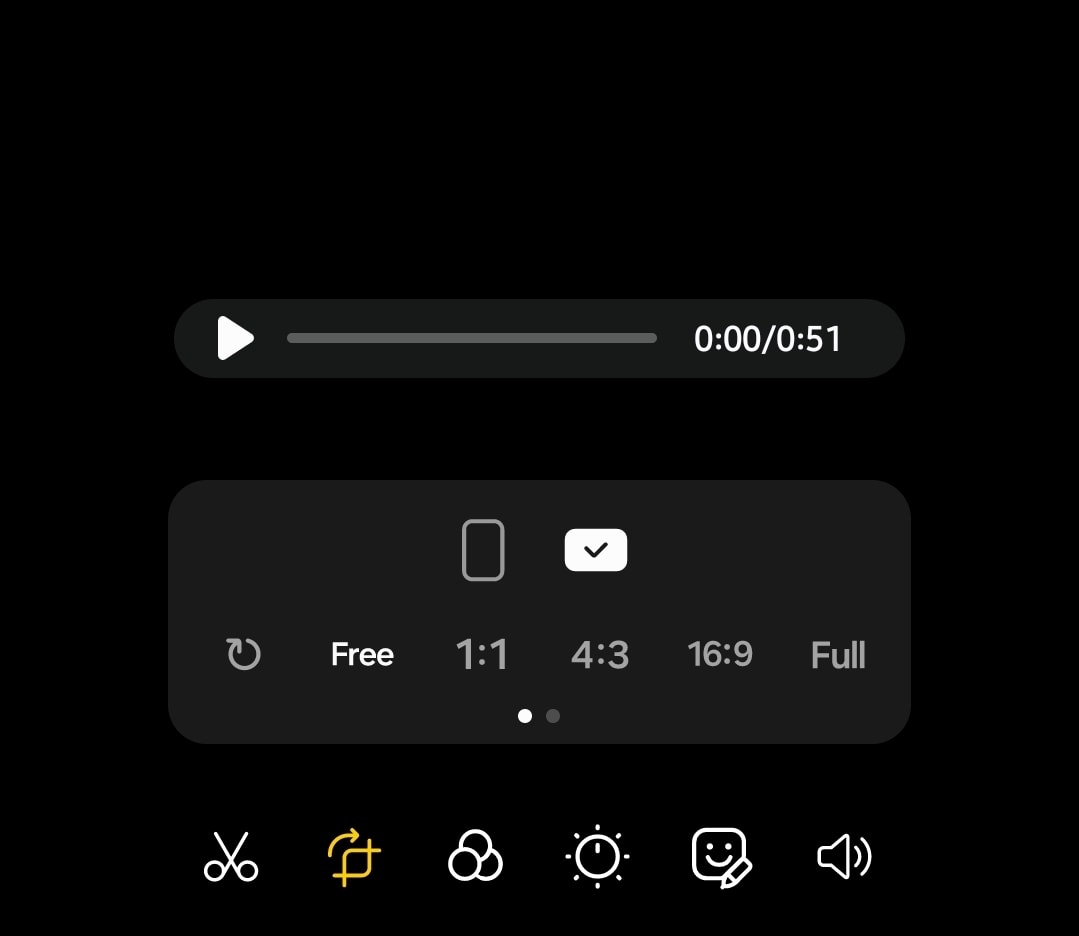 Step 4: Choose a file size and format in the different video resolutions and video codec( HEVC- saves space or H.264- most compatible). Step 5: Save your cropped video.
 How to Crop a Video- Best Practices
Cropping your videos is also about enhancing your video’s visual appeal and ensuring it resonates with your target audience. Here are some friendly tips to guide you:1. Embrace Composition Basics
Here are some composition tips to consider when cropping to avoid awkward cuts or unbalanced visuals.- Rule of Thirds: Visualize your frame divided into a 3×3 grid. Position key elements along these lines or their intersections to create a balanced and engaging scene.
- Headspace: Ensure there’s a comfortable amount of space above your subject’s head. This prevents a cramped look and makes your subject stand out naturally.
- Negative Space: Use empty areas around your subject to highlight them effectively. This balance guides your viewer’s attention to where it matters most.
2. Crop with Care
- Maintain Quality: Over-cropping can lead to pixelation or a grainy appearance. Aim to frame your subject well during filming to minimize the need for excessive cropping later.
- Focus on Essentials: While it’s tempting to zoom in closely, ensure that important background elements that add context aren’t lost.
2. Know Your Target Aspect Ratio and Orientation
Aspect ratios matter and different platforms have preferred video dimensions. Know your desired aspect ratio before you start cropping, and decide where your video will be posted. This foresight helps in maintaining consistency and reduces the need for multiple edits. Familiarize yourself with these to ensure your content displays perfectly:- Instagram Feed: 1:1 (square) or 4:5 (vertical)
- Instagram Stories and Reels: 9:16 (vertical)
- Facebook Feed: 1:1 (square) or 16:9 (landscape)
- YouTube Video: 16:9 (landscape)
- Twitter: 16:9 (landscape)


