
Recording a Google Meet session might seem like a task reserved for tech enthusiasts, but it’s incredibly useful for everyone. Imagine you’re in an important meeting, and your colleague joins late. Instead of recapping everything, wouldn’t it be great to just share a Google Meet meeting recording with them?
Google Meet makes it easy for meeting organizers and participants with recording permissions to capture events directly within the platform. Currently, you can only record meetings on desktop devices using Google Meet’s built-in features. If you don’t have recording permissions or prefer to use your mobile phone, you can opt for the best screen recording software available.
If you’re here to make sure your colleague (or anyone else) stays in the loop, or simply to streamline your workflow, you’re in the right place. We’ve compiled several step-by-step guides on how to record your Google Meet sessions, complete with some extra tips and tricks to ensure you never miss a moment again. Let’s dive in.
Can you Record a Google Meet?
Yes, you can record a Google Meet but not everyone can record Google Meet calls. Therefore you might have encountered Google Meet displaying “recording is unavailable: you’re not allowed to record this video call.” If that’s the case, these are the possible reasons:
- Google Workspace Account and Editions: To use the recording feature, you need a Google Workspace account, but not all editions support it.
- Google Drive Space: Ensure you have enough space on your Google Drive since the recording will be stored there.
- Permissions and Organizer Rights: Recording permissions are managed by your Google Workspace administrator. Additionally, only the meeting organizer or someone from the same organization as the event creator can initiate a recording.
- Phone or Tablet: Google Meet does not support recording on mobile or handheld devices. To record on these devices, you’ll need to use their native recording features or third-party screen recording apps.
- Recording Duration Limit: Google allows recording for up to 8 hours.
Some possible solutions to the limitations above include:
- Check Your Edition: Visit the Google Admin Console to verify which Google Workspace edition you have. Some editions may not support recording Google Meet meetings.
- Seek Permissions: If you need to record Google Meet sessions regularly, ask your Google Workspace administrator to grant you the necessary permissions.
- Be the Organizer: Whenever possible, try to be the meeting organizer or ensure the organizer is from your organization. This increases the chances of having the recording feature available.
- Switch to Zight: Consider switching to Zight, a faster and easier-to-use screen recorder app that eliminates these problems and limitations. Read more about it below.
What Does Google Meet Record?
Before recording a Google Meet session, ensure you’ll be capturing everything you need. When using Google Meet’s built-in recording feature, the following will be recorded:
- Video and audio of all participants
- Any presentations or screen shares shown during the meeting
- Chat messages are sent during the meeting (if chat is enabled)
- The active speaker
However, the built-in recording feature will not capture:
- Private messages sent in the chat
- Annotations made on shared documents or presentations during the meeting
- Live captions
- Other open windows
- Notifications
Which Account is Allowed to Record a Google Meet
Google Meet users without a paid Google Workspace account (formerly G Suite) can’t record meetings. The recording feature is available in all paid Google Workspace editions, except for the Business Starter edition. These editions include:
- Business Standard
- Business Plus
- Enterprise Essentials
- Enterprise Standard
- Enterprise Plus
- Essentials
- Education Fundamentals
- Education Plus (Available to users with a “staff” and “student” license)
Why Should You Record Your Meetings?
With the increasing shift from face-to-face interactions to video calls on platforms like Google Meet, it’s easy to make the most of these digital tools by recording conversations. The ability to record Google Meet video calls has become a helpful feature for both businesses and educators. Here’s why:
1. Documentation and Transparency
- Minutes of Meetings: Recording a Google Meet call captures every detail, ensuring accurate and comprehensive minutes without the need for frantic note-taking.
- Accountability: Imagine you had a call with a new client to discuss the details of a partnership. Recording that meeting provides a valuable reference for you, your team, your client, and anyone else involved. This ensures all participants can be held accountable for their commitments, decisions, and any changes in direction.
2. Training and Skill Development
- Training Material: The Google Meet recording feature can be great for creating presentations and training materials. You can start a call solo, record your session as you go through the material, and later share the link with your team for solid training content. Also, new team members or those who missed a training session can watch the recorded meeting.
- Review and Feedback: For skill development sessions, recordings allow trainers and trainees to review performances, provide feedback, and identify areas for improvement.
3. Recruitment and Onboarding
This is particularly relevant to HR, as recruiters and managers often prefer to record interviews and testing sessions for potential hires. This allows every decision-maker involved in the recruitment process to rewatch the sessions and make well-informed decisions.
4. Information Sharing
- Absentees: Not everyone can attend every meeting. Recorded Google Meet sessions allow those who missed the meeting to catch up at their convenience.
- External Sharing: Sometimes, stakeholders or clients need an overview of a discussion. Sharing a recorded meeting can be more effective than sending a lengthy email or report.
5. Efficiency and Productivity
- Reduced Repetition: Recordings help teams quickly revisit previous discussions, saving time and reducing the need to revisit the same points in follow-up meetings.
- Enhanced Focus: Knowing the Google Meet session is being recorded allows participants to focus on the discussion rather than taking notes, leading to more engaged and productive sessions.
How to Record Google Meet Video Calls on Windows & Mac PCs Without Permissions
Now that you know who can record, what does and doesn’t record, and the recording limitations, let’s learn how to record a Google Meet on different devices.
If you have the option to use Google Meet’s built-in screen recording feature, it’s a convenient way to quickly capture your meetings or video calls on your desktop. However, keep in mind that the quality may not meet your expectations.
Alternatively, if you’re unable to access the built-in screen recording feature, you can use a third-party screen recorder on Windows or Mac. These tools often provide high-quality recording with minimal limitations, making them an ideal choice for anyone needing to record Google Meet video calls. A perfect example is Zight.
A. Record Google Meet With Zight: Best Solution for All
If you’re using a free Google Meet account or don’t have the necessary permissions, you won’t be able to access the screen recording option during a meeting. To record a Google Meet on Windows or Mac, we recommend using a handy third-party tool like Zight.
Why should Zight be at the top of your list? For starters, it’s an all-in-one tool with comprehensive features that cater to your screen capture needs. It combines screen recording, screenshots, webcam recordings, and GIF creation in one platform whether you’re on Mac, Windows, Chrome, or iOS.
Key Features for Zight
- High-Quality Recordings: Zight ensures your Google Meet video sessions are captured in high definition, maintaining clear audio and video quality. This is important for reviewing meetings, sharing with absent team members, or creating training materials.
- Webcam Integration: Record your Google Meet calls with a webcam overlay, adding a personal touch to your recordings. This feature is perfect for the use of meeting recordings for virtual presentations, interviews, and any scenario where visual interaction is key.
- Annotations: Zight allows you to annotate to highlight key points of your Google Meet meeting, emphasize important information, and provide clear visual explanations using arrows, lines, shapes, and text.
- Cloud Storage: Zight automatically saves your Google Meet recordings to the cloud, ensuring they are secure and easily accessible. This organization allows you to manage and share your recordings effortlessly.
- Video Editing: After recording your Google Meet session, use Zight’s editing tools to refine your video. Trim unnecessary parts, merge clips, blur sensitive information, and enhance the overall presentation to ensure your Google Meet recordings are polished and professional.
- Instant Sharing: Share your Google Meet recordings quickly and easily with instantly generated links. Whether you’re collaborating with your team or distributing content more broadly, Zight makes sharing seamless and efficient.
Additional Zight Features
- Screen Capture: Capture full or partial screenshots from your Google Meet sessions, edit them, and add annotations as needed. All your screenshots are stored in the cloud for easy access and sharing.
- GIF Maker: Create engaging GIFs from your Google Meet recordings. This is perfect for highlighting key moments, creating quick tutorials, or sharing fun snippets.
- File Sharing: Share large files securely, with options for password protection and expiration dates. Zight supports various file types, including PDF, JPG, and GIF.
- Analytics: Track the engagement of your Google Meet recordings with detailed analytics. See how many times your content has been viewed and who has viewed it.
- Custom Branding: Enhance your recordings with custom branding options. Add your logo, customized redirect URLs, custom domains, and more to maintain a professional appearance.
With step-by-step instructions, we’ll show you how to:
- Set up your Zight account with just a few clicks
- Record your Google Meet calls
- Find your Google Meet calls after you have recorded
Let’s get into the step-by-step guide:
Step 1: If you haven’t already, download, install, and launch the Zight app or the Zight Chrome extension
Step 2: Open and join your Google Meet meeting and stay on this tab.
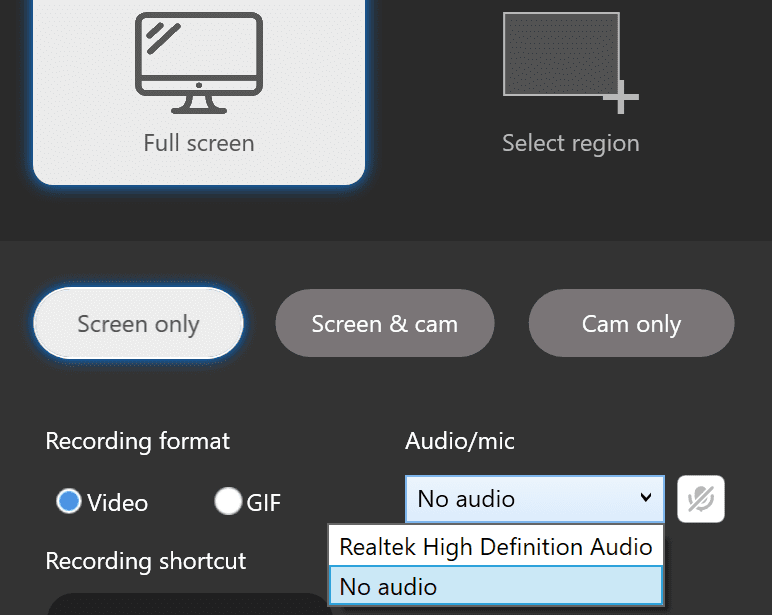
Step 3: On your Zight app click on “Record” and pick your preferences – either full screen or a selected region. You can also choose to record both the screen and camera or just one of them.
Step 4: If you’re using the Zight Windows app, go to the Audio/Mic drop-down menu. It’s initially set to “No Audio,” so switch it to your PC’s speakers, like “Realtek High Definition Audio.” If you’re using the Zight extension on Chrome, set your recording preferences and ensure to turn on the mic before starting. You can also select your preferred mic from the drop-down menu.
Step 5: When you’re ready, hit the “Start recording” button. To finish, click the red button. View your recorded Google Meet and edit it if needed. Your Google Meet recording will include sound, and you can easily share your recording link with your team.
B. Xbox Game Bar for Windows
Alternatively, if you are looking for a straightforward way to record Google Meet calls on your Windows with no extra features then the Game Bar is a good way to go about it. The Game Bar is a free built-in screen recording tool on Windows that can record screen video and audio. To use it to record your Google Meet meeting, follow these steps:
Step 1: First, enable Game Bar on Windows 10 by pressing Windows + I. To open the Game Bar, press Windows + G. Then, press Windows + Alt + R to start recording your Google Meet call.
Step 2: Navigate to Gaming -> Game Bar, and turn on the option “Record game clips, screenshots, and broadcast using Game Bar.”
Step 3: Once Game Bar is enabled, start or join your Google Meet meeting. When you’re ready to stop the recording, simply press Windows + Alt + R again.
C. QuickTime Player for Mac
To record a Google Meet session using QuickTime Player on a Mac, follow these step-by-step instructions:
Step 1: Launch QuickTime Player from your Applications folder or by using Spotlight search (Command + Space and type “QuickTime Player”).
Step 2: In the QuickTime Player menu bar, click on “File” and then select “New Screen Recording.”
Step 3: A small recording window will appear. Before starting your Google Meet session, click on the arrow next to the record button to adjust settings like microphone input and recording quality.
Step 4: Once you’re ready, click on the record button in the recording window and join the meeting that you want to record.
Step 5: Click on the “Share screen” button in Google Meet and select the screen or application window you want to share. This will also begin the recording in QuickTime Player.
Step 6: After the meeting ends, return to the QuickTime Player window and click on the stop button (a square icon) in the menu bar or the recording window itself.
Step 7: After stopping the Google Meet recording, QuickTime Player will automatically open the recorded video. You can review it and then save it to your desired location by clicking on “File” in the menu bar and selecting “Save.”
2. Record a Google Meet on PC as a Host or Permitted Participant
With Google Meet’s recording feature, capturing your webinar, video call, or any other event becomes a breeze. Here’s a simple step-by-step guide to help you learn how to use Google Meet’s recording features to record your event:
Step 1: Open up the Google Meet app on your device, just like you would for any other call.
Step 2: Kick off your meeting and look for the Activities icon to find the recording feature.
Step 3: Hit the “Start Recording” button and then click “Start.” Your recording will kick off, and everyone in the meeting will know it’s being recorded. It’s like pressing the record button on a camera before capturing a moment.
Step 4: When you’re ready to wrap up, head back to the Recording tab and hit “Stop recording.”
Your recorded meeting will be safely stored in your Google Drive, neatly tucked away in the Meet Recording Folder. Plus, a link to the recording will be sent to both the person who started it and the meeting host, so everyone stays in the loop. It’s ensuring everyone gets a copy of the group photo after an event.
Rewatch and Share a Recorded Meeting
To access recorded meetings, head to Google Drive. Move to the host’s “My Drive,” then go to “Folders” and open the “Meet Recordings” folder. Find the recording file and click on it to rewatch the meeting directly from My Drive.
For better quality, you can download the Google Meet recording to your computer. Just select the file, click the three vertical dots, and choose “Download.”
To share the recording, select the file, click the share icon, and enter the recipients’ names or email addresses. Alternatively, you can click the link icon to copy the recording’s link and paste it into an email or a messaging app.
After the Google Meet meeting, the organizer or the person who started it will get an email with the recording link once it’s processed. For quick access, open the email, click the link to view the recording, press “Play” to rewatch it, or click the three vertical dots and choose “Share” to send it to others.
3. How to Record a Google Meet Video Call on Mobile Devices
Since Google Meet’s recording feature is only available on computers, you’ll need an alternative method to record Google Meet sessions on mobile devices. Thankfully, both Android and iPhone have built-in tools that let you record Google Meet videos easily.
A. Android Phone
Step 1: Join the Google Meet meeting using the shared invitation link.
Step 2: Swipe down from the top of your screen and activate the Screen recorder. Allow the necessary permissions when prompted.
Step 3: Tap the microphone icon to ensure that both screen activity and audio are recorded.
Step 4: When your meeting ends, tap the red Recording icon to stop the recording. You’ll find the saved meeting recording in your gallery.
B. iPhone
Also, iPhones come with a built-in screen recorder that lets you easily record Google Meet sessions. Here’s how to do it:
Step 1: Open the Google Meet app and join the meeting you want to record.
Step 2: Swipe up from the bottom of your screen to access the Control Center, then tap the Record button (red circle).
Step 3: Tap on Start Recording, and your session will be recorded. Once you stop the screen recording, the video will be automatically saved to your iPhone’s gallery.
Conclusion on How to Record Google Meet
While there are certain restrictions when it comes to recording calls in Google Meet, these measures are put in place to uphold privacy standards. They serve to safeguard your ability to engage in vital and confidential discussions with your meeting participants using the video conferencing platform, ensuring that sensitive information remains protected.
However, if you aren’t malicious and want to record a Google Meet call, we have listed several ways to go about it. With the availability of tools like Zight, users can efficiently capture and enhance their Google Meet meetings, ensuring that valuable insights and information are preserved for future reference.
As technology continues to evolve, the ability to record and review virtual meetings will undoubtedly play a crucial role in modern communication and collaboration practices. So why not sign up with Zight and start recording your Google Meet call?


