We’ve all been there, in a situation where you are trying to explain a process, step-by-step, only to hit the realization that showing would be a thousand times easier than telling. An instructional video is the modern way to say, “Hey, let me show you how it’s done.” Today, screen recording takes that concept further, making it easy for anyone, whether tech-savvy or not, to create a video that’s clear, concise, and just plain useful.
How do you specifically record an instructional video on the computer? Luckily, with tools like the Zight screen recorder, you can teach viewers exactly what they need to know. The biggest advantage of using dedicated screen recording tools is that you don’t need an external device to make the video. Your laptop or computer can get all the work done.
This article will provide you with detailed answers from the preparation before you make an instructional screen recording to why we choose Zight as the best screen recording software.
What is an Instructional Video?
An instructional video is all about one thing- guiding your viewer through a process. It could be for various contexts like creating a demo for software, training new hires, helping customers by troubleshooting steps, or even sharing your know-how with a wider audience.
Instructional videos don’t just explain, they show. They are designed to teach step-by-step, so viewers not only understand but also feel confident in trying the process themselves.
With screen recording, your instructional videos can be exactly as engaging or straightforward as you need often saving time and reducing the margin for error.
Why Use Screen Recordings in Your Instructional Videos?
Screen recordings offer a direct, clear, and easy-to-understand way to guide. When you’re showing what’s on your screen, you’re avoiding vague descriptions and capturing exactly what your viewer will see in real-time.
Let’s say you’re teaching someone how to use a software feature. Explaining it over the phone would take ages trying to describe every menu and option. However, with a screen recording, you can share your screen, click by click, narrated with your guiding voice in the background. Notably, you don’t have to narrate and a good screen recorder should also be able to screen record without sound.
If you’re unsure about presenting on camera, screen-recording videos are a fantastic and straightforward option to start with. Screen recordings make even the most technical instructions feel approachable and keep viewers engaged from start to finish at their own pace. Plus, for visual learners, the combination of seeing and hearing the process is invaluable.
Best Types of Instructional Videos to Screen Record
Not every instructional video needs screen recording, but when it comes to software, video tutorials, or digital tools, screen recordings are ideal. The first step in creating your instructional video is choosing the type that best fits your needs.
Here are some types of instructional videos that work exceptionally well with screen recording:
- Software Tutorials: To show the ins and outs of a platform, making each step clear and easy to follow.
- Product Walkthroughs: To take users through key features, updates, or tips for using your product.
- Employee Training Videos: To make onboarding and training a breeze, especially for remote teams.
- Troubleshooting Guides: To provide solutions to common issues by walking through each step.
- Instructional Presentation Videos: A presentation video can help outline important, need-to-know information and guide the viewer to the next step.
- Explainer Videos: To break down complex topics or processes, making them easier to understand through visual demonstrations.
- Customer Onboarding Guides: Effective for introducing new customers to a service or product, ensuring they understand how to use it.
How to Plan Your Instructional Video
Creating an instructional video is more than hitting “record.” It’s about crafting a clear path that aligns with your goals, audience, and content. Before jumping into screen recording and editing, let’s map out five key steps to make your video both impactful and easy to follow.
1. Define Your Objective
Ask yourself: What do I want my viewers to walk away with? For example, if your company launched a product update, your objective could be threefold:
- Inform users about the update.
- Show them the benefits of this update.
- Demonstrate how to use the new features, so they feel confident after watching.
Establishing a clear goal will shape everything that follows, from your video script to your editing choices.
2. Research Thoroughly
Once your learning objective is set, dive deep into the topic. Connect with subject matter experts, test the product yourself, or conduct online research to ensure your instructional content is accurate and thorough. It’s important to know your material well so you can keep explanations both clear and engaging.
3. Identify Your Audience
Think about who will be watching. Consider their age, familiarity with the topic, and even their preferences. Tailoring the tone and language to your target audience makes the video feel personal and relatable, increasing its impact.
4. Outline and Storyboard
A video storyboard is like a visual blueprint for your tutorial video, breaking down your content frame by frame. A storyboard, even if simple, helps visualize what the audience will see on screen and ensures your instructional flow feels natural.
It’s all about shaping the flow of your instructional video and seeing it from your viewers’ perspective. Also, don’t worry as this doesn’t require a gallery-worthy art display. Simple doodles work just fine, as long as you can follow along.
Each frame typically includes small details like camera angles, character reactions, and setting elements. If you’re filming yourself, you might note facial expressions, body language, or background music for different scenes.
5. Write Your Script
Once your storyboard is set, it’s time to dive into the video script. With a clear idea of each scene, you can write dialogue that complements every visual. Keep your audience front and center. They’re here to learn, so avoid complex jargon and overwhelming details.
Stick to simple language, and where technical terms are necessary, add visuals or numbers to keep things accessible. A touch of humor can keep your video engaging, but use it sparingly to keep the focus on the content.
A strong video script breaks down into three key parts:
- Introduction: Announce the topic and what viewers will gain.
- Main Content: Carefully guide the viewer through each step, covering every detail so they don’t feel lost.
- Conclusion: Summarize or reinforce the learning outcome.
Remember, your instructional video should be informative and highlight key points without being overwhelming. By following these steps, you’ll be well on your way to creating instructional videos that keep viewers engaged and confident in the content they’ve learned.
What is the Best App to Record your Screen in an Instructional Video?
If you’ve explored top screen recording tools, you already know there’s a wide variety out there. Yet, when it comes to creating instructional videos that look clean and professional without the hassle of setup, Zight takes the lead thanks to its simplicity, versatile features, and ease of use makes it easy to screen without learning new tech.
With the Zight app or Chrome extension, all you need to do is open the app or a Chrome extension, press a button, and be set to record in seconds without worrying about complex setups.
For more detail, here’s what sets Zight apart as the best screen recorder for instructional videos.
- Comprehensive Features: Zight isn’t just about screen recording but it’s an all-in-one tool with other tools such as a webcam recorder, and a GIF maker. The screen recorder app also has bonus features such as annotations, AI features, privacy, and security. These features can elevate your instructional content and make it visually engaging.
- Flexible Recording Modes: Zight lets you capture your entire screen, specific windows, or just sections. This is perfect for when you need precision.
- Screen & Audio Recording Syncing: The ability to record your screen alongside your audio ensures that your viewers get the full picture. This makes it perfect for tutorial videos, presentations, or training videos.
- In-App Editing and Annotations: You can polish and highlight key parts right within Zight, creating professional-grade videos without needing any third-party apps.
- Effortless Sharing: Zight’s cloud-based sharing is as simple as generating a link. It means your instructional video is just one click away from your target audience, whether they’re clients, teammates, or learners.
- Flexible Recording Lengths: Say goodbye to cutting off mid-instruction with Zight as you can decide the recording length that fits your instructional video needs.
- Customizable Quality Controls: With Zight, you can tweak video resolution and frame rates to suit your style and keep your audience engaged.
Now that you know why Zight is the best screen recording software to create instructional videos, you are probably wondering how to use this screen recorder.
Below, we’ll guide you through the whole process from downloading and installing Zight to effectively using it to screen record your computer on Windows and Mac computers with audio.
How to Make Your Instructional Video- Zight Screen Recorder
Let’s start slow. If it’s your first time creating an instructional video, don’t expect flawless clips right from the start. Creating quality screen recordings takes time, and it’s normal to stumble and make mistakes. Luckily, our step-by-step instructions will make it easy for you even as a first-timer.
Step 1. Download Zight
To start creating your instructional videos, you’ll need to download and install Zight. You can easily record screens on your Windows 10 and 11 or your Mac.
Here’s how to do it:
- Open your web browser and search for “Zight screen recorder.” or visit the official Zight website.
- Click the “Download” button and follow the prompts to install the software on your computer screen.
If you are using a browser tab:
- Visit the Chrome Web Store: Search for “Zight” and click “Add to Chrome.”
- Follow the on-screen instructions: Complete the installation process.
Step 2. Configure your Recording Settings
Once you have installed Zight, it’s time to configure the screen recording tool. Open Zight from your desktop or Applications folder.
- In the Zight interface, click on the “Settings” or “Preferences” option to adjust your recording settings
- Choose the video quality for optimal sound quality and visual clarity.
- Set the maximum recording length based on your learning objective.
- Select your audio input, which could be your computer’s built-in microphone (system audio) or an external voice recorder, to ensure clear audio recording.
Step 3: Start Screen Recording Your Instructional Video
Now you’re ready to start recording your first instructional video:
- Click the “Record” or “Start Recording” button in the main Zight window.
- Choose whether to capture your entire screen, a specific browser tab, or a selected area.
- Click “Record” to begin recording. Zight will give you a countdown timer to prepare.
As you record, follow your video script and provide step-by-step instructions for your viewers. Use visual aids like presentation slides where necessary to enhance understanding.
Step 4: Add Annotations to Your Instructional Video for Clarity
Annotations can make your instructional video clearer and more engaging. So, if you want to add some flair to your instructional video:
- Pause Recording: When you need to make an annotation, pause your recording.
- Use Annotation Tools: Zight provides tools to add lines, arrows, shapes, and highlights. Choose custom colors and even timers to emphasize key points.
- Resume Recording: Once you’re done annotating, continue to make an instructional video
Step 5: Stop Recording your Instructional Video
Click the “Finish Recording” button once you’re done. Your video will upload to the cloud, and a link will be copied to your clipboard.
Step 6: Enhance Your Instructional Video
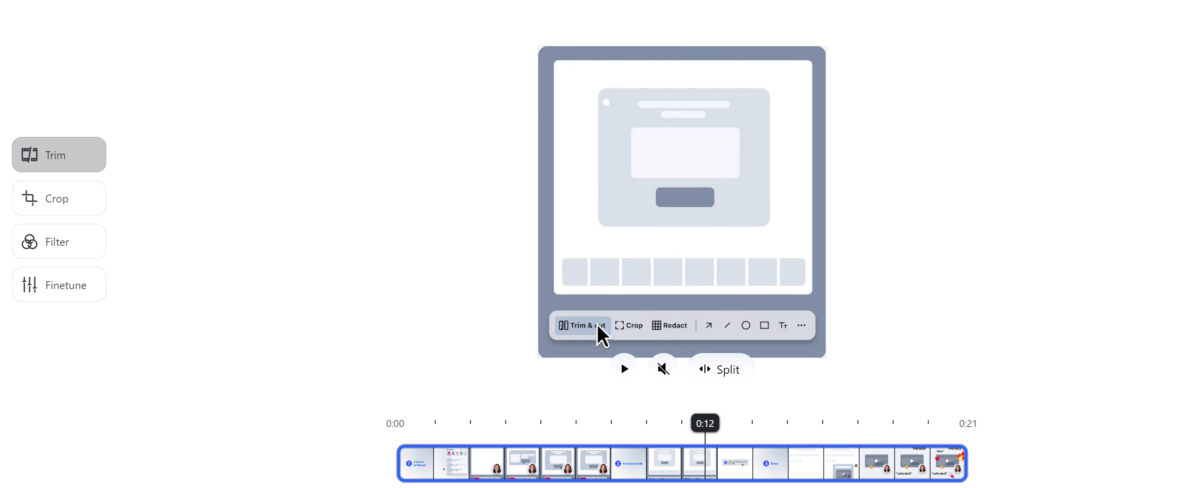
After recording, it’s time to refine your video project using Zight’s built-in editing features.
- Trim and Cut: Use the editing tools to trim unwanted sections, add filters, or split and merge clips to enhance your instructional content ensuring your video is concise and focused.
- Add Interactive Elements: Incorporate call-to-action buttons, links, and other interactive features to enhance engagement.
- Apply Templates: Choose from default video templates or create your own to maintain a consistent look across your videos.
Step 7: Save and Share
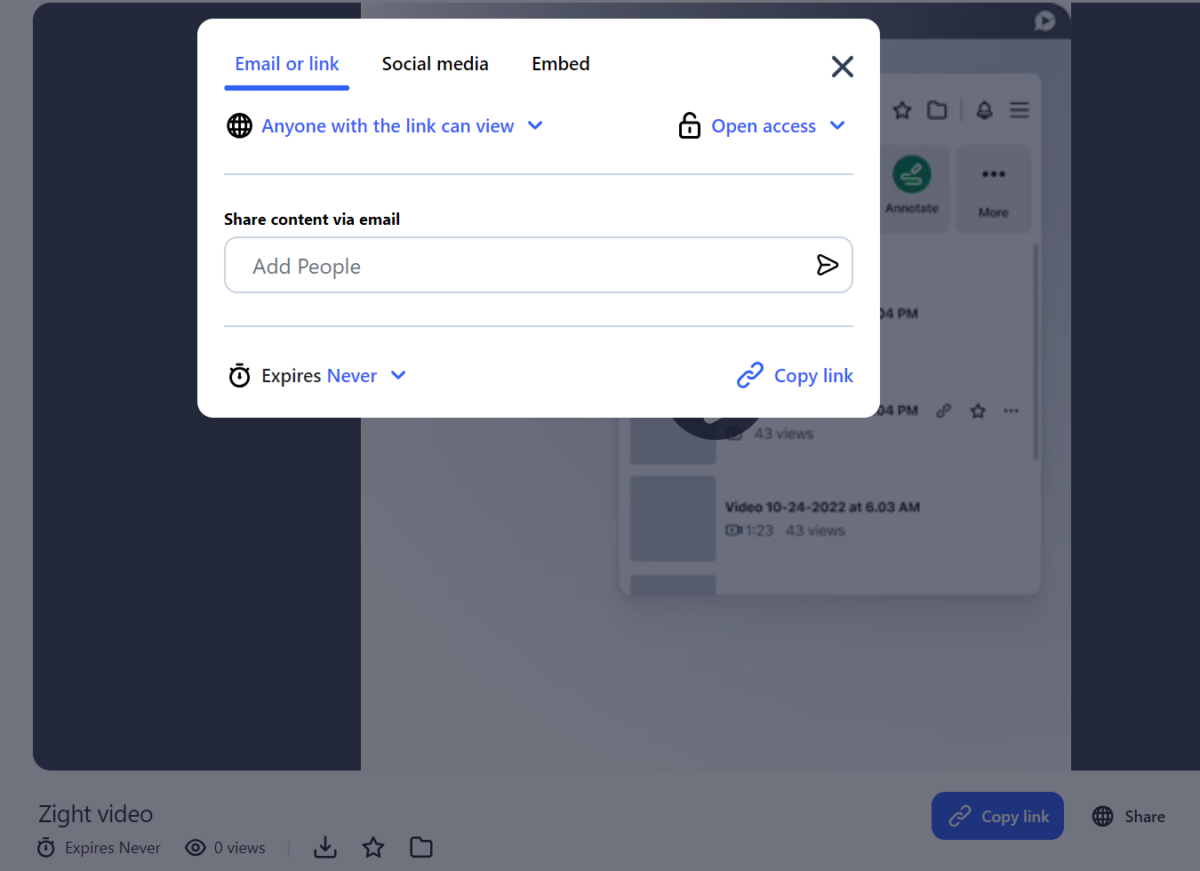
Now that your instructional video is ready, sharing it is easy. Click the “Share” button on Zight to distribute your instructional video.
- Download: Keep a local copy on your desktop.
- Embed: You can share it via email, social media, or embed it on your website.
- Copy the Link: The easiest method is to copy the shareable video link generated by Zight. Paste it into any messaging platform like Slack, WhatsApp, or email for effortless distribution. The link allows viewers to access the tutorial video without needing a Zight account, making sharing effortless.

In addition, you can customize your share settings, enabling comments or setting viewing permissions to control who can see your video. Zight even allows you to add expiration dates and track who has watched your video for better management.
Worthy Read: Best Screen Recording Tips
Conclusion
Making instructional videos with screen recording doesn’t have to be complex. It is a simple yet powerful way to boost your teaching and communication. Following these steps will help you create a video that’s clear, informative, and engaging for your audience. We hope this guide has helped get you started!


