Imagine you’re in the middle of a crucial remote meeting, and you need to share your screen to present your findings. You’ve tried various methods, but nothing seems to be seamless or intuitive enough.
Not to worry; we have an easy fix for you. Just download Zight Chrome Extension – a powerful tool that makes screen sharing effortless and efficient. In this guide, we’ll walk you through everything you need to know about using the Zight Chrome Extension for screen sharing, from installation to advanced tips.
Why Choose Zight for Screen Sharing?
Zight is one of the best Chrome extensions for screen sharing because it combines a host of features into a single, easy-to-use platform. Whether you need to capture screenshots, record videos, create GIFs, or share your screen live, Zight has you covered.
Its seamless integration with Chrome makes it a go-to choice for professionals looking to enhance their remote work setup.
Step-by-Step Guide to Using Zight Chrome Extension
Here are the steps to follow to record and share your screen with Zight:
1. How to Install the Zight Chrome Extension
- Open your Chrome browser and go to the Chrome Web Store.
- Type “Zight Chrome Extension” into the search bar.
- Click on the Zight extension from the search results.
- Click the “Add to Chrome” button.
- A pop-up window will appear. Click “Add Extension” to confirm the installation.
- Once installed, click on the Zight icon in the Chrome toolbar.
- Sign in with your Zight account. dont have one? Sign up for free!
- You’re ready to start sharing your screen!
2. How to Set Up Zight for Screen Sharing
- Click on the Zight icon in your Chrome toolbar.
- Select the “Screen Sharing” option from the dropdown menu.
- Choose your preferred settings, such as whether you want to include computer audio, use a webcam overlay, or share a specific tab or the entire screen.
3. How to Share Your Screen with Zight
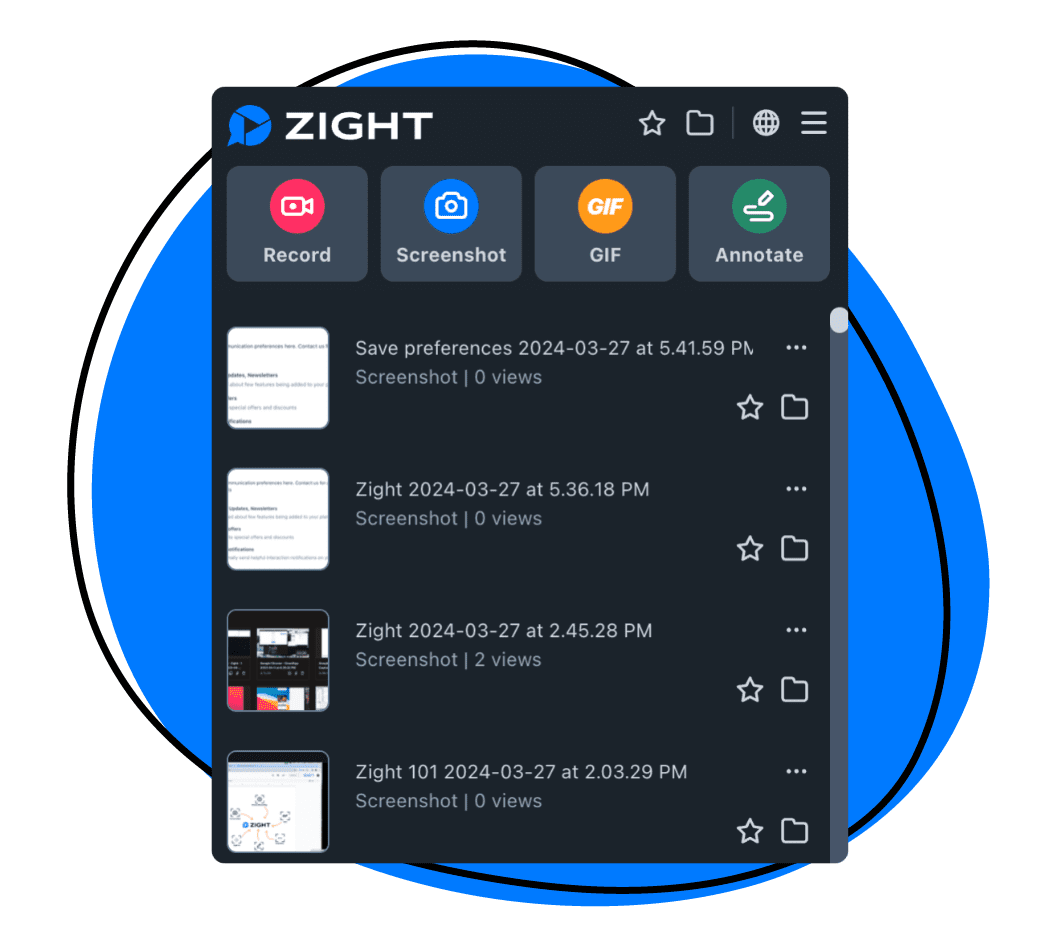
- Click on the Zight icon and select “Record.”
- Choose some Zight system preferences like your screen mode – Screen Only, Screen & Cam, or Cam Only. To share your screen, the first two options make the most sense.
- Choose between recording your entire screen, a Chrome window, or a Chrome tab.
- Once you’ve selected your screen area, click “Share.” Zight will start sharing your screen.
- When you’re done, click the Zight icon again and select “Stop Recording.”
- Your screen recording will be saved to the cloud, and you can share it via a URL. The good thing about cloud storage is you also get an intuitive dashboard you can access even from mobile devices – be sure to edit the video before sharing!
Advanced Screen Sharing Features
The Zight Chrome Extension offers several advanced features to enhance your screen-sharing experience. These tools make your presentations more professional and improve productivity, engagement, and communication with your audience.
Let’s explore the specifics of these advanced features.
1. Annotation Tools
One of the standout features of Zight is its annotation tools. During a screen-sharing session, you can highlight important information, draw attention to specific areas, and add notes directly onto your screen. This is particularly useful during webinars, training sessions, or collaborative projects where clarity is key. This is how you can annotate your screen recording before sharing:
- During a screen-sharing session, click on the annotation tool in the Zight menu.
- Select from a variety of tools such as a pen, highlighter, or text box.
- Draw, highlight, or type directly on your screen to emphasize points or guide your audience.
2. Webcam Overlay
Adding a personal touch to your presentations is easy with Zight’s webcam overlay feature. This allows you to include a live video feed of yourself while sharing your screen. It’s a great way to maintain a personal connection with your audience and make your presentations more engaging. Here’s how to share your screen with webcam:
- Before starting your screen-sharing session, enable the webcam option in the Zight settings, then click Screen & Cam.
- Drag and position the webcam anywhere on your screen to avoid covering important content.
- Begin your screen-sharing session with your webcam overlay, allowing your audience to see both your screen and your facial expressions.
3. Instant Sharing
One of the most convenient features of Zight is the ability to share your screen recordings instantly. After completing a screen-sharing session, Zight generates a URL that you can share with your team, clients, or audience. This eliminates the need for lengthy file uploads or email attachments. Here’s how to share large files instantly with Zight:
- Finish your screen-sharing or recording session.
- Zight will automatically create a shareable video link for you.
- Copy the URL and share it via email, chat, or any other communication platform.
4. Cloud Storage
Zight provides integrated cloud storage, which means you have remote access to your recordings from anywhere. This feature ensures that all your screen-sharing sessions are securely stored and readily available for future reference. Here’s how to access cloud storage:
- Access your Zight account from any device.
- Go to the recordings section in your account dashboard.
- View, download, or share your recordings as needed.
5. Custom Branding
For businesses and professionals, Zight offers the option to add custom branding to your screen-sharing sessions. This feature allows you to include your company logo, colors, and other branding elements to maintain a professional appearance. Here’s how to add custom branding:
- Go to the settings section in your Zight account.
- Upload your company logo and select your branding colors.
- Save your settings, and your branding will be applied to all your screen-sharing sessions.
6. Troubleshooting Zight Screen Sharing
Running into any problems as you screen share? Here are some instances and how to troubleshoot them:
I) Extension Not Working
The first step is to confirm that the Zight Chrome Extension is properly installed:
- Go to your Chrome browser’s settings by clicking the three dots in the upper right corner.
- Navigate to “More tools” and then “Extensions.”
- Ensure that the Zight extension is listed and enabled.
- If it’s not there, download and install it from the Chrome Web Store.
II) Screen Not Sharing
Sometimes, the issue lies with the browser permissions. Here’s how to ensure Zight has the necessary permissions to share your screen:
- Click on the three dots in the top right corner of Chrome and select “Settings.”
- Click on “Privacy and Security” in the left-hand menu, then select “Site settings.”
- Scroll down to “Permissions” and click on “Screen capture.”
- Ensure that Zight is allowed to capture your screen.
- Close and reopen Chrome and try sharing your screen again.
III) Poor Quality
Poor screen sharing quality can be frustrating, but it’s often easy to fix:
- Adjust Screen Resolution: Lowering your screen resolution can help. Right-click on your desktop and select “Display settings.” Adjust the resolution to a lower setting.
- Check Internet Connection: A stable internet connection is crucial for high-quality screen sharing. Use a wired connection if possible, or ensure you have a strong Wi-Fi signal.
- Close Unnecessary Applications: Running multiple applications can slow down your system and affect screen sharing quality. Close any unnecessary apps to free up resources.
- Bandwidth Management: Ensure other devices on your network aren’t consuming excessive bandwidth, as this can impact your screen-sharing quality. Pause large downloads or streaming services during your session.
IV) Clear Cache and Cookies
Sometimes, accumulated browser data can interfere with extension functionality. Clearing your cache and cookies can help:
- Click the three dots in the top right corner of Chrome and go to “Settings.”
- Click on “Privacy and Security” and then “Clear browsing data.”
- Select the time range (choose “All time” for a thorough clean).
- Check the boxes for “Cookies and other site data” and “Cached images and files.”
- Click “Clear data.”
V) Reinstall the Extension
If all else fails, reinstalling the Zight Chrome Extension can resolve persistent issues:
- Go to the extensions page in Chrome (three dots > More tools > Extensions).
- Click the remove button for Zight.
- Visit the Chrome Web Store and search for Zight.
- Click “Add to Chrome” to reinstall the extension.
Tips for Effective Screen Sharing with Zight
Ready to share screen with Zight? It’s easy to do, especially with these invaluable tips:
- Set Up Beforehand: Ensure you have the Zight Chrome Extension installed and configured before your meeting. This will save time and prevent last-minute technical glitches. Familiarize yourself with Zight’s features so you can navigate them smoothly during your presentation.
- Highlight Key Points: Utilize Zight’s annotation tools to draw attention to crucial areas on your screen. Whether you need to underline text, circle important data, or add explanatory notes, these tools help keep your audience engaged and focused on your message.
- Stable Internet Connection: Ensure you have a stable and high-speed internet connection. This minimizes lag and maintains the quality of your screen-sharing session. If possible, use a wired connection to avoid interference that can occur with Wi-Fi.
- Add a Personal Touch: Engage your audience by including a webcam overlay in your screen-sharing session. This feature allows your audience to see your facial expressions and body language, making the interaction more personal and effective.
- Quick File Sharing: After your screen sharing session, use Zight’s instant sharing feature to distribute your recording via a shareable URL quickly. This is particularly useful for sending follow-up materials or for those who couldn’t attend the live session.
- Run a Test Session: Before your actual meeting or presentation, run a test session to ensure everything works as expected. This helps you become comfortable with Zight’s interface and features, reducing the likelihood of technical issues during the live event.
- Tidy Up: Close unnecessary applications and tabs to minimize distractions. An organized desktop helps maintain a professional appearance and ensures you can quickly find the documents and applications you need during your screen sharing session.
Wrapping Up
With the Zight Chrome Extension, screen sharing has never been easier. Whether you’re conducting a virtual meeting, hosting a webinar, or collaborating with a remote team, Zight provides the tools you need for a seamless experience.
By incorporating these steps and tips, you’ll master screen sharing with Zight, making your remote interactions more productive and engaging. Download the Zight Chrome Extension and elevate your remote communication.


