
You know that feeling; when you’re scrolling through a webpage or social media on your laptop, and you come across a piece of very useful information that you want to capture and share. But how?
Sure, you could copy and paste it to your recipient, but who wants to read blocks of text anymore? At least not the 40% of people who prefer visual content, compared to text! Visual content outperforms text by up to 650%!
If you use a Windows laptop, the best thing to do is capture a screenshot of the page with the Snipping Tool. But you can capture screenshots even faster when you know how to use the tool’s shortcuts.
Let’s tell you all about this tool and its shortcuts!
What Is the Windows Snipping Tool?
The Windows Snipping Tool is your go-to, built-in app for screenshots, seamlessly integrated into Windows from Vista onwards, through Windows 7, 8, and 10, and it’s still kicking in Windows 11.
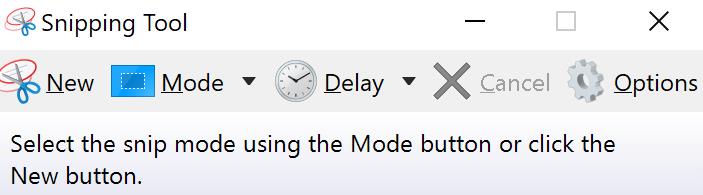
You can use it to capture any part of your screen in different formats and annotate screenshots with its pen and highlighter tools.
The snipping tool is located in the Windows Accessories folder (C:\ProgramData\Microsoft\Windows\Start Menu\Programs\Accessories) and sports an iconic scissors symbol, as what it does is “cut out” or “snip” parts of your screen.
What Can You Do with The Snipping Tool?
The Snipping Tool goes beyond just taking screenshots. Here’s what you can do with it:
- Capture different types of snips: Free-form, rectangular, window, or full-screen snips. The flexibility allows you to grab exactly what you need from your screen, whether it’s a detailed section or the entirety of it
- Annotate snips: The Snipping Tool offers options to annotate your screenshot. You can use a pen or highlighter to draw attention to specific areas or add hand-written notes directly to the image, making it perfect for tutorials, presentations, or feedback processes
- Delay snips: Need to capture a dropdown menu or a tooltip? The Snipping Tool includes a delay feature so you can time your capture perfectly. This is especially useful for grabbing elements on your screen that disappear when not interacted with
- Save in multiple formats: After capturing your snip, you can save it in various file formats like PNG, JPEG, GIF, or single file HTML (MHTML)
- Copy to clipboard: If you need to quickly share a screenshot in an email, document, or chat, the Snipping Tool lets you copy your captures to the clipboard. Just paste it wherever needed without the need to save the file first
- Share easily: The latest versions of the Snipping Tool come with a direct share feature, that lets you send your snips via email without leaving the tool.
- Edit with Paint: For more advanced editing options, you can open your snip in Paint directly from the Snipping Tool which is great when you need to do more than just annotate, like resizing or applying filters.
Need a Snipping Tool Alternative? Here’s Why It Should Be Zight!
While the Snipping Tool is a free and reliable screenshot software, you will notice it comes with some limitations.
For instance, your annotations are limited unless you use Microsoft Paint, which is also limited and requires a bit of a learning curve. In addition, your screenshots are saved on your computer and will be lost as soon as you change devices.
Finally, sharing a screenshot you took on the Snipping Tool is still hard, especially if you have the older Windows versions. Simply put, no one wants to have to download a file to their computer – it’s easier if they can view the file online and always have access to it even without storing it locally.
So, if you are a busy professional and need to capture and share many screenshots often, we recommend getting Zight.
Here’s why:
- Zight is compatible with all versions of Windows. Plus, it works the same on all devices, so you will not have limitations (like when sharing a screenshot on the Snipping Tool on older versions). You can even get the Chrome extension, and you’ll be able to capture the screen within your Google workflows!
- Capturing a screenshot with Zight is easy. Just press Alt + Shift + 5 and select the region.
- You can annotate the image to communicate best. Unlike with the Snipping Tool, you will capture a screenshot and it will be automatically uploaded to the cloud. Add all annotations you need – from arrows, text, and paths to cropping, changing image backgrounds, redacting sensitive parts, and more.
- With Zight, you also get seamless and professional image sharing! Unlike with the Snipping Tool, where you have to upload the capture – and your recipient has to download it to view – Zight takes the work out of that process. Once the screenshot uploads to the cloud, you can share the link with your recipient (and they don’t have to download the file to their computer!) Plus, they will always access the image as long as the link is active! Here’s how you can annotate an image and share it to Slack within moments.
15 Windows Snipping Tool Shortcuts You Need to Be Using Today
Here is how to start using the Snipping Tool faster with shortcuts:
How to Open the Snipping Tool
1. Using the Start menu
To open the Snipping Tool, you can follow these steps:
- Click on the Start button or press the Windows logo key on your keyboard.
- Type “Snipping Tool” into the search bar.
- Click on the Snipping Tool app from the search results to open it.
2. Using Run Command
Another quickfire way to launch the Snipping Tool without navigating through menus is:
- Press the Windows logo key + R to open the Run dialog box.
- Type snippingtool and press Enter or click OK.
3. Using Cortana
To use Cortana:
- Click on the Cortana search box or microphone icon on the taskbar.
- Say “Open Snipping Tool” if you have voice activation set up or type it into the search box.
Or, just say “Hey Cortana, open the Snipping Tool” and the voice assistant will automatically open the tool.
4. From Task Manager
The Snipping Tool shortcut for this is:
- Press Ctrl + Shift + Esc to open Task Manager.
- Click on “File” at the top left, then select “Run new task.”
- Type snippingtool and press Enter or click OK.
How To Capture Screenshots With the Snipping Tool
Capturing screenshots with the Snipping Tool is straightforward and you can utilize various shortcuts to streamline your screenshot process.
5. Capture a New Snip
Once the Snipping Tool is open, if you want to start a new screenshot, simply press Ctrl + N to reset the tool for a new capture. This shortcut will take a screenshot using the last screenshot mode.
6. Choose a Snipping Mode
By pressing Alt + M when the Snipping Tool is open, you can cycle through the different modes of snipping (free-form, rectangular, window, and full-screen snip). After pressing Alt + M, use the arrow keys to select your desired mode and press Enter to activate it.
7. Delay a Snip
For capturing tooltips or other pop-up menus, the Snipping Tool offers a delay feature. Press Alt + D to activate it, then use the arrow keys to choose the delay time (0-5 seconds) before the snip is taken. You may want to reset the timer to 0 for new captures to save time.
8. Copy Snip to Clipboard
To copy the screenshot directly to your clipboard, press Ctrl + C. You can then paste the snip into another program or document without saving the file first.
9. Cancel a Snip
If you’ve initiated a new snip but wish to cancel, you can press the Esc key. This will exit the capture mode and bring you back to the Snipping Tool window.
10. Save a Snip
After capturing your screenshot, press Ctrl + S to open the save dialog box. This shortcut allows you to quickly save your snip to your desired location on your computer. Remember to save the right file format if necessary.
11. Print the snip
Want to print the screenshot you just captured? Just click Ctrl + P and select your printer and printing preferences.
How to Create Snipping Tool Shortcuts On Your Computer
If you perform a quick Google search for the Snipping Tool shortcut, you may find that you can press the Windows logo key + Shift + S. However, this shortcut opens the Snip & Sketch tool, a newer Windows screenshot app.
There simply are no native keyboard shortcuts for launching the Snipping Tool, unless you create them.
12. Keyboard Shortcut
While there’s no default keyboard shortcut to launch the Snipping Tool, you can create one:
- Navigate to the Snipping Tool via the Start Menu.
- Right-click on the Snipping Tool and select “Open file location.”
- Right-click on the Snipping Tool shortcut and select “Properties.”
- In the Shortcut tab, click on the “Shortcut key” box and press the key combination you want to assign (e.g., Ctrl + Alt + S). Windows will automatically add Ctrl + Alt to your chosen key, creating a shortcut for your Snipping App.
- Click “Apply” and then “OK” to save your changes.
13. Pin to Taskbar:
- Find the Snipping Tool through the Start Menu.
- Right-click on it and select “Pin to taskbar.” This allows you to launch the Snipping Tool with a single click from the taskbar.
14. Pin to Start Menu:
- Locate the Snipping Tool in the Start Menu.
- Right-click on it and choose “Pin to Start.” This adds the Snipping Tool to your Start Menu tiles for easy access.
15. Desktop Shortcut:
- Navigate to the Snipping Tool via the Start Menu.
- Right-click on it, select Open File Location, and then “Send to” > “Desktop (create shortcut).” This creates a clickable icon on your desktop to launch the Snipping Tool directly.
How to use a snipping tool for work.
Using a screenshot tool at work can enhance productivity and communication. Here are ten ways to utilize a screenshot tool effectively in a professional setting:
- Documenting Processes:
- Capture step-by-step instructions for tasks or processes to create training materials or user guides. Screenshots can make complex procedures easier to understand.
- Reporting Issues:
- When encountering a software bug or issue, take a screenshot to illustrate the problem clearly for the IT or development team. Annotate the screenshot to highlight specific errors.
- Sharing Visual Feedback:
- Provide feedback on designs, documents, or presentations by capturing screenshots and adding comments or annotations directly on the images.
- Creating Tutorials:
- Develop visual tutorials or how-to guides for colleagues. Screenshots can show each step of a process, making instructions more accessible and less prone to misunderstanding.
- Presenting Data:
- Capture charts, graphs, or other data visualizations to include in reports or presentations. Screenshots can help illustrate key points and trends effectively.
- Collaborating on Projects:
- Share screenshots of work-in-progress with team members for review and input. This is particularly useful for remote teams or when working on visual projects.
- Saving Web Content:
- Capture web pages, articles, or online resources for reference or sharing with colleagues. This is helpful for research or keeping a record of online content that might change over time.
- Enhancing Communication:
- Use screenshots in emails or chat messages to convey information quickly and clearly. Visuals can often explain things more efficiently than text alone.
- Monitoring Competitors:
- Keep track of competitors’ websites, products, or marketing materials by taking screenshots. This can be useful for market research and competitive analysis.
- Recording Meeting Notes:
- Capture important slides or whiteboard content during virtual or in-person meetings. Screenshots can help preserve key information discussed during meetings.
Using a screenshot tool strategically can streamline many work tasks, improve clarity in communication, and enhance overall productivity.
10 Reasons You Should Use Zight Instead Of The Windows Snipping Tool
While the Windows Snipping Tool is a versatile and accessible tool for taking screenshots, Zight (formerly known as CloudApp) offers a more advanced and feature-rich alternative. Here are ten reasons why you should consider using Zight instead of the Windows Snipping Tool:
- Integrated Cloud Storage: Zight automatically saves your captures to the cloud, eliminating the need to manually save screenshots to your local drive. This feature ensures your screenshots are accessible from any device, at any time.
- Video and GIF Recording: Beyond static screenshots, Zight allows you to create video recordings and GIFs. This is especially useful for creating tutorials, presentations, or sharing dynamic content that cannot be captured in a single image.
- Advanced Annotation Tools: Zight provides a more extensive set of annotation tools compared to the Snipping Tool. You can add text, arrows, shapes, and even blur sensitive information, making it easier to create clear and professional-looking annotations.
- Instant Sharing Links: After capturing a screenshot or recording, Zight generates a shareable link instantly. You can easily copy this link and share it via email, chat, or social media without having to attach files or worry about file sizes.
- Team Collaboration: Zight supports team collaboration features, allowing multiple users to view, comment, and collaborate on the same screenshots and videos. This is particularly beneficial for remote teams and collaborative projects.
- Custom Branding: With Zight, you can customize your sharing links and viewer pages with your company’s branding. This creates a more professional and cohesive experience when sharing content with clients or colleagues.
- Advanced Editing Features: Zight includes advanced editing options like cropping, resizing, and applying filters to your captures directly within the app. This reduces the need for additional editing software and streamlines your workflow.
- Notifications and Analytics: Zight offers insights and analytics on your shared content. You can track who views your screenshots or videos and receive notifications when someone interacts with your shared links, providing valuable feedback and engagement metrics.
- Cross-Platform Compatibility: Zight is available on multiple platforms, including Windows, macOS, iOS, and through web browsers. This ensures a consistent and seamless experience across all your devices, unlike the Snipping Tool, which is limited to Windows.
- Enhanced Security: Zight offers advanced security features, such as password protection and expiration dates for shared links. This ensures that your sensitive information remains secure and accessible only to intended recipients.
By opting for Zight, you gain access to a comprehensive set of tools that go beyond basic screenshot capabilities, enhancing your productivity, collaboration, and content-sharing experiences.
Conclusion
You can see how incredibly easy it is to use the Windows Snipping Tool when you use different shortcuts. This screenshot software is reliable to have in your arsenal for those quick screenshots that don’t need a lot of editing.
But if you have reasons not to use native screenshot apps? Why don’t you try a more advanced third-party tool that takes screen capture, annotations, editing, and file sharing to a whole new level?
Wondering which? You guessed right – download Zight today and use these simple shortcuts to capture and finetune screenshots at work. It is the best Windows Snipping Tool alternative for screenshots and workplace collaboration!


