
A Windows laptop is equipped with so many shortcuts that make communication easier. And yet, not many people even know these Windows shortcuts exist, and, as a result, how to use them to improve productivity at work.
Do you need to improve your game? If so, we want to show you how to capture screenshots on Windows using shortcuts only. To start:
Can You Take a Screenshot on Windows Using Shortcuts Only?
The simple answer is yes. You can capture different types of screenshots without opening the screenshot apps manually.
The screenshot apps you get on Windows are Snipping Tool (we’ve discussed Snipping Tool shortcuts here), Snip & Sketch, X-Box Game Bar, and Windows Steps Recorder. For even better results, you can install a third-party screenshot tool like Zight to take screenshots so much faster. Here’s how to take a screenshot on Windows using these tools.
One thing you’ll notice is how, even with these different tools, the screenshot capture process can sometimes take a lot of time you may not always have to spare, especially when communicating at work. So, we recommend using simple keyboard shortcuts that activate the Print Screen function on your computer, without necessarily opening any of the apps.
As you know, a keyboard shortcut is a combination of keys that, when pressed simultaneously, performs a specific task or command within your Windows operating system faster than navigating through the standard interface. These shortcuts enhance productivity by saving time and effort in executing common or repetitive tasks. Some popular keyboard shortcuts perform common tasks like copying (Ctrl + C) and pasting (Ctrl + V).
But there are more shortcuts for taking screenshots on your Windows computer.
How to Take A Screenshot Windows Using Keyboard Shortcuts Only
Want a simple screen capture process? In this section, let’s cover how to use simple keyboard shortcuts to capture your entire screen, active windows, select regions, multiple windows, capture game screenshots, and even delay your capture process.
1. How to Capture a Screenshot of Your Entire Screen On Windows With Keyboard Shortcuts only
Most Windows laptops come with the Print Screen key. It is designed to do just that – print your screen, which is the same as capturing a screenshot. It is the easiest way to take a Windows screenshot since it is a keyboard shortcut itself. Here’s how:
- Locate the Print Screen button (labeled PrtSn) on your keyboard. Press it, and that’s just about it, you have captured a screenshot of your entire screen (including all open windows) that is now copied to your clipboard.
- Open any photo editing software on your computer – Paint, Photoshop, or even a Word document, and click Ctrl + V to paste the screenshot. You can also right-click your mouse and Paste.
- Edit your screenshot, and then save it to your desired folder.
Quick Tip: Some computers with an adaptive keyboard may not have the PrtSn button. Instead, you can press the Fn button with another hotkey designed to emulate Print Screen. For example, on a Lenovo Thinkpad X1 Carbon the 2nd Generation, you will press Fn + T to capture a screenshot and copy it to the keyyboard. Then, follow steps 2 & 3 above to edit and save the capture.
How to Capture and Save Your Screenshot Using a Windows Keyboard Shortcut Only
The process above, while simple, still requires you to open other software and manually save the screenshot to your computer. It’s still a lot of work.
To capture and save a screenshot automatically on Windows without opening photo editing software:
- Press the Windows Key + PrtSn. If your computer has an adaptive keyboard, like Lenovo, press the Windows logo key + Fn + T.
- The screen will dim for a second to indicate a successful capture. Then, your screenshot will be automatically saved to the Pictures Folder, under Screenshots.

2. How to Capture an Active Window with Shortcuts Only
To take a screenshot of only your active window;
- Click the specific window you want to record.
- Press the Alt + PrtScn keyboard shortcut. This will capture the screenshot and copy it to your clipboard.
- Open a Microsoft Word document or photo editing software like Paint or Photoshop and click Ctrl + V to paste the screenshot.
- Edit and save your screenshot.
Quick Tip: If you don’t need to save the screenshot to your computer, you can go ahead and paste it to your recipient. Just press Ctrl + V on any messaging thread including Slack, Trello, Asana, Whatsapp, and more to paste and send.
3. How to Take a Screenshot of A Specific Screen Area using Shortcuts Only
Suppose you have opened a page and only need to capture content on a specific area, however small. You can use this shortcut on your Windows PC:
- Press the Windows + Shift + S buttons simultaneously.
- Your screen will dim to indicate the Snip & Sketch screenshot tool is running.
- At the top, you will see a crosshair menu – select the shape of your screenshot by clicking the icons (rectangle, free form, and full-screen snip) to select your preference.
- Use the mouse pointer to select the specific area you want to capture. Once you let go of the mouse, the screenshot will be taken and copied to your clipboard.
- Click Ctrl + V to share the screenshot on your messaging thread, or open photo editing software or a blank Word document to paste it there. Edit and save, then share!
Pro Tip: You can paste your screenshot on Paint and then annotate. On Paint 3D, you can annotate your screenshot with brushes, text, stickers, and shapes, and crop, rotate, or even use Magic Select to remove unwanted content!
4. How to Capture a Delayed Screenshot with Windows Shortcuts Only
Want to capture a tooltip or a pop-up menu? Then, you know how as soon as you click your mouse that pop-up will be gone. Not to worry, you only need to create a Snipping Tool keyboard shortcut, then take a screenshot as follows:
- Press the Windows logo button or click Start.
- In the Start menu, type Snipping Tool, then click Open File Location. When the location opens, right-click on it and select Properties.
- Go to the Shortcut key box and type a keyboard combination you’ll easily remember for launching the Snipping Tool in the future. For example, you can click Ctrl + Shift + S.
- Click Apply.
Then, to take a delayed screenshot:
- Press the key combination you set above ( for instance, Ctrl + Shift +S) to launch the Sipping Tool.
- To select a delay time, click Alt + D, and use your keyboard arrows and Enter to select your delay time (0-5 seconds).
- Open the popup menu you want to capture within the Delay timeframe you selected. When the timer counts, you will be prompted to select the area you want to capture. If you don’t want to click your mouse, press Enter, and the computer will select the cursor for you – just drag it (without clicking) to select the area to screenshot.
- Then, press the Enter button again to take the screenshot.
5. How to Take A Screenshot of Your Game or App With Shortcuts Only
Some apps or games do not allow you to take screenshots using the keyboard shortcuts we discussed above. But you can use the Game Bar using these fast hotkeys:
- Press Windows + G to open the Game Bar.
- Click the camera icon on the top left and that will capture all the contents of your screen.
- You will get a popup notification to open and start sharing your screenshot.
The More Effective Way: Use Windows Shortcuts To Take Fast Screenshots on Zight
Most native Windows screenshot tools have limited capabilities, especially when editing and annotating captures. And that’s just one of the reasons not to use native screenshot tools.
To improve your screenshot captures, you can get Zight. Click ‘Download Free’ and create an account. Then, download Zight for Windows, and get the Chrome extension.
Here are two ways to capture the best screenshot (with shortcuts):
To use the app, click Alt + Shift + 5, then use your cursor to select the area of the screen to capture. Alternatively, open the Chrome extension and click ‘Screenshot.
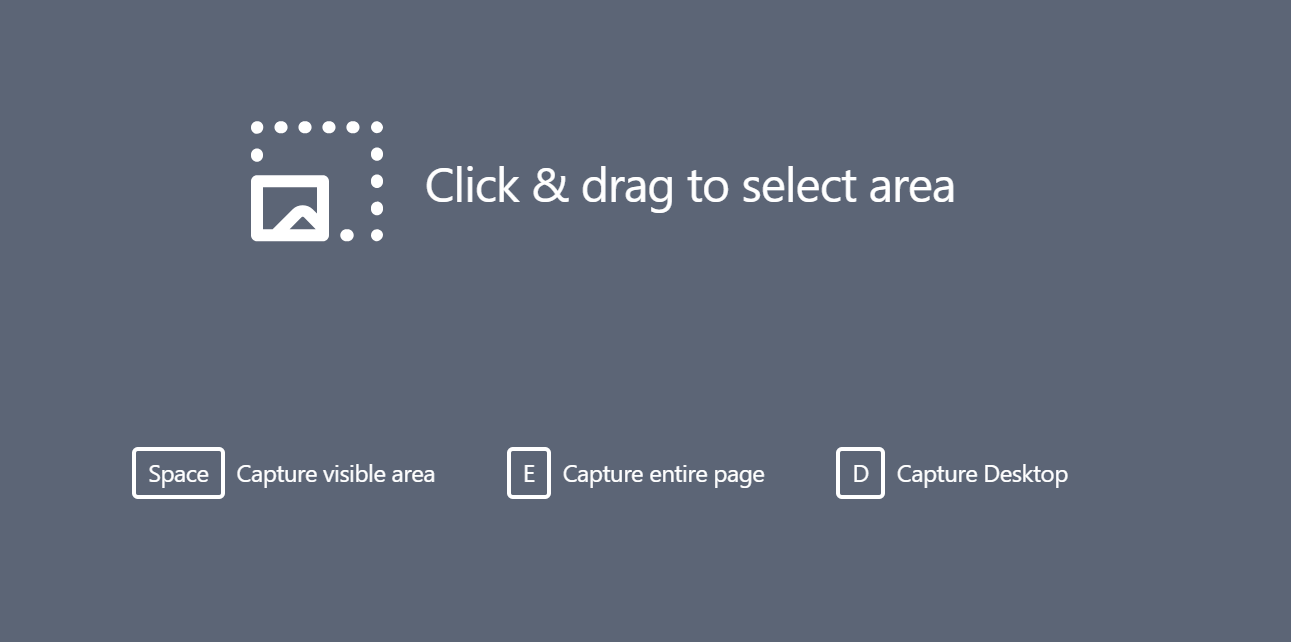
Then, click any of the shortcuts above ( select an area with your mouse; or click S to capture the visible area, E to capture the entire page, and D to select which parts of your desktop to capture. For desktop, you can capture a Chrome Tab, a window, or the entire screen).
When you select your preferences, the software will automatically capture the screen, copy the screenshot link to your clipboard, and open it on your default browser where you can annotate and edit the image.
The best part? This screenshot automatically saves to the cloud and you can always access it from your dashboard. In addition, you don’t need to upload the screenshot when sharing – simply paste its link to your recipient, and they can always view the screenshot as long as they have internet access and that link (even if they don’t use Zight!)
For workplace collaboration, you can encourage your recipient to open a Zight account so they can leave comments, and reactions, and track the screenshot’s data online. This is usually best for better productivity and feedback loops, taking the work out of a rather long and tiring process of downloading, editing, and uploading images.
Wrapping Up
As you can see, it is easy to capture screenshots on your Windows laptop, whether using the native apps or the more effective Zight software. You no longer need to open the apps – you can just press designated Windows keys together and capture a screenshot in seconds.
We hope the seven methods above will make it easy to screenshot. Remember, all you need to do is master these keyboard shortcuts, and you can capture your screen content in just a few steps when the need arises!


