In the age of video content from YouTube to TikTok, it is hard to believe making a video or screen recording doesn’t come naturally for everyone. For some, recording video content may make you nervous. Particularly when you are just getting started, or haven’t done it much in the past.
Personally, I’ve recorded hundreds of videos and screen recordings over the past few years, but every time I still get just a little anxious when it is time to hit record. That’s why our team wanted to put together some of our top tips to help you get set up for a successful screen or video recording.
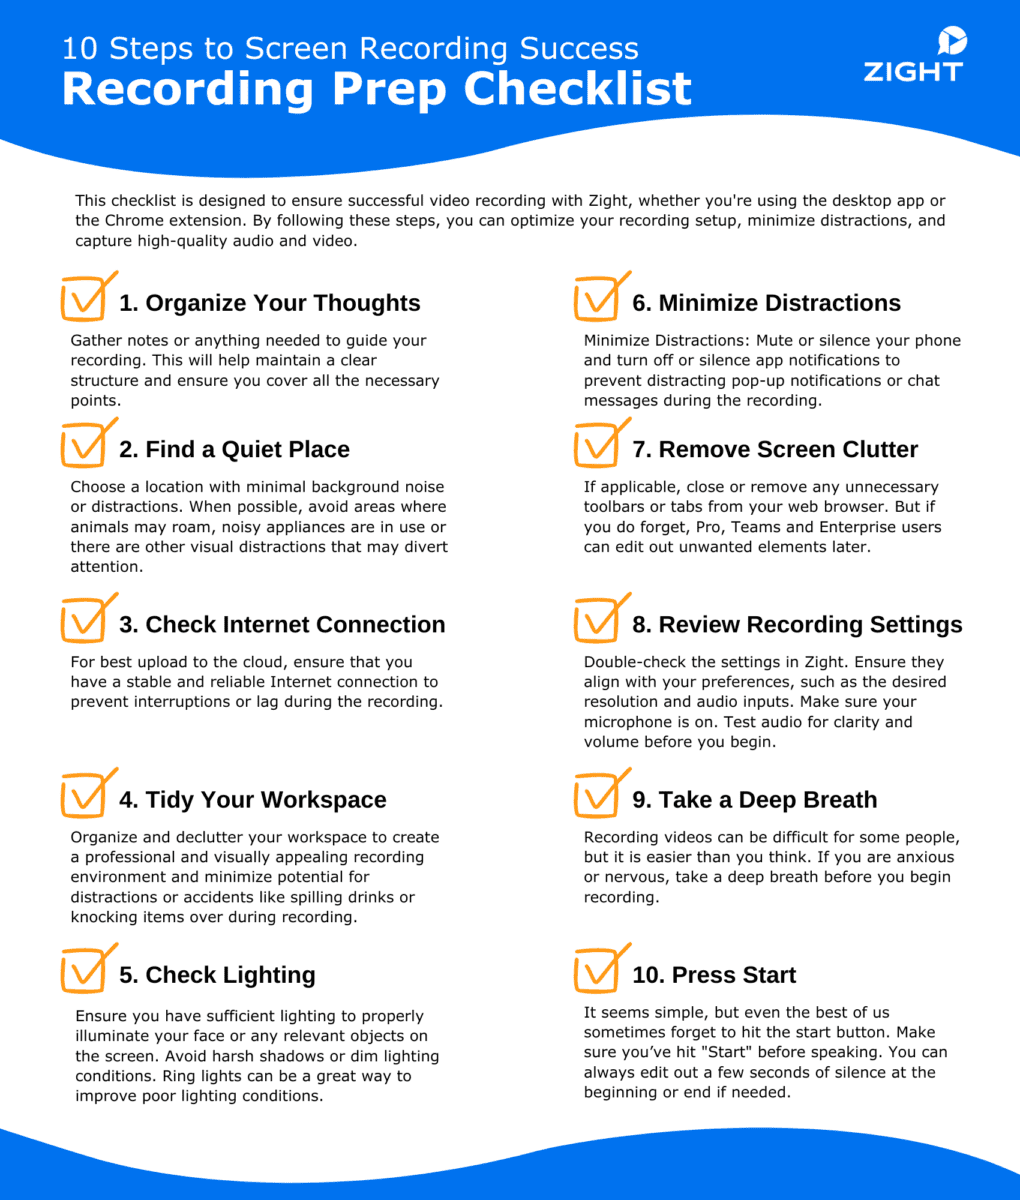
Prep Checklist for Successful Recording
Here are 10 things you can do to ensure a successful video or screen recording:
- Organize your thoughts
- Find a quiet place
- Check internet connectivity
- Tidy up your workspace
- Check your lighting
- Minimize distractions
- Remove screen clutter
- Review recording settings
- Take a deep breath
- Don’t forget to press start
Each of these steps is pretty simple to follow but can make a big difference in saving time while ensuring you make a good impression.
Organize Your Thoughts
You may or may not need much prep work or guidance depending on the kind of video you are making, but it is always good to organize your train of thought before starting any recording. Just a few moments upfront may help you save twice as much time in editing or re-recording later.
Before beginning your video, you will want to make sure you are prepared for what you want to say or show. This will help avoid any stumbling and help you make your point as clear as possible. Gather any notes, bullet points, or other materials you feel you need to help guide you during recording.
Find A Good Location to Record In
Loud locations with lots of background noise or distracting elements can hurt engagement and fail to capture the attention of your intended viewer. While it may not always be available, try and find a quiet place with minimal background noise or distractions.
You may be thinking it is obvious to avoid a noisy coffee shop or busy street, but you may also want to avoid places where animals may roam, noisy appliances are in use, or small children or pets may interrupt. It can be quite frustrating after recording a 20 min company-wide presentation to discover your ceiling fan was constantly clicking or making whooshing noises in the background.
Some things you may not consider distracting in your day-to-day life can be quite distracting to others, so try to keep an eye and ear out and minimize distraction potential with a good location.
Check Your Connectivity
This is more relevant for live broadcasting, but check your internet connectivity if you are broadcasting live or looking to share content right away. One of the benefits of recording with Zight, is that even if you aren’t well connected, your content will be safe until it can be successfully uploaded to your dashboard, but if you are looking to share content right away, make sure you have a strong connection so the instant upload and processing can happen without delay.
Tidy Up Your Workspace
I’m not sure about you, but I tend to use a lot of gesturing when I talk. A cluttered workspace can result in knocking things over or even an unfortunate beverage spill when you are trying to record.
Cleaning up your workspace helps avoid mid-sentence accidents during recording and can help you focus more on what you are trying to accomplish by eliminating distractions around you.
Check Your Lighting
There is already a bit of information out there about the importance of good lighting when recording. Lighting can make or break our confidence if we are recording using our cam.
Ensure you have sufficient lighting to properly illuminate your face or any relevant objects on the screen. Avoid harsh shadows or dim lighting conditions. Ring lights can be a great way to improve poor lighting conditions no matter how much space you have to work with.
Minimize Distractions
Attention spans are getting shorter and shorter these days. If you are recording, you need to stay focused so you can provide a clear message to your intended viewer. Remember to mute or silence your phone and turn off or silence app notifications to prevent distracting pop-up notifications or chat messages during the recording.
Remove Screen Clutter
Just like clearing up your physical workspace. You will want to clean up your digital workspace. If applicable, close or remove any unnecessary toolbars or tabs from your web browser. But if you do forget, don’t worry. Zight Pro, Teams, and Enterprise plan users can edit out unwanted elements later.
Review Audio and Video Settings
It’s no fun to record a lengthy video only to realize it was done in the wrong format or you never unmuted your mic. Double-check the settings to ensure that they align with your recording requirements, such as the desired resolution and audio inputs. Make sure your microphone is on and test audio for clarity and volume before you begin to avoid the need to re-record.
Take A Deep Breath
Recording videos can be difficult for some people. You may feel nervous before you begin recording. The great thing about making a Zight recording is you can set your own pace. Before you begin, take a deep breath and remember it doesn’t have to be perfect, if something goes wrong, you can always do another take or re-record. Video editing is there to help if you need it!
Remember to Press ‘Start‘
Learning how to record your screen is easy. But it is the small things that can make a big difference. Even the best of us may forget to hit the start button sometimes. (OK, more times than we would like to admit.)
This is probably the most important step of all. Make sure you push the ‘Start’ button before you start speaking. It’s even a good idea to give yourself a few seconds after the action countdown before you start speaking if needed. Remember, you can always edit out a few seconds of silence when at the beginning or end if needed, but if you started speaking before the recording started, there isn’t much you can do save that take and will have to start over.
We hope you find this list helpful to ensure successful video recording with Zight or any other video recording tool. By following these steps, you can optimize your recording setup, minimize distractions, and capture high-quality audio and video.
A pdf version of this checklist is also available for you to download here: 10 Steps to Screen Recording Success.