YouTube is the second largest search engine after Google, so you have great potential to attract viewers and, subsequently, customers to your business. But, there are many factors that contribute to your video ranking well. It is not all about recording and publishing good YouTube video content – you must persuade people to click on your video.
So, what’s the first thing people see after you publish your video? It sure is the YouTube thumbnail image! Nail this, and more people will watch and engage with your content. Read on as we tell you what a YouTube thumbnail image is, the best size, and the best practices to help you create one!
But first!
How To Create A YouTube Video With Zight
You need YouTube thumbnails to enhance your video’s discoverability, but they won’t do much good if they don’t back the best video content. So, you must create a superb video first, then design the best YouTube thumbnail to accompany it.
Guess what? You don’t need a Hollywood budget to create YouTube videos that grab attention. With Zight, you can make professional-quality videos and thumbnails without breaking the bank!
Let’s show you how to create a good YouTube video in a few steps:
- Prepare your YouTube videos-research your topic, identify your audience, and create a script. Here’s how to come up with a good video script!
- Open a Zight account, then download and install the app to your computer. You can find a Zight app for Mac, Windows, and iOS. You can also get the Chrome extension to ease your workflow!
- Open your Zight app and navigate to Record. Here, you can create three types of videos – you can record a video of your screen, which is ideal for demo software videos. You can also record a Screen & Cam to show your screen and appear on a webcam overlay. This is your best preference for explainers and training videos where you must show viewers how to use your software or perform tasks like troubleshooting. You can also record a presentation or pre-meeting with the Cam Only preference. This option will only record your webcam.
- After selecting your screen or webcam preferences, you can also choose between a full-screen video or select the region of your screen to record. In addition, you can choose between a video or GIF. The former will be longer and you can use the microphone and camera, while the latter is a minute long and doesn’t use the microphone.
- When you select all your preferences, hit the Start Recording button and wait out the 3-second timer. After, start recording your video according to your script, and annotate as you go. Need a break? Pause our recording and resume when ready.
- Once you finish recording, the video will upload to your Zight cloud account, and the link will open on your browser. Follow the link and edit your video further with Zight’s video editing tools. You can trim, split and merge, fine-tune, add custom branding, and much more.
- After editing, download the video to your computer storage, and add more edits like an intro, lower thirds, background music, and an outro. Note; this is when to create a YouTube thumbnail (more on how to use Zight below!).
- You can now upload your video. Go to your YouTube channel, click the upload button, and upload the video from your computer storage. Don’t forget to create the best title, description, and tags – use the best keywords and hashtags for your video to rank high.
- Now, add end screens and cards to promote other videos on your channel, select the video’s visibility, and publish. Occasionally optimize the video’s title, description, tags, and thumbnails, and reply to comments to improve engagement.
Talking about optimizing your YouTube video – thumbnails are a vital part of this. So, what are they even, and how and where do you add them to your video? Do they have ideal sizes? Let’s discuss this below!
What Is A YouTube Thumbnail?
YouTube thumbnails are the first things you see on a YouTube video. They are small, clickable images that serve as visual previews of what the video is about and can entice viewers to click and watch the entire video.
A compelling thumbnail can drastically improve your click-through rate (CTR), a key metric in YouTube’s algorithm, especially during the first hours after publishing.
The difference between a subpar and excellent thumbnail is that the latter – especially a custom thumbnail image – will entice viewers to click through, thereby increasing your video’s chances of being ranked higher in search results and distributed through the ‘Recommended Videos’ feed. A higher CTR can make the difference between your video being a hit or fading into obscurity!
What Is The Best YouTube Thumbnail Size?
A YouTube thumbnail is vital in helping your video rank high and get watched by your target audience. But it will only achieve that when you understand and obey its technical aspects. One vital aspect is the size in pixels, width, and aspect ratio. Here are some pointers:
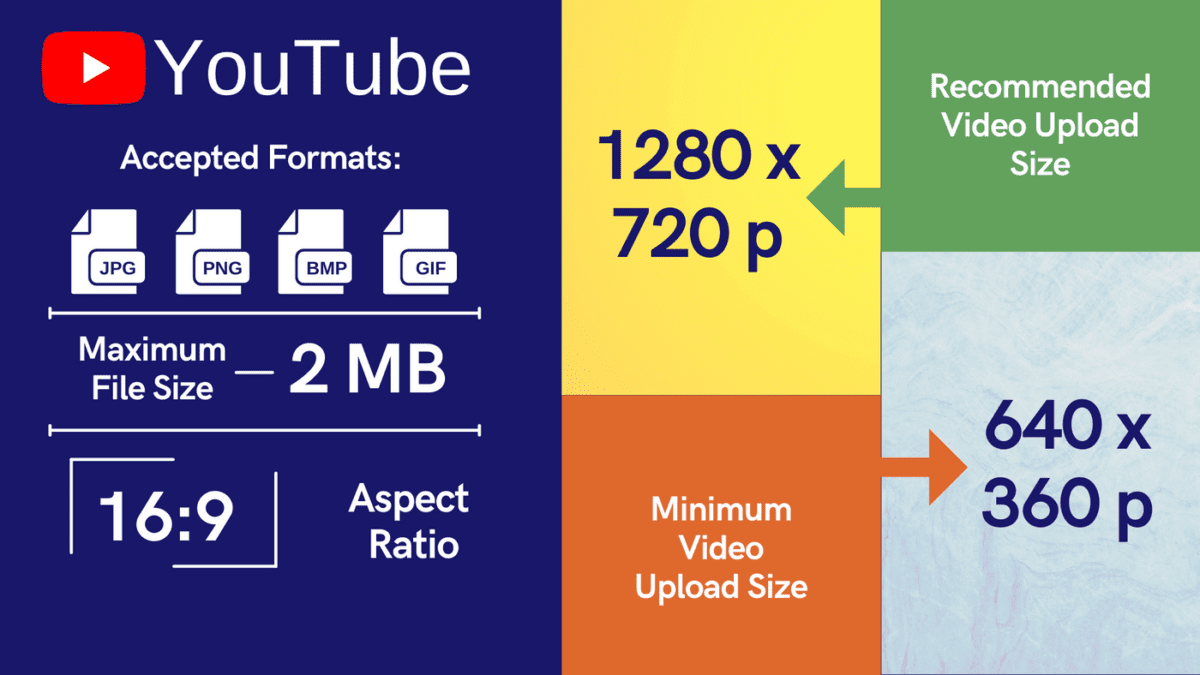
- Aim for an ideal resolution of 1280 x 720 pixels. This will ensure your thumbnail appears clear and sharp and enhance its clickability
- The minimum width should be 640 pixels. Anything less and YouTube won’t allow you to use the image as a thumbnail image
- Use an aspect ratio of 16:9. It is the most commonly used ratio in YouTube players and previews and will ensure your thumbnail fits perfectly and looks great across all devices
Besides these, you also want to consider other technical aspects of a YouTube thumbnail like file types and sizes. For instance, the maximum file size is 2MB – so you want to find the sweet spot between high resolution and file size. As for the file types, YouTube accepts;
- .JPG
- .GIF
- .BMP
- .PNG
Armed with this information, you’re well on your way to creating thumbnails that catch the eye and meet YouTube’s technical criteria. So, now that you know the best YouTube thumbnail size, how do you make the best one for your video?

Best Practices for Creating A YouTube Thumbnail Image
Before publishing your YouTube videos, ensure you also create a YouTube thumbnail that adheres to technical guidelines and – most importantly – previews your entire video to attract viewers. Here are some tips you can use:
1. Use a Still Image From The Video
One of the best practices for creating a custom YouTube thumbnail is using a still image from the video. This approach offers a genuine preview of what viewers can expect, making your content more authentic and relatable.
A still image can capture a pivotal moment or emotion that encapsulates the essence of your video. It’s a natural way to draw viewers in, offering an intriguing snapshot directly related to the content they are about to watch.
The best part about using a still image is it’s easy to create. All you need is a video editing software like Zight. Here’s how:
You only need to play the video you just created and pause it on a still you like. Ensure you play the video on full screen, and make this a still that captures the message and emotion of your video. Then, use these Zight shortcuts to capture the screenshot:
- Mac: CMD + SHFT + 5
- Windows: Alt + Shift + 5
You can then utilize Zight’s annotation tools to add any text or graphic elements you might need. This way, you get a high-quality image directly related to your video and have the flexibility to enhance it further, making your thumbnail even more compelling.
2. Grab Attention with Your YouTube Thumbnail Image
When creating a YouTube thumbnail, you can only grab attention with an image that has vibrant colors. So, whether you are using a still image like we discussed above, or relying on thumbnail creators, you want to ensure the thumbnail features bright and contrasting colors that will stand out on YouTube. Remember, the image should be sharp, clear, and focused on your video’s main subject.
Then, use Zight to annotate your image. This is where elements like text become impactful. An image alone won’t tell the viewer what the video is all about – you want to emphasize the point with a headline that succinctly conveys your video’s main message. Make sure it’s legible and impactful.
Besides text, you can also use other features like arrows, emojis, and more to grab attention. When creating the YouTube thumbnail, create a visual hierarchy by arranging elements to guide the viewer’s eye. For instance, use a high-quality image, then put a headline at the bottom, and use elements like arrows to guide the viewer’s gaze.
However, even as you want to grab attention, ensure the YouTube thumbnail design looks clean. So, keep the annotation elements minimalistic to avoid overcrowding the image.
3. Keep the YouTube Thumbnail Relevant
A relevant thumbnail serves as an authentic visual summary of your video, setting accurate expectations for potential viewers. It should encapsulate your video’s essence or main point in a single frame. This could be a pivotal moment, a key visual, or even text that complements the video title.
Viewers are more likely to click on your video when the thumbnail aligns with the title and the content they are about to watch. This improves your click-through rate and positively impacts viewer retention and engagement, which are crucial metrics for YouTube rankings.
4. Use Your Logo
You also want to ensure your YouTube thumbnail images show your custom branding. A logo is a smart way to boost brand awareness and add a professional touch to your YouTube videos.
But how do you go about it? The key is placement. Your logo should be visible but not overwhelming, complementing rather than dominating the thumbnail’s overall design. As you did with the YouTube thumbnail size, the logo should be identifiable but not so large that it overwhelms the other visual elements. Also, consider a corner placement, typically the bottom right or top left, so the logo does not interfere with the headline or image.
You also want to maintain consistency with the placement. So, whatever corner you choose for your logo, ensure you do the same for other YouTube thumbnails.
5. Be Consistent
Consistency is key when it comes to YouTube thumbnails. It enhances your brand image and makes your channel more recognizable to your audience. Many AI logo creators and business name generators offer a full set of branding images that make maintaining consistency across platforms easier. Here’s how you can achieve consistency across all your YouTube thumbnails:
- Uniform style: Stick to a specific style or theme that aligns with your brand. This could be a particular color scheme, font, or layout. Consistency in style makes your YouTube thumbnails instantly recognizable among a sea of videos. This is easier to achieve if you are using image editing tools to get the job done, especially those with automation baked in. The latest software in this space can edit images in batches, applying a uniform style to each thumbnail easily
- Logo placement: As discussed earlier, placing your logo in a consistent location on all thumbnails can significantly boost brand recognition. Choose a corner or position that doesn’t interfere with other visual elements and stick to it
- Text formatting: If you’re using text in your thumbnails, keep the font style, size, and color consistent. This adds a level of professionalism and makes your custom YouTube thumbnails more visually appealing
- Image quality: Always use high-quality images for your YouTube thumbnail. Poor-quality thumbnails can detract from the credibility of your YouTube videos. Ensure your thumbnail meets the platform’s requirements to avoid blurriness on larger screens.
- Emotional tone: If your videos generally follow a certain mood or tone, let that be reflected in your thumbnails. For example, if your channel is about comedy, light-hearted and funny YouTube thumbnails would be more appropriate.
6. Keep Testing Your YouTube Thumbnails
It’s not enough to create a visually appealing thumbnail; you need to ensure that it effectively drives clicks and engagement. Here’s how to test your custom thumbnails over time:
- A/B testing: This involves creating two different thumbnails for the same video and alternating them to see which one performs better. Monitor metrics like click-through-rate (CTR), watch time, and viewer engagement to determine the winner
- First-Hour metrics: Your video’s performance in its first hour on YouTube is a significant ranking factor. Pay close attention to the CTR during this period to gauge the effectiveness of your thumbnail
- Study your competitors: Study YouTube thumbnail images from channels similar to yours. What are they doing right or wrong? Use these insights to refine your own thumbnails

Five bonus tips to further boost your YouTube success:
1. Leverage YouTube Analytics
Use YouTube Analytics to understand your audience better and refine your content strategy. Track metrics such as watch time, audience retention, and traffic sources. Identify which videos perform best and analyze why they succeed. Look for patterns in viewer behavior and adjust your content accordingly to meet their preferences and improve engagement.
2. Create Engaging Titles and Descriptions
Your video title and description are crucial for both search engine optimization (SEO) and attracting viewers. Ensure your title is compelling, includes relevant keywords, and accurately reflects the content. In the description, provide a detailed overview of the video, include keywords, and add links to related content or your social media. Utilize timestamps for longer videos to make it easier for viewers to navigate to sections they’re interested in.
3. Use Playlists to Organize Content
Organize your videos into playlists based on themes or topics. Playlists not only make it easier for viewers to find related content but also increase watch time as viewers are likely to continue watching videos within the same playlist. Optimize your playlist titles and descriptions with relevant keywords to improve discoverability.
4. Engage with Your Audience
Engagement goes beyond just replying to comments. Create a community by asking questions in your videos and encouraging viewers to comment. Host live streams to interact in real-time with your audience. Use YouTube’s Community tab to post updates, polls, and behind-the-scenes content. Regular engagement helps build a loyal audience and boosts your video’s algorithmic favorability.
5. Collaborate with Other YouTubers
Collaborations can expose your channel to a broader audience. Partner with other YouTubers who have a similar or complementary audience. This can involve guest appearances, co-created videos, or shout-outs. Collaborations can provide fresh content ideas and enhance credibility by associating with other respected creators in your niche.
By incorporating these additional strategies, you can further optimize your YouTube presence, attract more viewers, and build a strong, engaged community around your content.

10 ways you can use Zight to enhance your YouTube channel:
Zight (formerly CloudApp) is a powerful tool for content creators, particularly those managing YouTube channels.
- Screen Recording and Tutorials: Use Zight to record your screen and create detailed tutorials. This is especially useful for tech, software, or gaming channels where step-by-step guides are necessary.
- Annotations and Comments: Add annotations and comments to your screen recordings to highlight important sections or provide additional context. This can make your videos more informative and engaging.
- GIF Creation: Create GIFs from your videos or screen recordings to use in your social media promotions, making your content more shareable and eye-catching.
- Quick Edits: Perform quick edits on your videos directly within Zight. You can trim, crop, and annotate your recordings before uploading them to YouTube.
- Collaboration: Share your video drafts with collaborators or team members easily. They can view and provide feedback directly on the video, streamlining the review process.
- Thumbnails and Graphics: Use Zight to capture and edit screenshots for creating custom thumbnails. You can add text, borders, and other elements to make your thumbnails more attractive.
- Feedback Collection: Collect feedback on your video drafts by sharing Zight links with your audience or team. They can comment on specific parts of the video, helping you refine your content.
- Customer Support and Engagement: Create personalized video responses for your audience’s questions or comments. This can help build a stronger connection with your viewers.
- Video Annotations and Overlays: Use Zight’s annotation tools to add overlays, callouts, and highlights to your videos, making complex information easier to understand.
- Archiving and Organization: Organize your video content in Zight’s cloud storage. You can easily archive your recordings, drafts, and final videos, making it simpler to manage your content library.
By integrating Zight into your YouTube workflow, you can enhance the quality of your content, improve collaboration, and engage more effectively with your audience.
Wrapping Up
There you go – you now know the perfect YouTube thumbnail size to use for your videos, along with the best practices for creating an eye-catching and effective thumbnail image. We have also seen why a YouTube thumbnail is the secret weapon to ranking your YouTube videos high. So, the next time you create a video, accompany it with a powerful thumbnail image to grab attention and boost engagement.
Don’t know how to start? you can start by capturing a still image from your YouTube video, then annotate it with Zight to add text, arrows, and logos. Sign up now to get started!


