Screen recordings have become increasingly popular because they offer a convenient way to share processes with team members and demonstrate how things operate. Imagine guiding your colleagues through complex processes or showcasing your latest gaming victories to friends with just a few clicks.
From capturing important presentations to sharing epic gaming moments, the ability to record your screen opens up endless opportunities for communication, collaboration, and creativity. Let’s look at how to start and stop a screen recording on your Chromebook.
1. Zight Screen Recorder- Best Method
Zight is a productivity tool that also functions as a Chrome extension, seamlessly integrating into your Chromebook workflows for effortless screen recording. This cutting-edge browser extension brings you all the essential screen recording tools you require, conveniently accessible with just a few clicks, eliminating the need for bulky software installations.
With its intuitive interface and advanced features, Zight offers users more control and customization options than the built-in screen recording feature. It allows users to easily capture their entire screen, specific application windows, or custom areas.
With the Chrome Extension, you can easily capture screenshots, record videos and GIFs (here’s how to record a GIF), organize them into collections, and share your content. Let’s get into a step-by-step guide on screen recording on your Chromebook using Zight.
Step 1: Install Zight
If you haven’t already, sign up for Zight (enjoy up to 90-second recordings for FREE) and install the Chrome extension on your Chromebook.
- To get started, click here to navigate to Zight on the Chrome web store
- Click ‘Add to Chrome’
- Click ‘Install Extension’
- A new window will open. Click ‘add to chrome’ and then select ‘add extension’ in the pop-up window
- From here, your web dashboard will open up (if you’re logged in)
- You may also opt to ‘pin’ the Zight extension to your taskbar for even quicker access
Step 2: Launch Zight
Once the web dashboard is open, you will see “New Recording“ on its right.
Click on New Recording, and a small window will pop up of “Record Screen as Video“

If your Zight Chrome Extension is not screen recording, the app’s permissions have not been enabled. For the Zight extension, allow permissions for your microphone and camera.
Follow the steps below so you can see step-by-step how to access your Chrome extension permissions:
- Open your Chrome Browser
- Go to your ‘Settings’ by clicking on the three dots in the upper right-hand corner
- Click on the ‘Privacy and Security’ tab
- Go to ‘Cookies and site permissions’ and scroll down until you see the ‘Camera’ option click on it
- Select the arrow next to Zight; from there, you can allow your permissions.
- Once your microphone and camera are enabled, you can record on your Zight extension!
Step 3: Choose Your Screen Recording Options
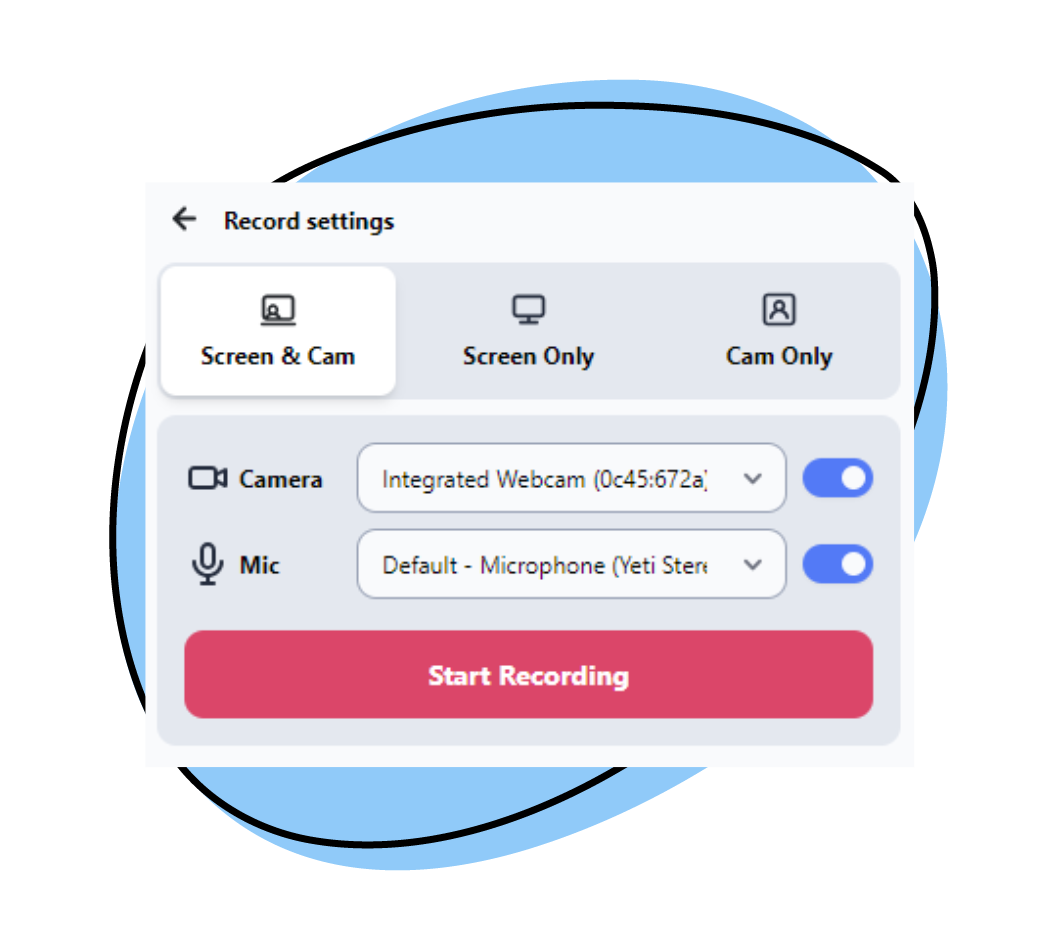
Navigate to the Record menu and pick your preferences for screen recording. You have the flexibility to:
- Record your entire screen
- Record a specific part of your screen, such as the Windows tab
Zight will ask for permission to capture audio. Choose the appropriate audio source you want to record:
- “Tab Audio” captures audio from the current tab
- “Microphone” captures audio from your device’s microphone
- “No Audio” records without sound. Make your selection and click on the “Share” button.
Videos recorded through the Zight extension can reach up to 720p (1280×720 pixels) in quality. However, this can differ based on certain factors specific to your Chromebook, such as your laptop’s screen resolution, the strength of your internet connection, and the quality of your webcam.
Step 4: Start Recording
After setting your preferences, hit the “Start recording” button. You’ll see a countdown from 3-2-1 before your screen recording kicks off. Keep an eye on the recording timer in the toolbar, where you’ll also find options to annotate, pause, or finish your recording.
Step 5: Finish & Edit your Screen Recording
Once you’re done, click “Finish,” and your recording will automatically process. Zight will automatically save the video recording as a video file. A preview of the recorded video will appear in the Zight popup window.
Zight has built-in video editing features, allowing you to edit screen recordings by trimming or cropping.
Step 6: Easily Share via URL
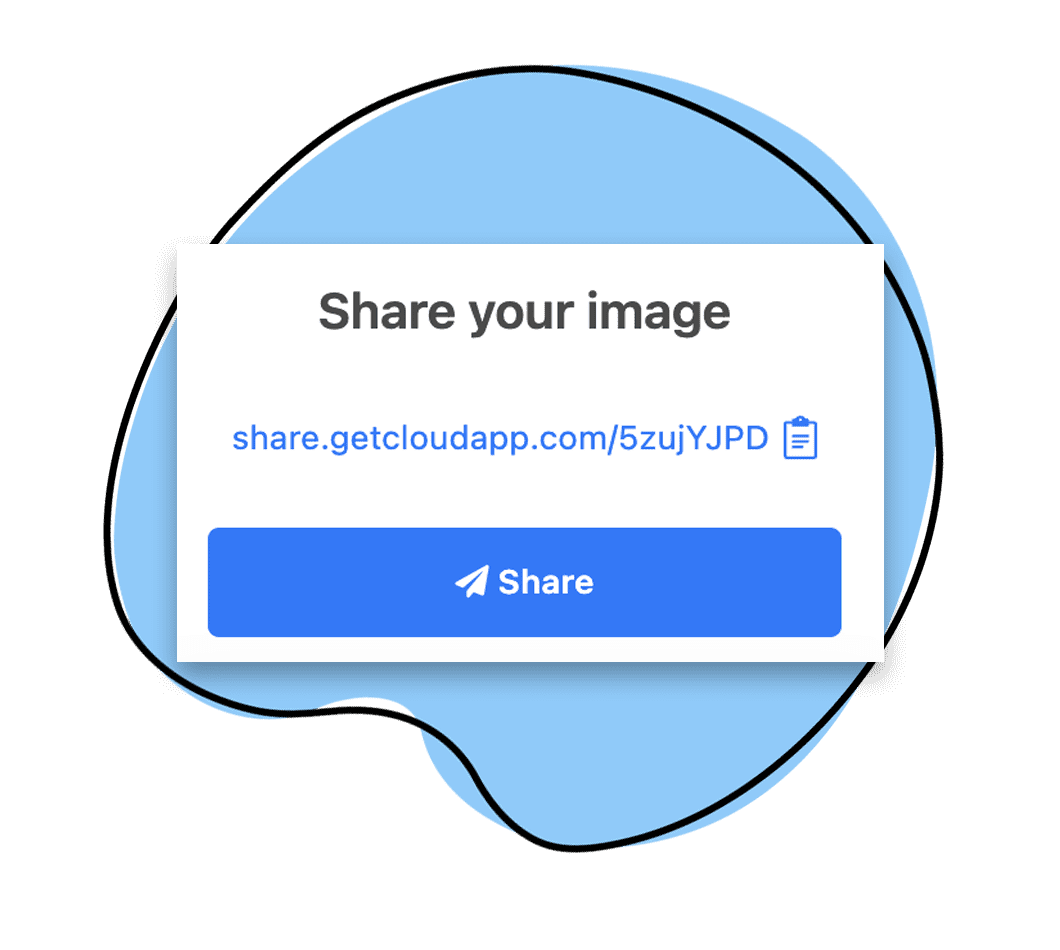
To save the video, click the “Save” button in the Zight popup. You can choose the destination folder and provide a name for the video file. Your webcam recording is now accessible in your Zight files.
Share your video by clicking the “Share” button, copying the autogenerated link to send it to anyone, dragging and dropping screen recordings into emails and chat apps, or sharing your video directly to platforms like Trello, Asana, and Slack or embedding it in an email.
With Zight, you can capture up to 25 static screenshots or videos, each with a maximum duration of 90 seconds. Even in its free version, Zight maintains video quality up to 720p, which is respectable for a free recording tool. Boasting over 4 million users, Zight has certainly earned its approval worldwide as one of the best screen recording tools.
2. Built-in Screen Recording Tool
Google implemented a built-in screen recording feature in Chrome OS, simplifying the video recording of your Chromebook screen. This native tool enables you to record your screen with audio seamlessly, eliminating the necessity for extra software or browser extensions.
The Screen Capture tool is one of the default screen recording tools available on Chrome OS 89 or newer versions. The built-in screen recorder provides basic recording functionality and is ideal for users who prefer a straightforward approach to screen recording. Here’s a guide on how to use the built-in screen recorder on your Chromebook:
Step 1: Click on the right corner of the taskbar, where you will find the Wi-Fi, Battery, and Time options. Click on this area to open a menu with various options.
Step 2: In the “Quick Settings panel” pop-up window that shows up, click on the “Screen capture” option at the bottom middle of your screen. Look for and select “Screen capture.” Alternatively, you can access the capture tool by pressing Ctrl + Alt + Show Windows. After opening the tool, take a moment to explore its features.
Step 3: Switch between screen capture and recording modes by toggling the option at the bottom left corner of the toolbar, ensuring you’re prepared to begin screen recording whenever needed.
Locate and click on the screen record icon, the second icon on the left. You’ll then be presented with three recording options:
- Fullscreen– Captures the entire screen
- Partial screen– Records a specific area by clicking and dragging the cursor
- Window– Record a particular window, such as a Google Chrome tab
Step 4: After choosing one of the above recording options, you can start recording by clicking the Record button. To screen record with the microphone, tap the Settings icon toward the right corner of this toolbar to display a “Record microphone” toggle switch option for your videos.
Step 5: To stop the recording, click the red Stop icon in the bottom right corner of the taskbar, next to Wi-Fi, Battery, and Time. After completing the screen recording, you’ll receive a notification, and by default, the system will save the recording in the Downloads folder. However, if you wish to share or view your screen recording immediately, you can double-click the file saved in the WEBM format.
Although using the screen recording feature on Chromebook is simple, it saves recordings in WEBM format, and sharing them with other Chromebook users is seamless—they can view them without issues. Alternatively, you can convert the videos to MP4 or suggest the other user install VLC, a program capable of playing WEBM files. VLC is versatile, supports various file formats, and is accessible as an open-source download.
3. Screen Record on Chromebook Using Screencast
If you’re using Chrome OS version 103 or higher, you’re in luck! Your Chromebook comes with a handy tool called the Screencast app, which won’t cost you a dime. It’s perfect when you need to record your screen and add a few quick annotations. Here’s how to make the most of it:
Step 1: Open the app launcher and find the Screencast application. Look for the ‘+ New Screencast’ option at the top left corner, and you’ll see the toolbar at the bottom of your screen.
Step 2: Decide how to record: Full Screen, Partial Area, or a Specific Window. Then, remember to click on the ‘Settings’ icon to toggle the ‘Microphone’ to record audio.
Step 3: Once your settings are proper, hit the red ‘Record’ icon to start your screen recording adventure. And hey, if you feel like adding some flair, you can add some annotations with the trusty ‘Pen’ icon.
Step 4: After recording your video project, tap the red ‘Stop’ button to finish. You can then save your creation within the Screencast app or share it with the world via a handy link.
4. Using the Keyboard
You can use this method on any Chromebook or ChromeOS desktop with its own keyboard.
Step 1: To take a screenshot on your Chromebook, press the dedicated Screenshot key located on the function row of your keyboard. You can easily identify this key by the camera icon printed on it.
Step 2: Once you’re ready to switch to screen recording mode, press the Screen Record icon in ChromeOS’s screen recording toolbar, which typically appears at the bottom of your screen.
Step 3: Select Screen Record. When you click the video camera icon, you’ll be presented with three screen recording options, all conveniently located in the center of the screen capture toolbar:
- Record full screen: Capture everything visible on your screen in one go.
- Record partial screen: Record only a specific portion of your screen by dragging a box around the desired area.
- Record window: Record just the current browser tab or application window you select.
Before the screen recording begins, a brief countdown will let you prepare.
Your microphone is not activated by default for recording. To enable it, click on Settings and then select Record Microphone.
Step 4: To end your recording session, click Stop screen recording, which can be found in the ChromeOS taskbar.
5. Using Keyboard Shortcuts
The keyboard shortcut method is an excellent way to swiftly capture the screen you need. However, if you wish to customize the screen size during recording, you’ll need to follow a few additional steps:
Step 1: Press Ctrl + Shift + Show all Windows (the rectangular icon typically found on the right side of your Chromebook keyboard, featuring two vertical lines).
Note: If you can’t locate the ‘Show all Windows’ option on your Chromebook keyboard, press Ctrl + Shift + F5 to initiate the recording directly.
Step 2: In the menu at the bottom of the toolbar, click the ‘Screen Record’ option.
Step 3: Choose your preferred screen recording option: Full Screen, Partial Screen, or Window — and the screen recording will commence automatically.
Step 4: Once you have finished recording, click the ‘Stop Recording’ icon to conclude the ongoing screen recording.
Chrome OS will save the screen recording to your download folder by default. Additionally, a notification will appear after you’ve completed the screen recording- click it to open the recording on your Chromebook.
Conclusion on How to Screen Record on Chromebook
Mastering the art of screen recording on your Chromebook opens up a world of possibilities, whether you’re a student, professional, or creative enthusiast.
However, if you’re looking for a screen recording solution that combines ease of use with powerful features, look no further than Zight. With its intuitive Chrome extension, Zight makes screen recording a breeze, seamlessly integrating into your Chrome workflows. Whether you’re recording tutorials, gaming sessions, or virtual meetings, Zight has robust features.
Zight is the perfect alternative to Loom, Screenpal, and Gyazo, among other popular screen recording tools. So why settle for anything less when you can elevate your screen recording experience with Zight? Say goodbye to complicated setups and hello to effortless screen recording with Zight’s Chrome extension.


