
You probably have heard of Discord, but are you aware of Discord’s secret weapon? Screen sharing! While Discord is widely recognized as a go-to platform for gamers with over 250 million users worldwide, its powerful features can revolutionize your business too.
Discord’s screen share function is a game-changer whether you’re hosting virtual meetings, delivering presentations, or collaborating with your team. The screen sharing will skyrocket your productivity and enhance collaboration within your business.
In this post, you’ll learn how to use the Discord screen share function to improve productivity and collaboration. Let’s dive in!
What Is Discord?
There are over 2.6 billion gamers worldwide, many playing and communicating on Discord. A gamer for gamers created Discord. Now, it’s shedding its gamers-only brand and becoming as inclusive as possible for anyone who wants a “place to talk .” Which includes you and your team members.
It’s a popular alternative to communication apps like Slack or Microsoft Teams. Discord’s best part is that all its base features are completely free. Create an account, build a server, and grow your server full of users, text chat, voice chat, video chat, and screen share without paying for anything.
You can upgrade your account to Discord Nitro to enhance your server’s video and live stream functions and limits, but for most business uses, this isn’t necessary.
What are Its Unique Features?
- One of Discord’s best features is its incredibly high server limits. A single server can support up to 250,000 members and 25,000 simultaneous online members. This is more than enough for the majority of businesses using the platform.
- Each server can host up to 500 different channels to keep hundreds of conversations well-organized by various topics.
- If you’re concerned about security and privacy when discussing sensitive information, Discord protects your communications with two-factor authentication (2FA) and a specially-designed client-server architecture that guards your IP from being exposed. Users logging in from a different IP must be verified by email, and other users can only join your server if you send them an invite link.
- Discord offers a private and safe message board, chat room, and VoIP chatting system.
What Are the Benefits of Screen Sharing?
Screen sharing in your business offers many benefits. Here’s a short list of why you should use the screen-sharing functionality in the workplace.
1. Improve productivity during meetings
Video conferencing meetings have been rising for a long time and are being adopted more today than ever.
This streamlines communication, no longer needing to gather team members in a physical conference room – everyone can join the meeting from wherever they are.
But instead of sending out PowerPoint presentations for everyone to download and follow along, you can share your screen and present the PowerPoint to your team.
2. Receive Better Technical Support
You need to contact technical support when applications aren’t working, or the software is glitchy. If you’re working remotely, this can cause significant issues in resolving the problem.
Rather than describing the problem over the phone or email, you can share your computer screen with your IT tech and allow them to see the issue themselves, making it much easier to solve.
3. Strengthen Your Pitch to Clients
For example, if you’re running a remote meeting with a client to pitch them on your SaaS product, it’s better to show them the product in action rather than relying on static descriptions of how-to guides with the product.
You can demonstrate how it works on your computer, giving them a vision of how it will work for them. This creates a deeper level of trust in you and your product.
How to Share Your Screen in a Discord Server
The screen-sharing feature on Discord was released back in August 2017. It allows users on your Discord server to view and engage with your screen.
You and nine coworkers can simultaneously conduct a live video chat and share your desktop screens.
Below, we’ll walk you through setting up Discord to manage this feature and activating screen share.
First, we’ll look at the basic settings for voice and video that you should set to take advantage of Discord’s features, especially if you want to speak over your screen share or simultaneously share your screen while on a live video chat.
1. Enable Your Video Settings
- First, you must enable the proper video settings to prepare the application for screen sharing.
- Navigate to the lower left-hand part of the app (or screen if you’re using it in your web browser) and click on the little cog icon located slightly to the right of your username.
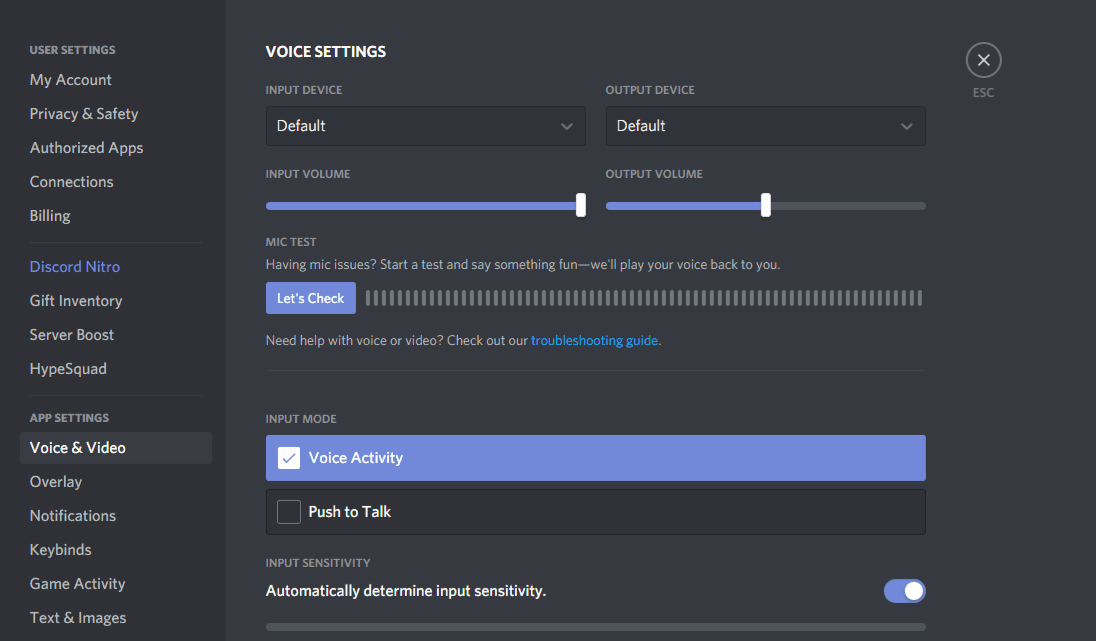
- That will take you to a list of different settings you can adjust. Select “Voice and Video” from the list to adjust these settings.
- From here, you can select your “input device,” which would be the headphones or speakers you’re using. You can leave this as default if you’re using your PC’s built-in speakers.
- Your “input device” is the microphone you’re using. Again, if you use your PC’s built-in mic, leave it to default.
- Once you’ve chosen your input and output, you should perfect a test to ensure everything works properly by pressing the “Let’s Check” button in blue.
- Scrolling down, you’ll see the video settings where you can select your video camera. If your PC has a built-in webcam, leave it on “Integrated Camera.”
- Just like with the sound, you’ll want to test the video. To do this, hit the blue “Test Video” button.
If you’re using a web browser instead of the Discord app, ensure you’ve given your web browser permission to access your camera; otherwise, you’ll end up with a blank screen instead of your smiling face. This also applies to voice settings.
2. Join or Create a Server
To share your screen with coworkers, you’ll need to join or create a server where you’ll be video conferencing.
Servers contain text channels that let you type to talk and voice channels for live talking and video which we’ll cover in this post in a moment.
Every server has multiple channels, each of which can be dedicated to a different topic and governed by a different set of rules. Dividing your teams by department, project, or category makes it easy.
Starting and joining servers is completely free.
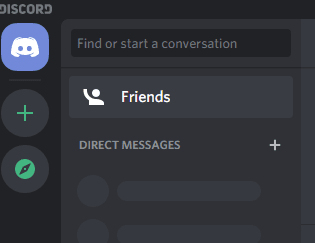
To create or join a server, click on the big “+” button in the upper left corner of the app resting below the bright blue Discord logo.
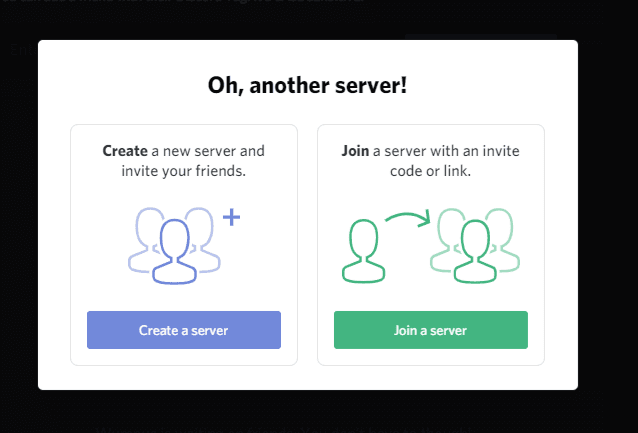
A pop-up will appear, prompting you to create or join a server. For this example, let’s create a server.
After clicking “Create a server,” you’ll be asked to give it a name.
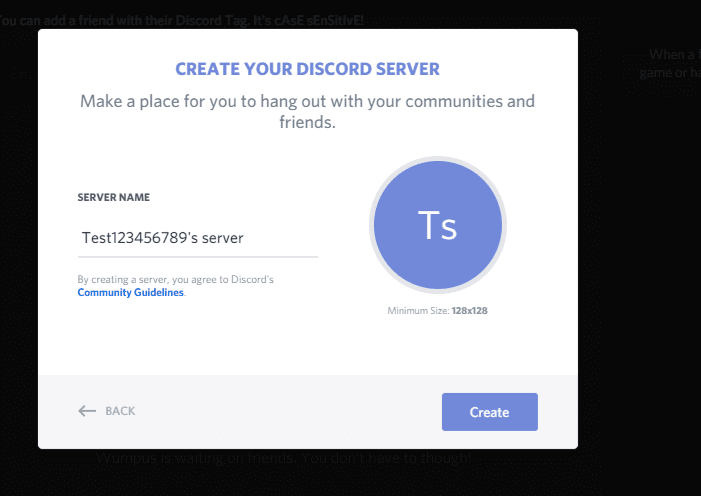
Once you’ve chosen your name, click “Create.”
3. Connect to a Voice Channel
To chat with team members, click the video icon to start a live video conference, share your screen, and connect to a “voice channel.”
- Simply click on “General” to begin fiddling with this feature.
- You’ll see you’re connected and ready to start a video or share your screen.
- By clicking on the “Video” button, your PC will access your webcam and start a streaming video.
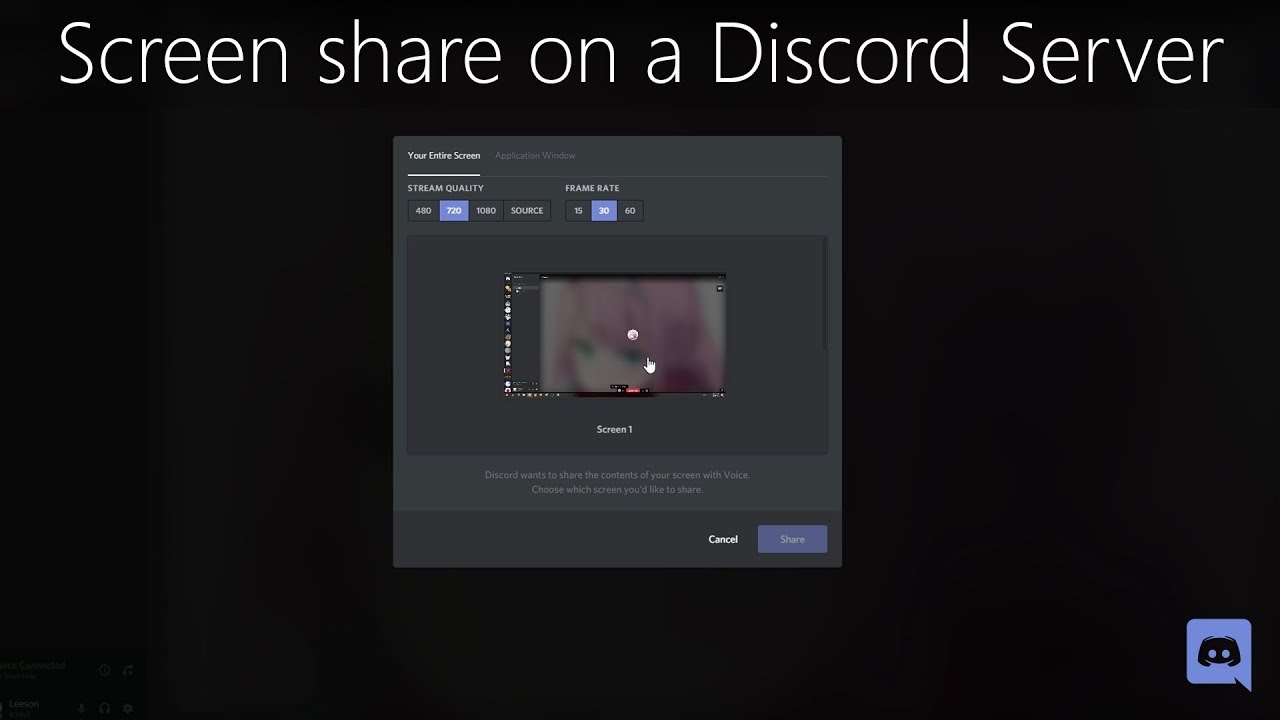
- Clicking the “Screen” button will allow you to share your screen. You’re presented with several options.
If you have applications open, you’ll be able to select one of them to share your screen displaying only that application. One app may be your web browser, photo-editing software, or a PowerPoint presentation.
You can also choose to share your screens. You can choose the screen you want to share if you have multiple monitors.
This means you can share a selected window excluding all others or your entire screen and windows.
- After selecting an application or screen, you’ll be given several options before you screen share.
- You can change the Voice Channel you’re streaming in.
- You can change the resolution and framerate of the video (but this requires a Discord Nitro paid subscription).
- And you can double-check that you’re screen-sharing the right application.
Now, click “Go Live,” and you’ll start sharing your screen in a server or voice call! Discord will now show your screen share side-by-side with your webcam video screen. This is where Discord shines. You can start a live video while sharing your screen and vice versa.
Only people connected to the voice channel can see your video and screen share.
How to Record Your Screen and Share It With Anyone
One of the features missing from Discord is the ability to record your screen and share the recording with your team members.
There are many reasons why you may want to record your screen:
- Create a tutorial or walkthrough.
- Show work completed to your team.
- Connect with customers.
That’s why we created Zight.
Zight is a screen recorder that is fast, easy to use, and comes loaded with tons of features absolutely free.
It’s an all-encompassing tool that lets you:
- Capture HD video recordings of your screen.
- Record high-quality webcam videos of yourself.
- Record your screen with your webcam at the same time.
- Snap unlimited screenshots with Mac or Windows.
- Create helpful GIFs.
And so much more.
Zight (formerly CloudApp) is a visual communication solution that makes collaboration fun and easy while reducing miscommunication and mistakes.
No more multi-paragraph emails or unnecessary team meetings.
Zight allows you to quickly share important information and create engaging content for team members and customers while helping you stay focused and productive.
With 700+ reviews on G2 and an almost 5-star rating, Zight is among the highest-ranked screen recording software options.
Plus, G2 Crowd has ranked us as one of the top sales enablement tools, and we continue to help companies improve communication with one of the easiest-to-use visual content apps available in the cloud.
Frequently Asked Questions on Discord Screen Share
1. How do I share the screen on Discord?
- Open the Discord app on your computer or mobile device.
- Join a voice channel, and start a voice or video call with your desired server or friends through a direct message.
- Once you’re in a voice channel, look for the Screen icon in the voice status panel (near the bottom left corner of the Discord app).
- Click the Screen icon, and a new window will pop up. You can select which window or screen you want to share in this window.
- You can also share your audio with your viewers.
- Once you’ve selected what you want to share, click the Go Live button to share your screen. A confirmation screen may appear, asking you to confirm the screen-sharing process. Click “Yes” or “Confirm” to proceed.
- Your screen will now be shared with the participants in the voice channel or call.
2. Is Discord screen sharing free?
Yes, Discord screen sharing is available for free to all Discord users. Whether using the Discord app on your desktop computer or the Discord mobile app, you can access the screen-sharing feature without additional cost. This allows you to share your screen with others during voice or video calls, making collaboration, presentations, or gaming sessions convenient.
3. How do I share my screen on Discord with sound?
To share your screen with sound on Discord, you must ensure you have enabled audio sharing in your settings. To do this, open the Discord app and go to User Settings > Voice & Video. Under Audio Sharing, ensure the Enable Audio Sharing checkbox is checked.
Once you’ve enabled audio sharing, you can share your screen with sound by following the steps above. You’ll see a checkbox next to Share Audio when you click the Screen icon. Ensure this checkbox is checked before you click the Go Live button.
4. How do I turn on screen sharing on Discord mobile?
To turn on screen sharing on Discord mobile, you first need to join a voice or video call. Once you’re on a call, tap the Three Dots icon in the top right corner of the screen. Then, select Share Screen.
A pop-up window will appear. You can select which screen or app window you want to share in this window. Then tap the Start Sharing button once you’ve selected what you want to share.
5. How do I stream on Discord PC?
First, you must join a voice channel to have good stream quality on Discord PC. Once you’re in a voice channel, look for the Stream icon in the voice status panel (near the bottom left corner of the Discord app).
Click the Stream icon, and a new window will pop up. You can select which game or application you want to stream in this window. You can also choose to share your audio with your viewers. Click the Start Streaming button once you’ve selected your stream.
6. Is Discord screen share better than Zoom?
Discord and Zoom are both popular video conferencing and screen-sharing platforms. They both have their strengths and weaknesses.
- Discord is generally considered better for gaming and other activities requiring low latency. This is because Discord uses a peer-to-peer connection, which means that data is sent directly from your computer to the computers of the people you’re talking to. Zoom, on the other hand, uses a server-based connection, which can add latency.
- Discord also has several features specifically designed for gamers, such as a built-in overlay that allows you to see your Discord chat while playing a game. Zoom does not have this feature.
- However, Zoom is generally better for business meetings and other activities requiring high-quality video and audio. Zoom offers a broader range of resolution and frame rate options than Discord, and it also has some features designed for business users, such as the ability to record meetings and share your screen with multiple people.
Ultimately, the best screen-sharing platform for you will depend on your specific needs. Discord is a good option if you’re looking for a platform for gaming and other activities requiring low latency. Alternatively, Zoom is a better choice if you’re looking for a platform that offers high-quality video and audio for business meetings.


