Guide to New Request Video Feature for Log Collection
Make it easier for your customers to show you what’s going wrong and capture the technical details behind it. Zight’s Request Video feature lets you collect both a screen recording and browser logs, like console errors and network activity, with just a few clicks. This step-by-step guide shows you how to enable the feature, install the snippet, and customize request links so you can troubleshoot faster and more effectively.
Step 1: Enable the Request Video Feature
- In your settings, enable the brand-new section called Request Video. Access your settings via share.zight.com and navigate to Settings. On the bottom left, you’ll see a new section called Request Video.
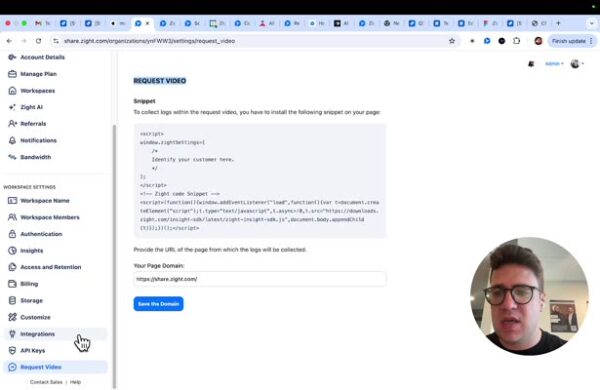
Step 2: Add Your Primary Domain
- Example: app.example.com or example.com

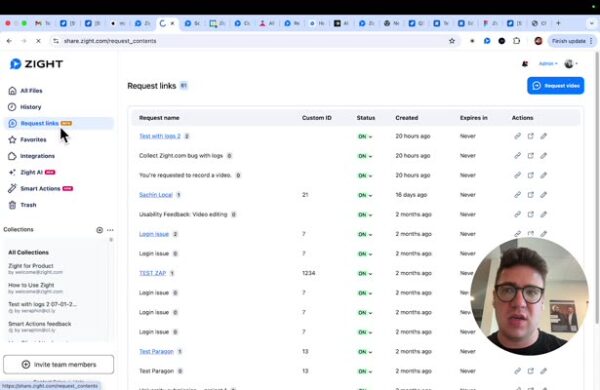
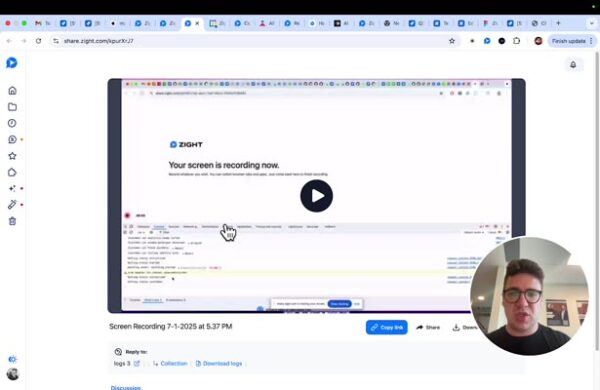
Step 3: Create a Request Link
- Navigate to your dashboard and go to the request link section.
Step 4: Ask to Collect Logs
- When creating a new request video link, you will see a section called “Ask to Collect Logs.” Click on that button to proceed.
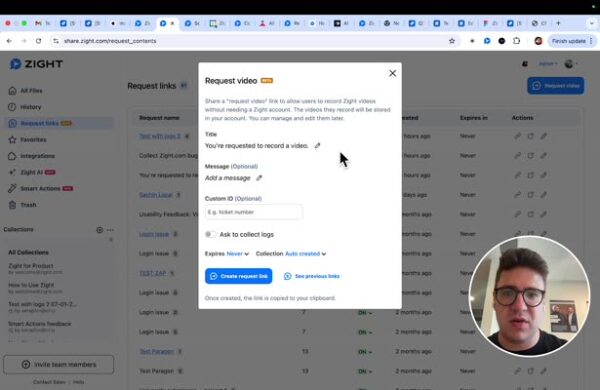
Step 5: Customize the Request
- When creating a new request video link, you will see a section called “Ask to Collect Logs.” Click on that button to proceed.
Step 6: Customer Experience
- From your customer’s perspective, they will see a two-step process: open the domain you set up and click on start recording. Their interactions will be recorded.

Step 7: View and Collect Logs
- Once the recording is complete, you will see their video and a button called “collect download logs” to start the download. This will include console information, warnings, errors, and network data.
The Ultimate Guide to the New Request Video Feature for Log Collection
Troubleshooting technical issues can be difficult, especially when customers have a hard time describing exactly what went wrong. Zight’s new Request Video feature makes it easier than ever to understand user-reported problems by letting customers record their screens and automatically include important browser logs.
This powerful feature simplifies the process of collecting both visual and technical data, so your support and engineering teams can pinpoint issues faster and more accurately. The result is quicker resolutions, better communication, and an improved experience for everyone involved.
What the Request Video feature does
The Request Video feature allows you to gather more than just a recording. It collects essential background information, such as console errors, warnings, and network activity, alongside the customer’s screen recording.
Instead of asking customers to explain what they experienced, you can simply send them a Request Video link. When they click the link, they’ll see a short, guided process that walks them through recording their screen and sharing the technical details in one submission.
This eliminates the back-and-forth emails or screenshots that often make troubleshooting slow and frustrating.
How it helps your team troubleshoot faster
The Request Video feature saves hours of diagnostic time by giving your team the complete picture of what happened. Support agents no longer need to guess what users mean by “it doesn’t work,” because they can now see exactly what occurred on the customer’s screen.
Even more importantly, the attached logs provide the technical data needed to identify where the issue originated. Developers can view console messages, warnings, and network requests in context, helping them replicate and resolve bugs more effectively.
This feature bridges the gap between non-technical users and technical teams, streamlining collaboration and improving overall response times.
Setting up the Request Video feature
Enabling the Request Video feature is simple. Once activated in your Zight settings, you can install a small snippet on your website and begin creating customized request links. These links can include your own domain, ensuring a branded and trustworthy experience for customers.
The feature is currently available on Team and Enterprise plans, while Data Logs are accessible for Enterprise customers. This tiered approach allows teams of all sizes to use Request Video according to their workflow needs.
After setup, you can create and share links for specific support cases, product feedback, or bug reports, giving your team the flexibility to gather insights whenever needed.
What the customer experience looks like
From the customer’s point of view, the process is simple and secure. When they open a Request Video link, they are guided through two quick steps. First, they open the domain you’ve configured. Then, they click “Start Recording.”
Zight automatically captures their interactions and collects browser logs in the background. Customers don’t need to download software or navigate complex instructions. Once the recording is finished, they can submit it, and your team instantly gains access to the visual and technical data in one place.
This straightforward workflow not only improves customer satisfaction but also reduces friction during support interactions.
Reviewing and collecting logs
Once a customer submits a recording, your team can view it directly in Zight. Alongside the video, you’ll see an option to download the accompanying browser logs. These logs include detailed console information, warnings, errors, and network requests captured during the recording session.
Having both the visual context and the raw data makes diagnosing problems significantly faster. You can verify issues, test fixes, and close tickets with confidence knowing you have complete information about what occurred.
This also helps reduce miscommunication between customers and teams, resulting in faster turnaround times and higher-quality support experiences.
Why Request Video improves customer support
Request Video transforms how teams handle troubleshooting. It allows your customers to visually show you what’s happening while automatically providing the technical data your team needs to solve it.
Instead of relying on vague explanations or incomplete screenshots, you receive a complete record of what went wrong. This helps prevent errors, speeds up resolution times, and ensures a smoother experience for both the customer and the support team.
It’s particularly valuable for complex issues that are difficult to reproduce, like intermittent bugs or browser-specific errors.
Conclusion
The Request Video feature is one of Zight’s most powerful tools for improving communication between customers and support teams. By combining screen recordings with detailed browser logs, it provides complete visibility into user-reported issues.
This feature helps teams work faster, reduce miscommunication, and resolve problems with confidence. For customers, it simplifies the process of reporting issues, making it easy to “show” rather than “explain.”
If you’re on Zight’s Team or Enterprise plan, enabling Request Video is a must. It brings visual clarity and data-driven accuracy to every support interaction—helping you deliver faster, smarter, and more efficient customer support.
Frequently Asked Questions
It is used to collect both a video recording and browser logs from customers to help teams diagnose technical issues more quickly.
No. Request Video works directly in the browser without requiring extensions or downloads.
Request Video gathers browser console logs, warnings, errors, and network activity that occur during the user’s recording session.
Request Video is available on Team and Enterprise plans. The Data Logs collection feature is available only on Enterprise plans.
All videos and logs are transmitted securely through Zight’s encrypted system. Only authorized users on your account can view or download them.
Yes. You can customize request links with your own messaging, domain, and branding to fit your workflow.
Yes. Once a Request Video submission is completed, you can access the video and download the logs anytime from your Zight dashboard.


