The Zight (formerly CloudApp) Video Capture App is available for Mac, iOS and Chrome. Downloading is quick and easy. Access the app from GetZight (formerly CloudApp) above, from the Apple Store for Mac and iOS, or from the Chrome Webstore to add the extension to Chrome.
Named a leading screen and video capture application by G2 based on user reviews and feedback. The Zight (formerly CloudApp) snipping tool is available for Mac, Windows, Chrome, Linux, and iOS. You can download and use it for free. Shave minutes off every snip and capture without opening a new window or app.

Mac Screen Capture, but how about Video?
Let’s face it: the Mac changed the way we work. It is well designed, super intuitive, and extremely easy to use. And while it is quick and easy to take a screenshot using the snipping tool for mac, the one tool that Apple’s macOS lacks is a native video screen capture tool. So before you reach for shift + command + 4 assuming it records video as well, consider a video screen capture for mac tool which runs silently in the background, yet is packed with just about every option you need to capture anything on your screen. Introducing Zight (formerly CloudApp) – recently ranked in the top 50 Best Software Companies of 2018 by G2 Crowd.
For a tutorial on how it works, check out this video:
Video Screen Capture with Audio on a Mac
Want to learn just how simple it is to screen capture video on mac with audio? You will first need to download the App. It’s free to get started and powerful enough to capture all of your video screen capture needs in full HD video. Once you have downloaded the app and created a free account, follow these steps:
- Use shortcut ‘Cmd + Shift + 6’ and capture a section of your screen by dragging your mouse to include the desired area
- Once you see the app options, choose the HD video option and click the Mic option (the app defaults to no audio). You can also select the [ ] to capture full screen (customize the shortcut in Preferences menu)
- Click the Start button to record and capture your screen — that’s it!
There are recording limits based on your account type. However, unlike GIFs and mac screenshots, video recordings are limited by file size. For a free account, the file upload max is 25mb, for a Pro account it is 1gb, and for a team account it is 2gb per recording.
Capture and Create GIFs
In addition to full HD video, Zight (formerly CloudApp) allows you to make high quality GIFs with its screen recording software for Mac. Limits are 15 seconds for a free account, or 1 min for a Pro account. There are 2 ways to do this, from with keyboard shortcuts or from the App in your toolbar. To capture a GIF, follow these steps:
With a keyboard shortcut:
- As with video, use shortcut ‘Cmd + Shift + 6’ and capture a section of your screen by dragging your mouse to include the desired area
- Once you see the app options, choose the GIF option. You can also select the [ ] to capture full screen (customize the shortcut in Preferences menu)
- Click the Start button to capture your GIF — click Finish once you have captured the GIF or reached your accounts limit
From the Mac App:
- Click the Zight (formerly CloudApp) icon installed in your menu bar (top of your screen) or Applications Folder, then select the GIF icon to select part of your screen to capture and record
- To finish, follow the same steps as above
Capture and Annotate Images
Not only is Zight (formerly CloudApp) a powerful video screen capture tool, but it takes Apple’s screenshot function to another level. Not only can you capture anything on your screen, but any image, picture or GIF can be annotated with lines, shapes, arrows, blur, emoji and more. There are several ways to do this:
For Mac:
- Use shortcut ‘Cmd + Shift + A’ to capture a screenshot and instantly open an annotate window (customize the shortcut in Preferences menu)
- Hover over a captured photo, image, or screenshot from the Zight (formerly CloudApp) menu and select the ‘Annotate’ option
In a Browser:
- If you have already created and uploaded content, or your team or customers view any of your shared Zight (formerly CloudApp) links (drops) as images or screenshot, click on the ‘Annotate’ option
- Select from the many options in the annotate menu including the arrow tool, rectangle tool, spotlight circle tool, stroke color, pixelate tool and more
Sharing Your Content Made Simple
Not only does Zight (formerly CloudApp) allow you to quickly capture HD video, GIFs, or annotated images, sharing content with your team, colleagues, or friends is a breeze. After saving your video, GIF or annotated image, the file gets instantly uploaded to a unique Cl.ly short link where your content lives in perpetuity. Upon saving your content, this link gets uploaded to your Mac’s clipboard, so simply pasting it (Command-V) into a browser, email client, or any document will paste the link instantly.
Additionally, your content can be share through our numerous productivity app integrations, including Asana, Slack, Trello, or Google Docs. For those who want the get the most out of our content creation and sharing solutions, with a Pro or Team account, professionals and teams can turn any Cl.ly link into a custom domain. In addition to custom domains, you can enable SSL on your domains with a CloudFlare account.
How to Get Zight (formerly CloudApp)
Zight (formerly CloudApp) is very simple, yet powerful video screen capture tool and provides you with all the features you need to visually communicate ideas, share feedback, and collaborate with friends and co-workers using HD video GIFs, and annotated screenshots. You can register for your free Zight (formerly CloudApp) account here.
Other Screen Capture Tools Don’t Stand A Chance
As you learned above, the right screen recorder software can do so much more for you and your business than simply save a screenshot to your computer. That’s the way of the past, yet companies such as Techsmith, claiming to be top-of-class screen capture software, require downloading and installing 3 of their tools (Snagit, Jing, Screencast) to have all the features that Zight (formerly CloudApp) comes with in the all-in-one native app. Other tools including Vidyard or Wistia, simply miss out on valuable workflow collaboration tools, analytics to help you grow your business and customization capabilities. Others such as Loom, Soapbox or GoVideo, are limited to Chrome Extensions and serve no further business function or value beyond of a quick video or a screenshot.
Zight (formerly CloudApp) also serves as more than just a DropBox type file storage center. It also won’t cost your five times the amount of money for half the features like a Vidyard or a Droplr that provides little to no creative functions. With Zight (formerly CloudApp) you can let your creativity flow with video annotation or dual screen and webcam recording.
Still Don’t Believe Us? See For Yourself
Don’t restrict your creativity or slow down your workflow even more with antiquated screen recording software. It’s time to step into the 21st century and catch up with this on-demand world. Sign up for a free Zight (formerly CloudApp) account and try it for yourself to see just how fruitful screen recording can be for your teams and your bottom line. Zight (formerly CloudApp) is the future of visual communication — an essential screen recording tool for every industry where speed and clarity are essential.
How to Record Your Screen?
- Step 1: Download Zight (formerly CloudApp) for Windows or Mac
- Step 2: Click on the Zight (formerly CloudApp).msi file in the downloads folder
- Step 3: Zight (formerly CloudApp) should immediately open
- Step 4: Register for a free Zight (formerly CloudApp) screen recording account when prompted
- Step 5: To record your screen, click on your Zight (formerly CloudApp) icon. Select the TV recording image. Prefer hotkeys? Use this combination for Mac :Cmd+Shift+6, Windows: Alt+Shift+6
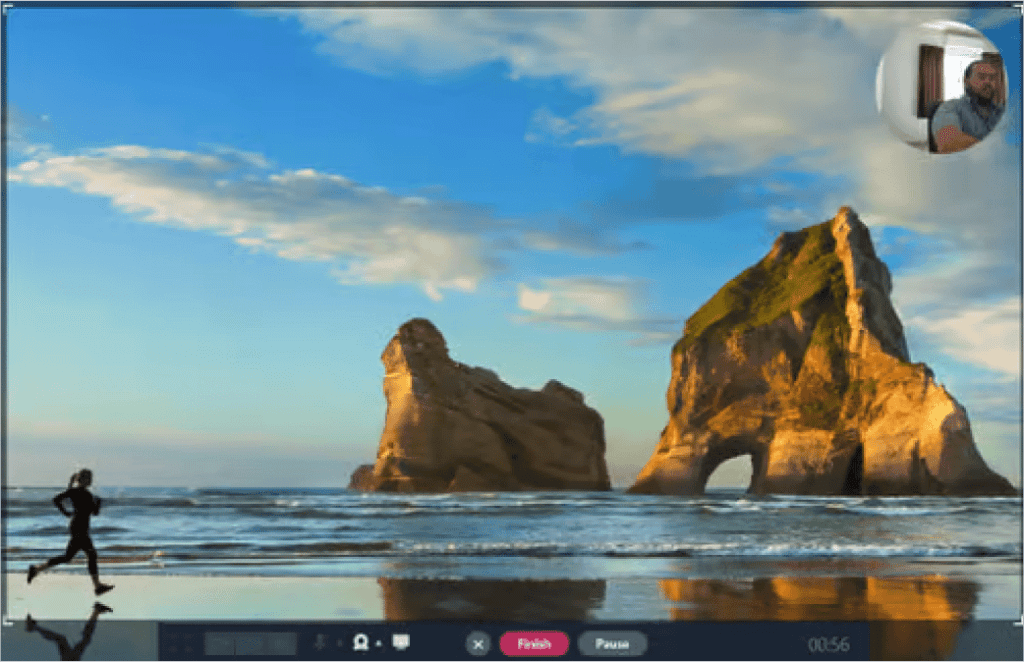
- Step 6: Use your mouse to select the area on your screen you wish to record and click the green “Start” button to begin recording.
- Step 7: Click the red “Finish” button when you are done your video


