You know how you can’t scroll through social media without bumping into a video? That’s because videos are a game-changer in the business world. Don’t just take my word for it; video marketing statistics show that video accounts for 82.5% of all internet traffic.
But here’s the twist: not everyone can hear what you’re saying in those videos, and not everyone understands the language you’re speaking. That’s why video captioning – or adding captions and subtitles makes all the difference today. If you’re keen on making your videos accessible to everyone while boosting your SEO, you’re in the right place.
Let’s tell you everything about captions or subtitles and how to add them to your video with Zight!
What Is Video Captioning?
These captions are in the text box that appears when you play a YouTube video or social media video. The captions pop up at the bottom of the screen and accompany the audio in your videos – verbalizing not just the dialogue but also any significant sounds like laughter, applause, or a door slamming. They aim to make the video accessible to everyone, regardless of hearing ability or language proficiency.
Captions work by synchronizing with the video’s audio track. As the video plays, the captions appear in real time, allowing viewers to read along with what’s being said or heard. This is particularly useful in noisy environments or situations where audio can’t be played out loud.
How to Create Videos and Caption Them Using Zight
Ready to make the best business videos and improve their accessibility with captions? Here’s how you can use Zight:
Step 1: Create the Video
You want to start by recording your video using Zight’s platform. Whether it’s an educational video, a training session, or a marketing pitch, Zight has got you covered. Here are the simple steps to follow:
- Create a Zight account, then download the app to your Mac or Windows computer. You can also get the Chrome extension and the iOS app.
- Open the Zight app and click Record. This option will allow you to record different types of videos, including full-screen videos, or you can select the region on the screen you want to record. You can also choose between three recording modes – screen only, screen and webcam, or webcam only. In addition, you can record a longer video to a short GIF.
- Turn on your mic and camera if necessary. Understand you cannot use the mic to record a GIF. So, if you want to caption a GIF, your best solution could be to convert a captioned video to a GIF.
- Once you select the recording preferences, click Start Recording. You can annotate the video as you record – adding elements like arrows, highlighters, ellipses, rectangles, pens, and more. Pause the video as you add these elements, and resume when done. If you make training or demo videos where you want to highlight sections longer, you can also add a timer to each annotation.
- Once you record the video, click the Finish button and wait for the video to upload to the cloud. Zight will also copy the link to the video in your clipboard and open it on your default browser.
- When the video loads, you can edit it further if necessary. For instance, you can trim, finetune, add filters or crop to size. In addition, you can split and merge different sections to improve flow. You can also add custom buttons for special effects like your business logo and also add templates.
- Save all edits.
You need to record and edit your videos thoroughly before you can add captions. This is important to maintain the flow of the video and to keep it clean and professional.
But what if you have a video already and want to add captions to it? You can go to your Zight dashboard and click Upload. This option will let you upload a video file on your computer – and you can upload several, too! Next, you can edit it with the Zight video editor before transcribing it.
Step 2: Add Captions To Your Video

Now that you’ve created and edited your video, here are the simple steps you want to follow to add captions:
- Open the video from your Zight dashboard.
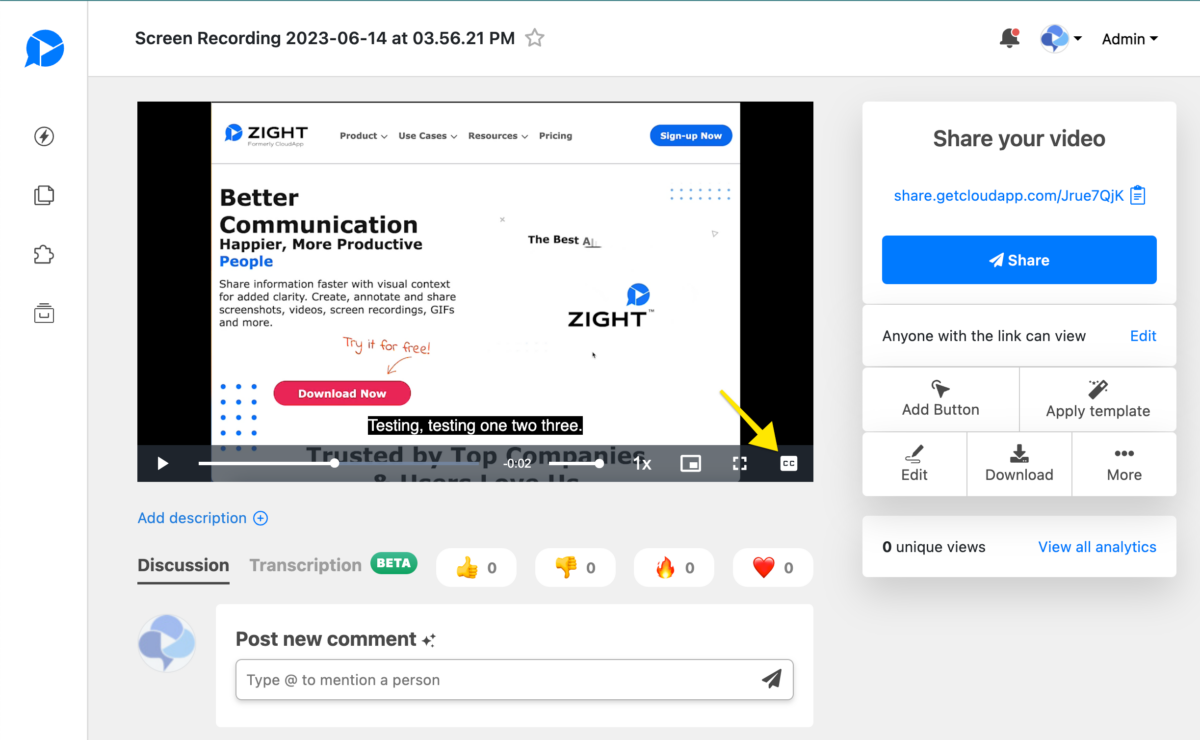
- Click on the Transcription box below your video description.
- Click Request Transcription.
- Your video will start getting transcribed, and automatic captions will be added to it. You can sit back and relax, as you’ll get an email when your transcription and captions are added.
- When you receive the email, open your video again from your Zight dashboard and see if everything looks good. Your captions will play smoothly as the video and audio play, and you can then send or upload the video to your viewers. To do so, share the link, or download the video and send it via email as an attachment, or upload it to YouTube. You can also generate its code and embed it on your website.
Note: Zight captions for video content are only available for Enterprise users. You can contact Zight to unlock the feature and create your closed captions.
Here are some things you can do after transcribing your video with Zight:
- You can use your transcriptions to skip some parts of your video – this applies to your viewers, too!
- You can toggle closed captions on or off. Simply click the CC on the lower right corner of the video player
Video Captions Vs. Subtitles: What’s the Difference?
The terms video subtitles and captions are used a lot – sometimes interchangeably- but they are not the same thing!
Captions are primarily designed for people who are hard of hearing, providing a text-based representation of both dialogue and significant audio cues like background noise, music, or sound effects. They are generally in the same language as the audio and aim to offer a full auditory experience in text form.
Here are some types of common captions:
- Open captions – are permanently “burned” into the video file and cannot be turned off by the viewer
- Closed captions – can be turned on and off by the viewer and are typically found in a settings menu
On the other hand, subtitles to a video file are designed for viewers who can hear the audio but may not understand the language. A subtitle file, like an SRT file, provides a text translation of only the spoken dialogue and is commonly used in multilingual settings. Unlike captions, subtitles do not include additional audio elements like sound effects or background noise.
Here are some common types of subtitles:
- SDH – include additional information like sound effects and music cues
- Non-SDH subtitles – for viewers who can hear but not understand the spoken language
- SRT file -contains time codes and the corresponding text that should appear on the screen.
A caption or subtitle file adds value to the entire video, making it accessible to all people. They also make your video content searchable and indexable by search engines.
I. When Should You Use Captions?
Captions serve multiple purposes, making them a versatile tool in video content creation. Primarily, they are designed to make videos accessible to individuals who are deaf or hard of hearing. By providing a text-based representation of the audio, captions ensure that these individuals can fully engage with the content.
Here are scenarios where captions would add the most value to your video:
- Educational videos: Captions can aid in comprehension and information retention, making them invaluable for educational content like online courses, demos, tutorials, or training videos
- Videos filmed in public spaces: In environments where audio is not feasible, such as airports or gyms, captions ensure that important information is still conveyed
- Social media videos: Platforms like Facebook often autoplay videos without sound. Captions grab attention and convey the message effectively in such cases
- Multilingual audiences: For content aimed at a global audience, captions in the native language can enhance understanding
- Podcasts and interviews: Captions can make long-form content like podcasts or interviews more digestible by allowing viewers to skim through the content.
- Legal requirements: Certain types of content are legally required to have captions to meet accessibility standards, such as public service announcements
- Live events: When live streaming events, real-time captions can make the content accessible to those with impaired hearing
- Corporate meetings: When hosting virtual meetings, captions can aid participants who may have difficulty understanding accents or who are in noisy environments
II. When Should You Use Subtitles?
Creating a subtitle file is your best shot at ensuring people of diverse backgrounds and who speak different languages can watch and understand your videos. Here are some scenarios where you can add subtitles to a video for significant value:
- Global marketing campaigns: When your target audience speaks multiple languages, add subtitles to make your message universally understood
- Educational content: Add subtitles for non-native students in your class to aid in comprehension
- Film and television: Movies and TV shows add subtitles to films that air internationally, allowing a broader audience to engage with the content
- Corporate training: Multinational companies can add subtitles to ensure that training materials are accessible to employees worldwide
- Online webinars: Adding subtitles can make real-time educational content more inclusive
- Social media videos: Given that these often autoplay without sound, add subtitles to video online to capture viewer attention and convey your message effectively
- Public speaking events: Whether it’s a TED talk or a conference presentation, subtitles can make the content accessible to international attendees.
- Product demonstrations: If you’re launching a product globally, add subtitles to reach a wider audience
- Customer testimonials: A subtitle file can make these more engaging and accessible, especially if the customer is speaking in a dialect or accent unfamiliar to the target audience
Benefits of Adding Captions or Subtitles to Your Videos
By now, you have a pretty idea of why video subtitles and captions are important. You can enjoy a range of benefits when you add captions and subtitles to a video, including:
1. Enhanced Accessibility
The first reason to add subtitles is to make your videos accessible to a broader audience. Whether someone is hard of hearing or in a noisy environment, adding subtitles ensures that your message gets across. The same goes for captions. You want to add captions to a video that has interesting things going on in the background – like some good background music you want people to notice.
2. Improved Comprehension
Sometimes, the audio file might not be clear, or the speaker’s accent might be difficult to understand. When you add subtitles and captions, you’re aiding in better comprehension and retention of the content.
3. SEO Advantages
Did you know that adding subtitles can also boost your video’s SEO?
When you add subtitles to a video, you’re essentially creating a text-based transcript of the spoken content. This can be indexed by search engines, making any video format easier to discover. If you’re using an SRT file for your subtitles, this can be particularly beneficial for SEO.
4. Increased Engagement
Research shows that videos with subtitles or captions are more likely to be watched to the end than those without. So, when you add subtitles or captions to a video, you’re likely to see increased viewer engagement.
6. Sound-Off Consumption
In public settings or noisy environments, viewers often prefer to watch videos without sound. When you add subtitles or captions, you make it easier for these viewers to consume your content.
6. Global Reach
If you’re aiming for a global audience, you can permanently add subtitles in multiple languages. This not only broadens your reach but also makes your content more inclusive.
7. Multi-Platform Sharing
When you add captions or subtitles, it makes it easier to share your video content across different platforms. Whether you’re embedding the video on a website or sharing it on social media, adding subtitles allows for a more versatile use of the video.


