Want to know how to ss (screenshot) with your Mac and how to capture and share screenshots in a few clicks? If you own a Mac device, you’ll be glad to know there are many ways to do so. In this article, we will tell you what shortcuts to use for capturing screenshots quickly, the native apps you can use, and how Zight, a screenshot app , simplifies the whole process.

I. Entire Screen Capture
Press Shift + Command + 3 at the same time to capture all the content on your entire screen at that time.

II. Partial Screen Capture
Press and hold Press Shift + Command + 4 at the same time.

III. To Capture a Specific Window
Open the exact window you want to capture, press and hold the Shift + Command + 4 , then press the Space bar .

2. Using the Screenshot App
Press Shift + Command + 5 to open the Screenshot app. You can also use Launchpad to locate the app and display its tools.
- Capture the entire screen.
- Capture a window.
- Capture a portion of the screen – drag the crosshair to adjust the size of the area you want to capture.
- Record the entire screen.
- Record a portion of the screen -drag the frame to select the area of the screen you want to capture.

3. Using the Touch Bar
If you have a MacBook Pro, you might be able to capture screenshots using the Touch Bar. Here’s how to add the native Screenshot tool to your Touch Bar:
- Click on the Apple menu at the top left corner of your screen and select System Preferences.
- Within System Preferences, find and click on Keyboard.
- Click on the Customize Control Strip button located at the bottom of the window. This will bring up the customization options for the Touch Bar.
- You will see various tools and shortcuts that can be added to the Touch Bar. Look for the Screenshot button, which typically resembles a camera icon. Click and drag this button to the bottom of your screen, aiming for the representation of the Touch Bar that appears. Release the button to place it on your Touch Bar. Click Done to save your changes.
How to Capture a Screenshot of Your Touch Bar
When you want to share or document the Touch Bar’s current state, press Shift + Command + 6 . You will capture the contents of the entire touch bar and save the file to your desktop.
4. Capture a Mac Screenshot with Preview
Preview is a powerful tool built into macOS to handle a wide range of image and PDF files. It offers editing capabilities such as adding text, shapes, and annotations. Here’s how to use Preview for capturing screenshots:
- Navigate to your Applications folder, open Preview and click on “File” in the menu bar at the top of the screen.
- In the dropdown menu choose one of the three options based on what you need to capture. For “From Selection” and “From Window,” you’ll need to select the area or window before the screenshot is taken. If you choose “From Entire Screen,” prepare your screen before the 10-second timer ends.
- After capturing the screenshot, it will automatically open in Preview, where you can edit it immediately.
- Once you’re satisfied with your edits, you can save the screenshot by clicking “File” > “Save” or use the “Export” option for more format choices. Preview also allows you to directly share the screenshot via email, Messages, AirDrop, and other services through the “Share” button in the toolbar.
5. How To Capture Screenshots on Mac with Zight (Recommended)
We have seen the different native screenshot apps you can use to capture screenshots on your Mac computer. However, these tools can limit your workflow if you need to take and share many screenshots with ease.
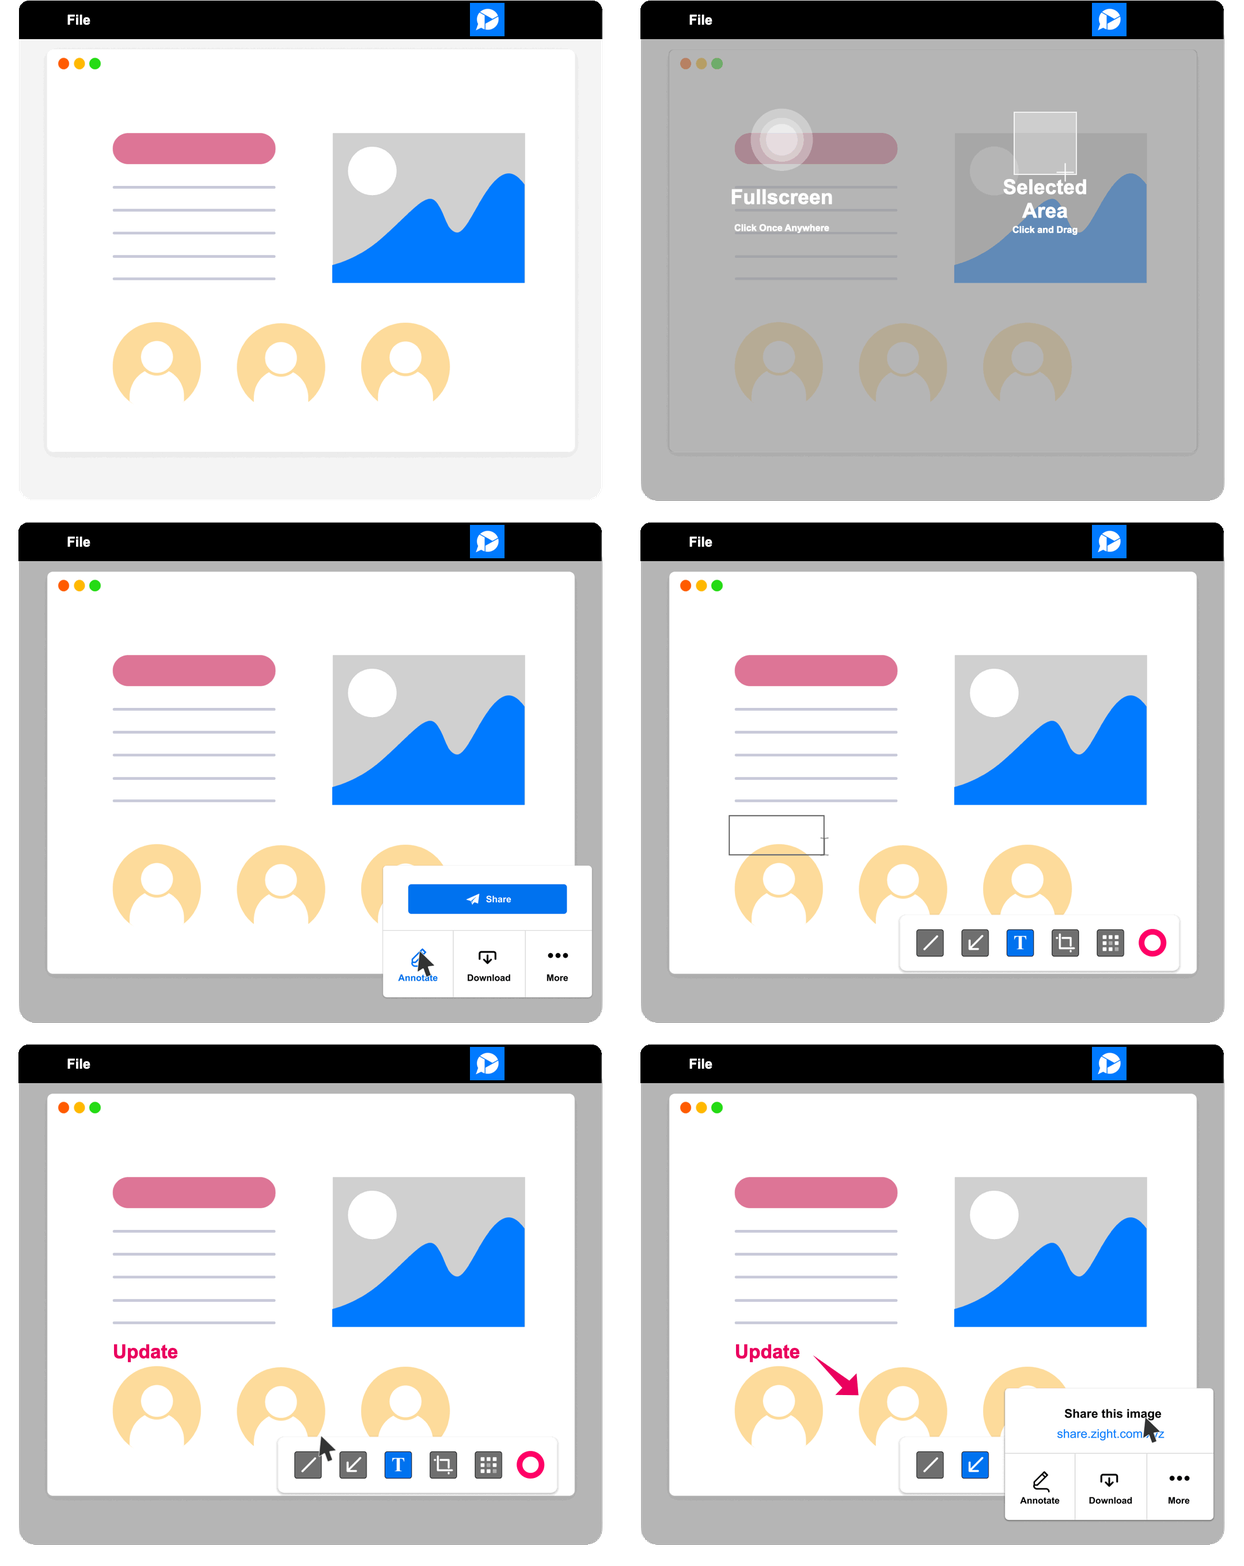
- Download the Zight app for Mac . You can also download the Google Chrome extension here .
- Open the Zight app on your device and click Capture. You can also click keyboard shortcuts Shift + Command + 5 to open the screenshot app.
- You can take a screenshot of your full screen or partial screenshots of a selected area or window. For the second option, click and drag the crosshair to select the area you will capture and you will automatically capture the screen.
- With Zight, you can also take a screenshot of a select window by clicking the Space bar, or click Enter to capture a screenshot of your last area selection. You can also press ESC to cancel the screenshot process.
- Once you capture your screenshot, it will automatically upload to the cloud, and a link to the file will be copied to your clipboard. You can proceed to paste this file to your recipients, whether in emails , Slack , Asana – or any other productivity software you use.
- However, if you want to edit the screenshot before sharing, wait for it to automatically load on your default browser and clock Annotate.
- You can then add annotation elements like text, arrow, line, rectangle, ellipse, path, and marker. You can also crop the screenshot, redact sensitive information, and add stickers. Click Save when done.
- If you want to collaborate with your team using this screenshot, you can also choose who can see the file and add comments or reactions to it.
- When done, share the screenshot via the URL link, or download it to your desktop for sending later.
Capture the Entire Screen
- Command (⌘) + Shift + 3 : This shortcut captures the entire screen and saves it as a file on your desktop.
Capture a Selected Portion of the Screen
- Command (⌘) + Shift + 4 : This shortcut changes the cursor to a crosshair. You can then click and drag to select the portion of the screen you want to capture. The screenshot will be saved as a file on your desktop.