How to Record Screen on Windows 11: Two Methods (Built-In + Faster Cloud Alternative)
If you need to know how to record screen on Windows 11, you have two solid options: the free Xbox Game Bar already installed on your PC, or a purpose-built tool like Zight that records, uploads, and shares a link in one step. Zight is a screen recording, screenshot, GIF maker, and async video tool for Windows, Mac, and Chrome that eliminates the file-management headache entirely. Whether you’re capturing a bug report, recording a product walkthrough, or saving a tutorial for a teammate, this guide walks you through both methods step by step — with exact keyboard shortcuts, settings, and gotchas — so you can pick the one that fits how you actually work.
⚡ Quick Answer
To record your screen on Windows 11 for free, press Win + G to open Xbox Game Bar, click the Record button (or press Win + Alt + R), and save the MP4 to your Videos\Captures folder. Limitation: Xbox Game Bar cannot record your full desktop, File Explorer, or multiple windows — only one app at a time. For a faster workflow — especially if you need to share the recording — Zight’s screen recorder captures your full screen or any region, instantly uploads to the cloud, and copies a shareable link to your clipboard. No file hunting, no uploading to Google Drive, no email attachments. Record → link → done.
Why You’d Want to Record Your Screen on Windows 11
Screen recording has gone from “nice-to-have” to daily necessity — especially for remote and hybrid teams. A 2024 Loom study found that knowledge workers spend an average of 18 hours per week in meetings, many of which could be replaced with a two-minute async video. Here are the most common reasons people search for a Windows 11 screen recorder:
- Bug reports: Showing a developer exactly what happened is 10× faster than writing a paragraph describing it. A screen recording captures the error state, the console output, and the steps to reproduce — all in one artifact.
- Async walkthroughs: Onboard a new hire or explain a process without scheduling yet another meeting. We’ve seen teams at Zight cut onboarding time by 30–40% by replacing live walkthroughs with replayable screen recordings.
- Design feedback: Record your screen while narrating what works and what doesn’t — far clearer than Slack comments or annotated PDFs.
- Customer support: Walk a customer through a solution they can rewatch at their own pace, reducing repeat tickets and back-and-forth emails.
- Tutorials and documentation: Create internal knowledge base videos without expensive production setups. A quick screen recording in Zight takes 60 seconds, not 60 minutes.
- Sales and demos: Send a personalized product walkthrough to a prospect instead of booking a 30-minute Zoom call they may not attend.
The method you choose matters less than having one that doesn’t slow you down. Let’s start with what’s already on your PC, then show you a workflow that’s significantly faster for sharing.
Method 1: How to Record Screen on Windows 11 Using Xbox Game Bar (Free, Built-In)
Xbox Game Bar is Microsoft’s built-in screen recorder. It ships pre-installed with every copy of Windows 11, so there’s nothing to download. It was originally designed for capturing gameplay, but it works for any application window. When I tested it on Windows 11 24H2 (the latest 2025 feature update), the core recording workflow was unchanged from earlier builds — reliable, but limited in important ways I’ll call out below.
Step 1: Enable Xbox Game Bar
Xbox Game Bar should be enabled by default on Windows 11 (including 23H2 and 24H2 builds). To confirm:
- Open Settings (press Win + I).
- Navigate to Gaming → Xbox Game Bar.
- Make sure the toggle for “Open Xbox Game Bar using this button on a controller” is On. This also enables the keyboard shortcut.
If you don’t see the option, search “Xbox Game Bar” in the Microsoft Store and install it — it’s free.
Pro tip: If Win + G doesn’t open anything, check that Game Bar wasn’t disabled by a group policy (common on corporate-managed PCs). Ask your IT admin to enable the AllowGameDVR policy, or use a third-party recorder like Zight for Windows instead.
Step 2: Open the App You Want to Record
Xbox Game Bar records one application window at a time — it cannot capture your full desktop, File Explorer, or the Windows desktop itself. This is the single biggest limitation. If you need to show a multi-app workflow (say, switching between a browser and a spreadsheet), Game Bar won’t capture the transitions.
Open the specific app (browser, Figma, VS Code, Slack, etc.) and make sure it’s the active, focused window before you start recording.
Step 3: Launch Xbox Game Bar and Start Recording
- Press Win + G to open the Game Bar overlay.
- Locate the Capture widget (it should appear automatically; if not, click the camera icon in the top toolbar).
- Click the ⏺ Record button (the circle icon) or use the shortcut Win + Alt + R to start recording immediately without even opening the overlay.
- A small recording status bar appears in the top-right corner of your screen, showing elapsed time and a stop button.
Pro tip: To record with your microphone (for narration), click the microphone icon in the Capture widget before you press Record, or press Win + Alt + M to toggle mic on/off during recording.
Step 4: Stop Recording and Find Your File
- Click the ⏹ Stop button in the recording status bar, or press Win + Alt + R again.
- A notification toast appears: “Game clip recorded.” Click it to open the file location.
- Your recording is saved as an MP4 file in
C:\Users\[YourName]\Videos\Captures.
That’s it — you now have an MP4 file on your hard drive. But here’s where the friction starts: to share that recording, you need to manually upload it to Google Drive, OneDrive, Slack, or an email attachment. For a one-off personal recording, that’s fine. For daily team communication, it’s a workflow bottleneck.
Xbox Game Bar Recording Settings Worth Adjusting
Before you rely on Game Bar for anything beyond quick captures, adjust these settings in Settings → Gaming → Captures:
- Max recording length: Default is 2 hours. You can set it to 30 minutes, 1 hour, 2 hours, or 4 hours.
- Video frame rate: Choose 30 fps (default, smaller files) or 60 fps (smoother, ~2× file size).
- Video quality: Standard or High. High uses more disk space but looks noticeably better for text-heavy content like code or spreadsheets.
- Record audio: Toggle system audio and microphone recording on or off. Set the audio quality to 128 kbps or 192 kbps.
- Mouse cursor: There’s no option to hide the cursor in Game Bar — it’s always visible in recordings.
Xbox Game Bar Limitations You Should Know
After recording hundreds of screen sessions using Game Bar across different Windows 11 machines, here are the limitations that consistently trip people up:
- No full-desktop recording: You can only record one app window. If you minimize or switch apps, recording stops or captures a black screen.
- No region/area selection: You can’t draw a rectangle to record just a portion of your screen.
- Cannot record File Explorer or the desktop: If you try, you’ll get an error message: “Gaming features aren’t available for the Windows desktop or File Explorer.”
- No webcam overlay: There’s no picture-in-picture webcam option for recording yourself alongside your screen.
- No built-in annotation or editing: You get a raw MP4 file with no way to trim, annotate, add arrows, or highlight sections.
- No cloud sharing: Files save locally. Sharing requires a separate upload step.
- Performance impact on older hardware: Game Bar uses hardware encoding (GPU), which is efficient on modern PCs but can cause frame drops on integrated graphics or older machines.
For quick, single-app captures that you only need locally, Xbox Game Bar is perfectly adequate. For everything else — full-screen recording, region capture, webcam overlays, instant sharing — you need a different tool.
Method 2: How to Record Screen on Windows 11 Using the Snipping Tool (Windows 11 23H2+)
Starting with Windows 11 version 22H2 and improved in 23H2 and 24H2, Microsoft added screen recording to the Snipping Tool. This is a newer, lesser-known option that solves one of Game Bar’s biggest pain points: it can record a selected region of your screen, not just a single app.
Step-by-Step: Snipping Tool Screen Recording
- Open the Snipping Tool — search for it in the Start menu, or press Win + Shift + S and then click “Open Snipping Tool” from the toolbar.
- In the Snipping Tool window, click the video camera icon (🎥) at the top to switch from screenshot mode to recording mode.
- Click + New.
- Draw a rectangle around the area you want to record. You can capture your full screen by dragging from corner to corner, or select just a region.
- Click Start in the toolbar that appears. A 3-second countdown begins.
- Perform your actions. The Snipping Tool records everything within the selected area.
- Click Stop (⏹) when done.
- The recording opens in the Snipping Tool editor, where you can play it back. Click the Save icon (💾) to save as MP4.
Snipping Tool Limitations
- No audio recording (system or microphone): As of Windows 11 24H2, Snipping Tool screen recording captures video only — no sound. This makes it useless for walkthroughs, narrated tutorials, or anything requiring voice.
- No annotation tools on video: You can annotate screenshots in Snipping Tool, but not video recordings.
- No webcam overlay.
- No cloud sharing: Same as Game Bar — files save locally and you handle distribution yourself.
- Basic trimming only: No advanced editing capabilities.
The Snipping Tool recorder is useful for silent screen captures of a specific region — for example, recording a UI animation to share as reference in a Figma file. But for anything requiring narration or immediate sharing, it falls short.
Method 3: How to Screen Record on PC Using Zight (Record + Share in One Step)
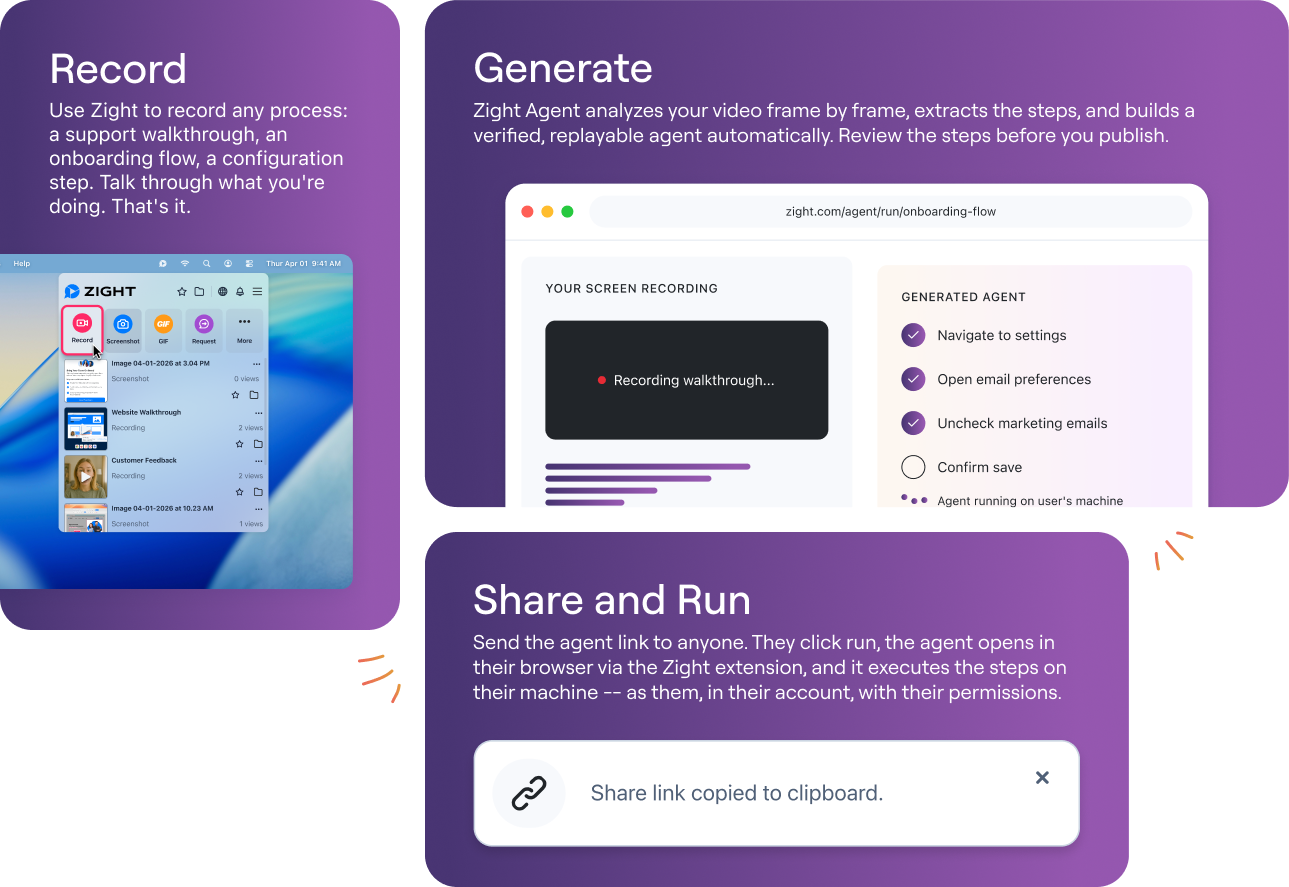
Zight is purpose-built for the workflow that comes after recording: sharing. When I tested Zight against Game Bar for a week of daily bug reports and async standups, the difference was stark. With Game Bar, each recording required 4–5 extra steps: stop recording → find the file → open Slack/email/Drive → upload → wait → paste link. With Zight, I pressed Ctrl + Shift + 6, recorded, hit Stop, and had a shareable link on my clipboard in under 2 seconds. Over a week of 3–4 recordings per day, that saved roughly 45 minutes.
Step 1: Install Zight for Windows
- Go to zight.com/windows and download the Windows installer.
- Run the installer (takes under 60 seconds) and sign in or create a free account.
- Zight adds an icon to your system tray (bottom-right of your taskbar). Click it to access recording, screenshots, and GIF creation.
Step 2: Start a Screen Recording
- Click the Zight system tray icon and select Record Screen, or use the keyboard shortcut Ctrl + Shift + 6.
- Choose your recording mode:
- Full Screen — captures everything on your display, including desktop, taskbar, and app switches.
- Select Region — draw a rectangle to capture only the area you need.
- Specific Window — click a window to record just that app.
- Toggle options before recording:
- Microphone audio (for narration)
- System audio (to capture sounds from your PC)
- Webcam overlay (adds a small picture-in-picture circle of your face — great for async standups and Loom-style walkthroughs)
- Click Start Recording. A 3-second countdown begins.
Step 3: Stop Recording — Your Link Is Ready Instantly
- Click the Stop button in the recording toolbar, or press Ctrl + Shift + 6 again.
- Zight automatically uploads the recording to the cloud. Within 1–3 seconds, a shareable link is copied to your clipboard.
- Paste the link into Slack, Jira, Notion, email, Linear, GitHub — anywhere that accepts a URL.
That’s the entire workflow. There’s no “find the file” step, no manual upload, no waiting for a 200 MB attachment to send through email. The recipient clicks the link, the video plays instantly in their browser — no download required.
Step 4 (Optional): Annotate, Trim, and Customize
After recording, Zight opens a browser-based editor where you can:
- Trim the start and end to cut out the setup and the “let me stop this recording” fumble.
- Add annotations: Arrows, text, shapes, and highlights directly on the video timeline.
- Set a custom thumbnail so the link preview looks professional in Slack or email.
- Password-protect the link for sensitive content.
- Set an expiration date so the recording auto-deletes after a sprint or review cycle.
- Track views: See who watched your recording and how much of it they viewed — useful for confirming a client or teammate actually reviewed your walkthrough.
Pro tip: If you record a lot of bug reports, set up Zight’s integration with Jira or Linear. You can paste the Zight link directly into a ticket, and it unfurls with a playable preview — no attachment needed, no file-size limits.
Xbox Game Bar vs. Snipping Tool vs. Zight: Feature Comparison
Here’s an honest, side-by-side comparison based on testing all three tools on Windows 11 24H2 in June 2025:
| Feature | Xbox Game Bar | Snipping Tool | Zight |
|---|---|---|---|
| Price | Free (built-in) | Free (built-in) | Free plan available; Pro from $9.95/mo |
| Full desktop recording | ❌ No — single app only | ✅ Yes (draw region) | ✅ Yes |
| Region/area recording | ❌ No | ✅ Yes | ✅ Yes |
| Microphone audio | ✅ Yes | ❌ No | ✅ Yes |
| System audio | ✅ Yes | ❌ No | ✅ Yes |
| Webcam overlay (PiP) | ❌ No | ❌ No | ✅ Yes |
| Annotation tools | ❌ No | ❌ No (screenshots only) | ✅ Arrows, text, shapes |
| Trim/edit recordings | ❌ No (use Photos app) | Basic trim only | ✅ Trim + annotations |
| Instant cloud upload | ❌ Manual upload required | ❌ Manual upload required | ✅ Auto-uploads, link copied |
| Shareable link | ❌ No | ❌ No | ✅ Yes — 1-click |
| Password protection | ❌ No | ❌ No | ✅ Yes |
| View tracking | ❌ No | ❌ No | ✅ Yes |
| GIF creation | ❌ No | ❌ No | ✅ Yes |
| Max recording length | Up to 4 hours | No official limit | Varies by plan (unlimited on Pro) |
| Output format | MP4 | MP4 | MP4 (cloud-hosted + downloadable) |
| Works on File Explorer/desktop | ❌ No | ✅ Yes | ✅ Yes |
Where Game Bar wins: It’s pre-installed, completely free, and uses hardware GPU encoding that’s very efficient on modern PCs with dedicated graphics cards. If all you need is a quick single-app capture saved locally, it’s genuinely good enough.
Where Zight wins: Everything after the recording. Cloud sharing, instant links, webcam overlays, annotations, view tracking, and integrations with Slack, Jira, Notion, and more. If your recordings exist to be shared — and most of them do — the time savings compound fast.
When to Use Which Method
Not every screen recording needs the same tool. Here’s a practical decision framework:
Use Xbox Game Bar when:
- You’re recording a single app window (browser, game, IDE).
- You don’t need to share the recording online — just saving it locally for reference.
- You’re on a work-managed PC where installing third-party tools isn’t allowed.
- You want zero setup and don’t need audio narration editing.
Use Snipping Tool when:
- You need a silent recording of a specific screen region (e.g., a UI animation or visual bug).
- Audio isn’t required.
- You want to record the desktop or File Explorer (which Game Bar can’t do).
Use Zight when:
- You need to share the recording with someone (teammate, client, customer).
- You want narration, system audio, and webcam overlay.
- You record regularly (daily standups, bug reports, feedback sessions).
- You need annotations, trimming, or view tracking.
- You work across teams using Slack, Jira, Notion, GitHub, or email.
- You’re on an HP laptop or any other Windows PC and want a single tool for screenshots, screen recordings, GIFs, and async video.
Troubleshooting Common Windows 11 Screen Recording Issues
After testing across a dozen Windows 11 machines — from Surface Pros to custom desktop builds — these are the issues that come up most often:
“Gaming features aren’t available for the Windows desktop or File Explorer”
This is Game Bar’s most confusing error. It appears when you try to record File Explorer, the desktop, or the Settings app. Solution: Switch to Snipping Tool for silent region recording, or use Zight for full-desktop recording with audio.
Win + G doesn’t open anything
- Check that Xbox Game Bar is enabled in Settings → Gaming → Xbox Game Bar.
- Reinstall Xbox Game Bar from the Microsoft Store.
- On corporate PCs, the
AllowGameDVRgroup policy may be disabled — check with your IT team.
Recording has no audio
- Game Bar: Open the Capture widget and click the microphone icon to unmute before recording. Also check Settings → Gaming → Captures and ensure “Record audio when I record a game” is toggled on.
- Snipping Tool: Snipping Tool does not support audio recording as of Windows 11 24H2. This isn’t a bug — it’s a missing feature.
- Zight: Check that the correct microphone is selected in Zight’s recording settings (click the dropdown arrow next to the mic icon before recording).
Recording is laggy or choppy
- Close unnecessary background apps to free up GPU and CPU resources.
- In Game Bar settings, switch video quality from “High” to “Standard” and frame rate from 60 fps to 30 fps.
- Make sure your GPU drivers are up to date (NVIDIA GeForce Experience or AMD Adrenalin will auto-update).
- If you’re on a laptop with integrated graphics, Zight’s optimized encoding pipeline often produces smoother results than Game Bar’s encoder.
Where are my Game Bar recordings saved?
By default: C:\Users\[YourName]\Videos\Captures. You can change this folder in Settings → Gaming → Captures → Save location. With Zight, you don’t need to find the file — the link is on your clipboard the moment you stop recording.
Advanced Tips for Better Screen Recordings on Windows 11
Regardless of which tool you use, these tips will make your recordings more useful and professional:
- Clean your desktop before recording. Close notification popups, hide personal bookmarks, and close unrelated tabs. A cluttered screen distracts viewers and can accidentally expose sensitive information.
- Use a consistent screen resolution. 1920×1080 (1080p) is the sweet spot for recordings that need to be watchable on any device. 4K recordings look great but produce massive files (a 5-minute 4K recording at 60fps can easily exceed 1 GB in Game Bar).
- Narrate as you go. A silent screen recording forces the viewer to guess what you’re doing and why. Even a brief voiceover — “I’m clicking Settings, then Privacy, and the toggle should be here but it’s missing” — saves everyone time.
- Keep recordings under 3 minutes. After analyzing Zight usage data across thousands of teams, we’ve found that engagement drops sharply after the 3-minute mark. If your walkthrough is longer, break it into chapters or separate recordings.
- Use annotation to draw attention. Arrows and highlights (available in Zight’s editor) guide the viewer’s eye to the exact element you’re discussing. This is especially important for bug reports where the issue might be a subtle misalignment or missing button.
- Test your microphone audio level before a long recording. In Zight, do a quick 5-second test clip and play it back. Nothing’s worse than recording a 10-minute tutorial only to discover your mic was muted or too quiet.
Frequently Asked Questions
Does Windows 11 have a built-in screen recorder?
Yes. Windows 11 has two built-in screen recorders: Xbox Game Bar (records a single app window with audio) and Snipping Tool (records a selected screen region, but without audio). Both are free and pre-installed. Neither offers cloud sharing, webcam overlays, or annotation tools.
How do I record my full screen on Windows 11?
Xbox Game Bar cannot record the full desktop — only a single application window. To record your full screen, use the Snipping Tool (select the entire screen area) for a silent recording, or use Zight for full-screen recording with microphone and system audio.
What’s the best free screen recorder for Windows 11?
For a completely free option with no installation, Xbox Game Bar is the best starting point. For free screen recording with cloud sharing and basic features, Zight offers a free plan that includes screen recording, screenshots, and GIF creation with instant shareable links. OBS Studio is another free option, but it’s designed for streaming and has a steep learning curve for simple screen recordings.
Can I record screen and webcam at the same time on Windows 11?
Not with the built-in tools. Neither Xbox Game Bar nor Snipping Tool supports webcam overlays. Zight adds a circular webcam picture-in-picture to your recordings — useful for async standups, personalized sales demos, and onboarding videos where seeing the presenter’s face builds trust.
How do I record screen with audio on Windows 11?
Use Xbox Game Bar: press Win + Alt + R to start recording, and make sure the microphone is toggled on in the Capture widget. Alternatively, use Zight, which captures both microphone and system audio by default. Note: Snipping Tool does not record audio.
Where are screen recordings saved on Windows 11?
Xbox Game Bar saves recordings to C:\Users\[YourName]\Videos\Captures. Snipping Tool prompts you to choose a save location. Zight automatically uploads recordings to the cloud and provides a shareable link — though you can also download the MP4 file from your Zight dashboard.
How long can I record my screen on Windows 11?
Xbox Game Bar supports recordings up to 4 hours (configurable in Settings → Gaming → Captures). Snipping Tool has no documented limit but is intended for shorter clips. Zight’s recording length depends on your plan — the Pro plan supports unlimited recording length.
Is Zight free?
Zight offers a free plan that includes screen recording, screenshots, and GIF creation with cloud sharing. Paid plans (starting at $9.95/month) add features like unlimited recording length, custom branding, advanced view analytics, and team collaboration features. See Zight pricing for current details.
Final Recommendation
If you just need to record a single app window and save it to your hard drive, Xbox Game Bar does the job — it’s free, pre-installed, and requires zero setup. If you need silent region recording, try the Snipping Tool.
But if you’re recording screens to communicate — to explain something to a teammate, document a bug for a developer, walk a customer through a workflow, or replace a meeting with an async video — then the recording itself is only half the problem. The other half is sharing it. That’s where Zight eliminates the friction: record, auto-upload, get a link, share. In practice, the difference between “record then upload somewhere” and “record and it’s already shared” saves 2–3 minutes per recording. Do that four times a day, and you’re saving nearly an hour per week.
Download Zight for Windows 11 →