How to Make a GIF from a Video: The Complete Step-by-Step Guide (2026)
If you’ve ever wanted to know how to make a GIF from a video, here’s the shortest answer: use a dedicated video to GIF converter like Zight. Record your screen or import any MP4/MOV file, trim it to the exact clip you need, and export a high-quality GIF with a shareable link — the entire process takes under 30 seconds. Zight is a screen recording, screenshot, and GIF maker tool used by over 4 million professionals to create and share visual content instantly on Mac, Windows, and Chrome.
But not everyone needs the same workflow. Maybe you want a free browser-based tool. Maybe you’re a developer who’d rather use FFmpeg. Maybe you’re on a phone and need a mobile solution. This guide covers every method — with exact steps, quality tips, and a comparison table — so you can pick the one that fits your situation and start creating GIFs in minutes.
⚡ Quick Answer — How to Make a GIF from a Video
- Install Zight on Mac, Windows, or Chrome (free download).
- Record your screen as a GIF or import an existing video (MP4, MOV, WebM).
- Trim, crop, and annotate using Zight’s built-in editor.
- Hit Save — Zight generates a shareable link and copies it to your clipboard instantly.
Total time: under 30 seconds. No watermarks, no account-gating on basic features, no file-size upload limits.
Why Convert a Video to a GIF?
GIFs occupy the sweet spot between a static screenshot and a full video. They autoplay everywhere, require zero effort from the viewer, and communicate action — not just state. Here’s why teams across SaaS, product development, customer success, and marketing rely on them daily:
- Bug reports that actually make sense. Instead of writing a 10-paragraph description of what went wrong, record the issue and send a GIF. Engineers see exactly what happened, frame by frame, without loading a video player.
- Async design feedback. Drop a GIF into a Slack thread, Notion doc, or Linear ticket showing the exact interaction you’re referencing. No meeting required, no “can you see my screen?” moments.
- Quick tutorials and onboarding. A 5-second GIF showing where to click beats a paragraph of instructions every time. New hires can self-serve from a library of visual walkthroughs instead of waiting for a live call.
- Lightweight embedding. GIFs autoplay in email clients, Slack, Jira, GitHub, Confluence, and virtually every project management tool — no embed code, no video player dependency.
- Social media and marketing content. Product demos, feature teasers, and reaction clips grab attention in feeds and load faster than embedded videos on most platforms.
- Documentation and knowledge bases. Help docs with GIFs showing exact UI interactions have measurably higher completion rates than text-only or screenshot-only versions.
According to GIPHY, over 10 billion GIFs are served daily across the internet. The format has been around since 1987 and remains the most universally supported animation format on the web. No codec issues, no player requirements — GIFs just work.
Method 1: How to Make a GIF from a Video Using Zight (Fastest Method)
If speed and quality matter — and if you’re already creating screen recordings or visual content for your team — Zight’s GIF maker is the fastest path from video to GIF. It’s the only tool on this list that combines recording, conversion, editing, annotation, and cloud sharing in a single workflow.
Step 1: Install Zight on Your Device
Download Zight for Mac, Windows, or install the Chrome extension from zight.com/gif-maker. Installation takes under a minute. Once installed, the Zight icon appears in your menu bar (Mac) or system tray (Windows), ready to use with a customizable keyboard shortcut.
Step 2: Record Your Screen or Import a Video
You have two paths:
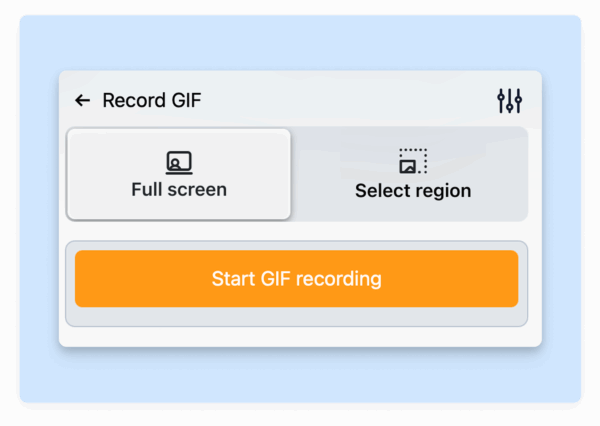
- Record directly as a GIF. Click the Zight icon and select GIF Recording. Draw a selection area around the part of your screen you want to capture, then hit record. Zight captures your screen activity and outputs a GIF automatically — no conversion step needed. This is ideal when you want to make a GIF from a screen recording without the “record as video, then convert” dance.
- Import an existing video file. Already have a video? Drag your MP4, MOV, or WebM file into Zight or use the upload option. Zight converts it to GIF with the settings you choose.
For a deeper dive into the first option, check out our guide on recording your screen directly to GIF — it covers advanced selection options, hotkeys, and tips for capturing clean loops.
Step 3: Trim and Edit Your GIF
After recording or importing, Zight opens a built-in editor where you can:
- Trim the start and end points to remove dead time before or after the action
- Crop the frame to focus on the relevant area and reduce file size
- Add annotations — arrows, text labels, highlights, and shapes — to draw attention to specific UI elements
- Adjust playback speed to slow down a fast interaction or speed up a lengthy process
- Blur sensitive information like emails, API keys, or personal data before sharing
Zight’s video editing features make this step intuitive. You don’t need to open a separate editor or learn a new tool — everything happens in one place.
Step 4: Export and Share Your GIF Instantly
Hit Save, and Zight does three things simultaneously:
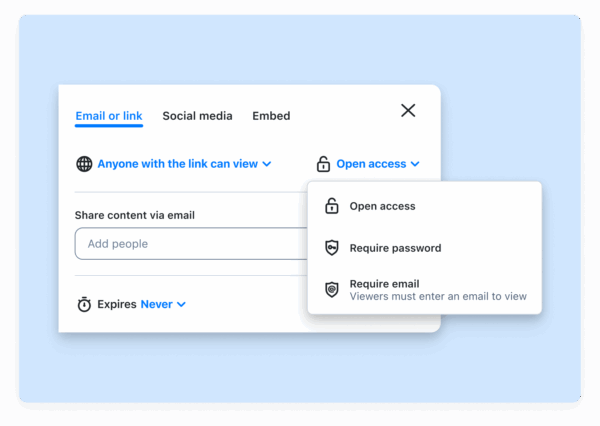
- Generates a shareable link and copies it to your clipboard — paste it into Slack, Jira, email, GitHub, Notion, or anywhere else in one keystroke.
- Saves the GIF to the cloud in your Zight dashboard, organized and searchable for future reference.
- Lets you download the file locally if you need the raw .gif file for embedding in a website, email template, or documentation.
The entire workflow — from clicking “record” to having a shareable GIF link on your clipboard — takes about 15–30 seconds depending on clip length. There are no watermarks on paid plans, no forced sign-in walls to view the link, and your GIFs are hosted on Zight’s CDN for fast loading.
Method 2: How to Make a GIF from a Video Using Free Online Tools
If you don’t want to install anything and just need a quick one-off conversion, browser-based video to GIF converters are a solid option. Here are the best free tools in 2026, with steps for each.
Ezgif.com (Best Free Browser-Based Option)
Ezgif is the go-to free online converter for developers and power users who want granular control without installing software.
- Go to ezgif.com/video-to-gif.
- Click Choose File and upload your video (MP4, AVI, WebM, MOV — up to 200 MB).
- Click Upload video! and wait for processing.
- Set the start time and end time for the portion you want.
- Choose your frame rate (10–15 fps is ideal for most use cases) and output size.
- Click Convert to GIF!
- Preview the result, then click Save to download.
Pros: Free, no watermark, granular controls (fps, size, optimization), no account required.
Cons: 200 MB upload limit, no cloud sharing, no annotation tools, upload speed depends on your connection. You also have to re-upload every time — there’s no saved history.
GIPHY (Best for Social Sharing)
- Go to giphy.com/create/gifmaker and sign in (free account required).
- Upload your video file or paste a video URL (YouTube, Vimeo, etc.).
- Use the trimmer to select the portion you want (up to 30 seconds).
- Add optional captions, stickers, or filters.
- Click Upload to GIPHY — your GIF gets a shareable GIPHY link.
Pros: Free, supports URL-based conversion (paste a YouTube link), built-in sharing to social platforms.
Cons: GIFs are public by default, limited editing controls, lower quality than dedicated converters, requires an account.
CloudConvert (Best for Batch and Format Flexibility)
- Go to cloudconvert.com/mp4-to-gif.
- Upload your video file (supports 200+ formats).
- Adjust settings: resolution, fps, trim start/end.
- Click Convert and download the resulting GIF.
Pros: Supports virtually any input format, batch conversion, API available.
Cons: Free tier limited to 25 conversions/day, no annotation or editing features.
Method 3: How to Make a GIF from a Video Using Desktop Apps
If you frequently create GIFs and want offline capability, a desktop application gives you the most control.
Adobe Photoshop (Advanced Users)
- Open Photoshop and go to File → Import → Video Frames to Layers.
- Select your video file and choose the range to import.
- Check “Make Frame Animation” in the import dialog.
- In the Timeline panel, adjust frame timing and delete any unwanted frames.
- Go to File → Export → Save for Web (Legacy).
- Select GIF as the format, set colors (128–256), and choose your looping option.
- Click Save.
Pros: Maximum control over quality, color palette, dithering, and frame-level editing.
Cons: Requires a Creative Cloud subscription ($22.99/mo), steep learning curve, slow for quick conversions.
ScreenToGif (Windows Only — Free and Open Source)
- Download ScreenToGif from screentogif.com.
- Open the app and choose Editor to import an existing video, or Recorder to capture your screen.
- Use the frame-by-frame editor to delete frames, add text, or adjust timing.
- Go to File → Save As → GIF and choose your encoder (the built-in encoder works well for most cases).
Pros: Completely free, no watermark, powerful frame-level editor, lightweight.
Cons: Windows only, no cloud sharing, no team collaboration features.
Method 4: How to Make a GIF from a Video Using the Command Line (FFmpeg)
For developers who prefer terminal workflows — or who need to batch-convert videos to GIFs in a CI/CD pipeline — FFmpeg is the gold standard. It’s free, open-source, and gives you pixel-level control over the output.
Basic Conversion
ffmpeg -i input.mp4 -vf "fps=12,scale=640:-1:flags=lanczos" -c:v gif output.gifThis command takes input.mp4, sets the frame rate to 12 fps, scales the width to 640 pixels (height auto-calculated), uses the high-quality Lanczos resampling filter, and outputs a GIF.
Higher Quality with a Custom Color Palette
GIFs are limited to 256 colors. For better quality, generate a palette first:
# Step 1: Generate a color palette from the video ffmpeg -i input.mp4 -vf "fps=12,scale=640:-1:flags=lanczos,palettegen" palette.png # Step 2: Use the palette to create the GIF ffmpeg -i input.mp4 -i palette.png -lavfi "fps=12,scale=640:-1:flags=lanczos [x]; [x][1:v] paletteuse" output.gifThis two-pass approach produces noticeably sharper GIFs with better color fidelity, especially for screen recordings with gradients or rich UI colors.
Trim a Specific Portion
ffmpeg -i input.mp4 -ss 00:00:03 -t 5 -vf "fps=12,scale=640:-1:flags=lanczos" output.gifThis starts at the 3-second mark (-ss 00:00:03) and captures 5 seconds of footage (-t 5).
Pros: Free, scriptable, highest level of control, batch processing, no file size limits.
Cons: Requires command-line comfort, no GUI, no sharing or collaboration features.
Method 5: How to Make a GIF from a Video on Mobile
Need to convert a video to a GIF on your phone? Here are the best options for iOS and Android in 2026:
iPhone (iOS)
- Shortcuts app (built-in): Apple’s Shortcuts app includes a “Make GIF” action. Open Shortcuts → Create New Shortcut → add “Make GIF from Video” → select your video → save. No third-party app required.
- GIPHY app: Free, easy trim-and-convert with social sharing built in.
- ImgPlay: More editing control — speed adjustment, text, filters, cropping. Free with optional pro upgrade.
Android
- GIF Maker by Momento: Simple video-to-GIF conversion with trim and resize controls.
- GIPHY app: Same functionality as the iOS version — upload, trim, convert, share.
- Video to GIF by Picto (on Google Play): Lightweight converter with batch support.
Note: Mobile-created GIFs are fine for quick social shares, but for professional use (bug reports, documentation, team collaboration), a desktop tool like Zight will give you better quality, annotation options, and instant cloud sharing.
Video to GIF Converter Comparison Table (2026)
Here’s how the most popular methods stack up across the features that matter most:
| Feature | Zight | Ezgif | GIPHY | Photoshop | ScreenToGif | FFmpeg |
|---|---|---|---|---|---|---|
| Price | Free plan; Pro from $9/mo | Free | Free | $22.99/mo | Free | Free |
| Platform | Mac, Windows, Chrome | Browser | Browser, iOS, Android | Mac, Windows | Windows only | Mac, Windows, Linux |
| Screen recording → GIF | ✅ Direct | ❌ | ❌ | ❌ | ✅ Direct | ❌ |
| Import video → GIF | ✅ | ✅ | ✅ | ✅ | ✅ | ✅ |
| Trim & crop | ✅ | ✅ | Basic | ✅ Advanced | ✅ Advanced | ✅ (CLI flags) |
| Annotations (arrows, text) | ✅ | ❌ | Stickers only | ✅ | ✅ | ❌ |
| Cloud sharing link | ✅ Instant | ❌ | ✅ (public) | ❌ | ❌ | ❌ |
| No watermark | ✅ | ✅ | ✅ | ✅ | ✅ | ✅ |
| Batch conversion | ❌ | ❌ | ❌ | Via Actions | ❌ | ✅ |
| Quality control | Good | Good | Limited | Excellent | Good | Excellent |
| Speed (record to share) | ~15 seconds | 2–5 minutes | 2–3 minutes | 5–15 minutes | 2–5 minutes | 1– |


