You usually do not crop a GIF because you want to edit for fun. You crop it because the frame includes a private browser tab, a messy desktop, too much empty space, or a distracting part of the interface. The hard part is keeping the animation intact while trimming the canvas down to what viewers actually need to see.
Quick answer
To crop a GIF without losing animation, use an editor that supports animated GIF input, set the crop box once across the full canvas, preview the complete loop, export as an animated GIF rather than a still image, and check file size before sharing. Do not crop individual frames by hand unless you are fixing a very specific frame problem.
Decision table
| Cropping choice | Best when | Watch out for |
|---|---|---|
| Tight crop around the action | The viewer only needs to see one menu, button, or state change. | Leave a small margin so cursor movement and tooltips do not feel cramped. |
| Wide crop with context | The UI location matters, such as a sidebar item or settings panel. | Wide GIFs can become heavy quickly, especially with many colors. |
| Square crop | The GIF will be used in a social, chat, or help-center preview. | Some desktop workflows become hard to read in a square frame. |
| Tall crop | The important action happens in a vertical panel or mobile screen. | Test the final width so labels remain legible. |
| Crop after trimming | The first or last seconds include irrelevant movement. | Trim timing first, then crop once so the loop stays consistent. |
Why animated GIF cropping is easy to get wrong
A GIF is not one picture. It is a sequence of frames with timing information, color tables, and a loop instruction. A basic image editor may open only the first frame, crop that still frame, and silently discard the rest. That is how people end up with a clean-looking preview that no longer moves.
The safer workflow is to treat the GIF as a small video-like object. Crop the canvas across the entire animation, preserve frame order, preserve timing, and then export the result as an animated GIF. If the tool does not show playback before export, use another tool or test the exported file carefully before sending it to a customer or teammate.
Start by deciding what the viewer must understand
Before touching the crop handles, decide what the GIF is supposed to prove. If it shows a bug, the frame may need the control, the error message, and the action that triggered it. If it explains a feature, the frame may only need the menu and final state. Cropping is a communication decision first and an image decision second.
That decision keeps you from over-cropping. A perfectly tight GIF can remove the context that tells someone where the action happened. A loose GIF can include private information or visual clutter. The right crop leaves enough context to understand the action and removes everything that does not help.
Step 1: duplicate the original file
Keep the original GIF unchanged until the cropped version has passed playback and file-size checks. This matters when the source came from a customer, a design review, or a one-time recording. If the export settings go wrong, the original is the only reliable way to recover the animation.
Use a clear filename such as product-menu-original.gif and product-menu-cropped.gif. That tiny habit prevents people from attaching the wrong version later, especially when the same GIF is compressed, resized, or added to a help article.
Step 2: trim before you crop when timing is messy
If the first second shows the cursor moving into position, trim that part before cropping. A GIF that starts on the relevant screen feels intentional and usually exports smaller. It also prevents the crop from being chosen around a cursor path that does not matter to the final explanation.
Trim the end as well. Many GIFs keep recording after the action is complete, which adds dead frames and makes the loop feel sluggish. A good loop ends after the viewer can see the result, then restarts without making them wait through idle time.
Step 3: crop the full animation, not one frame
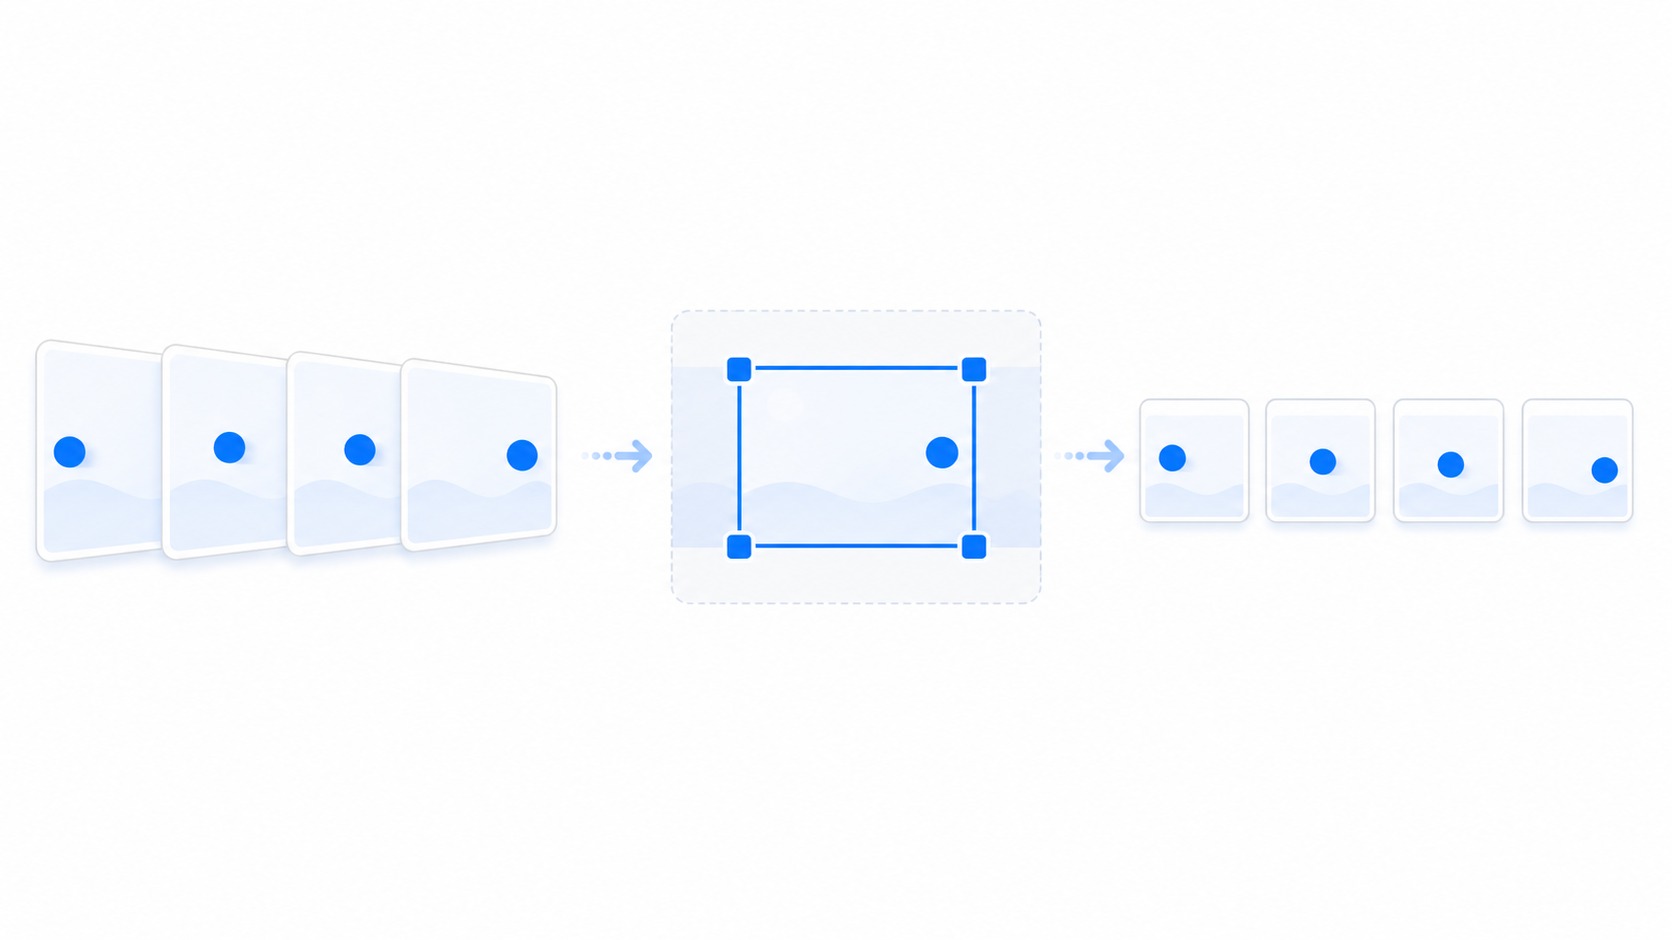
Use a tool that applies the same crop rectangle to every frame. That keeps the animation stable. If you crop frames independently, the subject can jump, the cursor can drift, and the GIF can feel broken even though every individual frame technically exists.
Preview the complete loop after applying the crop. Watch the edges of the frame, not only the center. Dropdowns, hover cards, mouse pointers, loading states, and validation messages often appear near the boundary. If any of those get cut off, widen the crop before exporting.
Step 4: preserve timing and loop behavior
A cropped GIF should play at the same pace as the original unless you intentionally changed timing. If the export feels faster or slower, the editor may have rewritten frame delays. That can make a product interaction look unnatural or make an instruction harder to follow.
Check whether the GIF loops forever or stops after one pass. For support and documentation, infinite looping is usually useful because viewers can glance back without replaying the asset. For a landing page or email, a limited loop may be less distracting. Choose the loop behavior based on where the GIF will appear.
Step 5: export, then test in the place people will view it
Do not trust the editor preview alone. Open the exported GIF in a browser, in the chat app, in the help-center draft, or wherever the final viewer will see it. Some platforms resize large GIFs, flatten animation, or generate previews that hide details.
If the GIF is for a support ticket, paste it into the same system your team uses and view it as the recipient when possible. That catches problems with dimensions, file limits, and tiny text before the customer has to ask for another explanation.
Quality settings that matter after cropping
Cropping usually reduces pixel area, which can lower file size without harming quality. But a cropped GIF can still be large if it has many colors, a long duration, or busy motion across the whole frame. The most useful settings are width, frame rate, color count, dithering, and duration.
Avoid lowering every setting at once. First crop the canvas. Then trim idle time. Then reduce width if text remains readable. After that, use fewer colors or light compression. This order protects clarity because it removes waste before it damages the useful part of the image.
When to use a GIF versus a video link
GIFs are excellent for short loops, tiny UI motions, and quick visual examples that do not need sound. They are less ideal for long walkthroughs, narrated explanations, or anything with important text that must remain sharp at full size.
When the explanation is longer than a few seconds, use the screen recorder and share a link instead of forcing a heavy GIF into a ticket or document. For short source clips, the video to GIF converter can help you create a GIF only after you know the loop should be brief.
Privacy checks before sharing a cropped GIF
Cropping can remove visible private information, but it is not a full privacy review. Look for account names, customer emails, browser tabs, bookmark bars, URLs, internal project names, document titles, and notification badges. If the sensitive detail is inside the action area, crop alone will not solve it.
For static images and recordings, use annotation and blur workflows where appropriate. If the asset is a GIF with a messy background, the GIF background remover may help with presentation, but it should not be treated as a security control.
Common mistakes when cropping GIFs
The most common mistake is exporting only the first frame. The second is cropping so tightly that the cursor, tooltip, or final success message disappears. The third is re-exporting again and again until the GIF becomes muddy and hard to read.
Another mistake is choosing a crop for desktop viewing and then sharing it somewhere that displays the GIF at half width. If text matters, test at the smallest likely display size. If viewers cannot read the label, a clearer crop or a short video link will work better.
A practical workflow for teams
Record the source with Zight screen recording or start from an existing clip. Convert only the useful segment into a GIF, crop around the action, and then compress if the result is still too large. The GIF compressor is useful after the crop because it works on the smaller final canvas.
If you need a GIF from scratch, use the GIF maker workflow and plan the frame before recording. A clean source is easier to crop than a cluttered one. If you later need to send a longer explanation, use the video link generator so the viewer gets a normal playback page instead of a bulky animation.
How to choose the crop frame
Use the first complete moment of the animation as your reference frame, then scrub to the busiest moment before committing. The busiest moment is usually where menus, tooltips, cursor movement, or success messages appear. If the crop survives that moment, it will usually survive the whole loop.
For product UI, leave more room on the side where the cursor travels. For a menu interaction, include the menu label that opened the dropdown and the selected result. For a bug reproduction GIF, include the trigger and the visible outcome. A viewer should not have to guess what happened just outside the frame.
If the GIF will sit inside a help article, test the crop in the article width rather than on your full desktop. A crop that looks generous at full size can become cramped once the CMS scales it down. When labels become too small, make a shorter GIF with a tighter subject rather than shrinking the whole desktop recording.
Use cases for cropped GIFs
Support teams use cropped GIFs to show a single repeated action, such as where to find a setting or what a loading state looks like. The crop should remove unrelated account information and keep the customer focused on the button, menu, or confirmation message.
Product teams use cropped GIFs to show a small behavior in design reviews. In that case, context matters more than file size. Keep enough surrounding UI that reviewers understand the component’s position in the flow. A tiny crop of only the animation can create more questions than it answers.
Marketing and documentation teams use cropped GIFs when a short motion explains a feature faster than a static image. Keep these loops clean, short, and readable. If the motion needs narration or more than one concept, a linked video will usually serve the audience better.
Troubleshooting bad exports
If the exported GIF flickers, the crop or optimization step may have changed how frames are combined. Re-export from the original with fewer optimization options and check whether the flicker disappears. Some encoders reduce file size by storing only changed pixels, which can behave poorly after aggressive edits.
If colors look rough, restore a higher color count or reduce dithering changes. Interface GIFs often contain subtle shadows, disabled states, and antialiased text. Heavy palette reduction can make those details look dirty even when the motion still works.
If the file is still too large after a clean crop, shorten the duration before lowering quality. A five-second loop with readable text is usually better than a ten-second loop that has been compressed until the interface looks smeared.
A final review checklist
Open the final GIF in a browser, view it at the size where it will be shared, and watch at least two complete loops. Confirm the animation starts in a sensible place, shows the full action, and ends after the result is visible. Check all four edges of the frame for clipped cursor movement or floating UI.
Then check the sharing context. If the GIF is going into a ticket, include one sentence of written context. If it is going into documentation, add nearby text that explains what the viewer should notice. A GIF should support the explanation, not carry the entire burden alone.
How to brief someone else before they do the work
If you hand this task to a teammate, do not just say how to crop a gif. Give them the purpose, audience, destination, and constraint. A support reply, a public help article, an internal review, and a customer handoff all require different tolerance for file size, context, privacy, and polish.
Use the decision table as a short brief. If the job looks like Tight crop around the action, name that explicitly and explain why. If it looks more like Wide crop with context, tell the teammate what trade-off matters most. A clear brief prevents the editor from optimizing the wrong thing and creating another review cycle.
What to save for audit or reuse
Keep the source file, the delivery file, and a short note about what changed. That note does not need to be formal. It can be as simple as the page range used, the bitrate chosen, the crop reason, the compression setting, or the link destination. The point is to make the work repeatable.
This matters most when the asset supports a customer, prospect, legal review, bug report, or training workflow. Someone may need to know whether the file was edited, why a section was removed, or where the original lives. A clean delivery file plus a traceable source is easier to defend than a mystery attachment.
How to review the result with a non-expert
Ask the reviewer what they understand from the final file before explaining your choices. If they can identify the point quickly, the how to crop a gif without losing animation workflow probably worked. If they ask where to look, what changed, or why the file was sent, the asset needs more context or a different format.
Review against real conditions. For Square crop, test the destination where the viewer will open it. For Tall crop, check whether the chosen format still supports the viewer’s decision. For Crop after trimming, confirm that you did not accidentally replace an archive-quality source with a smaller delivery copy.
When to stop optimizing
Optimization has a point of diminishing returns. Stop when the file is clear, safe to share, accepted by the destination, and small enough for the workflow. Chasing a smaller number can waste time and damage the part of the asset that actually helps the viewer.
A useful test is whether another round of editing would change the viewer’s outcome. If it would not help them understand, approve, reproduce, or act faster, stop. Send the file with a clear note and move on to the next step in the workflow.
Documentation habits that prevent repeat mistakes
Create a tiny internal note for recurring how to crop a gif tasks. Include preferred settings, naming examples, privacy checks, and the approved place to store originals. Teams do not need a long policy for every asset, but they do need a shared default that keeps quality consistent.
Update that note when a tool, CMS, ticket system, or sharing workflow changes. Many quality problems come from old instructions that were correct for last year’s destination. A five-minute update can prevent dozens of bad exports, oversized attachments, or confusing handoffs.
Handoff examples you can copy
For an internal teammate: I prepared this for how to crop a gif and optimized it for review, not archiving. The source file is still available, the delivery version is the one attached or linked here, and the main thing to check is whether the viewer can understand the point without extra explanation.
For a customer or prospect: I pulled together the smallest useful version so you do not have to sort through unrelated material. Please review the visible section, file, or recording linked here and use the written note as the source for what action is needed next.
For documentation or enablement: this asset should support the written process, not replace it. Add the file near the step where it helps, label it with the product area and date, and remove it when the workflow changes. That keeps how to crop a gif without losing animation work from becoming stale visual clutter.
For support or engineering: include the context that a viewer cannot infer from the asset. Add account type, browser or device where relevant, the expected result, the actual result, and whether the file has been edited for privacy or size. The more sensitive the workflow, the more important that note becomes.
For a manager reviewing the process: judge the output by whether it reduced confusion, not by whether every possible setting was perfect. A clean, timely, well-labeled delivery file is usually better than an overworked asset that arrives after the decision has already moved on.
What good looks like after sharing
A good how to crop a gif outcome is quiet. The recipient opens the asset, understands why it was sent, and can act without asking for a cleaner file, a missing page, a different format, or the original context. That is the standard to use when judging the final result. If the next message is a decision, approval, reproduction note, or useful question, the asset did its job.
The file should also be easy for your own team to recognize later. Clear title, clear destination, clear source, and clear owner matter more than people expect. Many teams lose time not because the asset was bad, but because nobody can tell which version should be used. Put the final version where the next person will naturally look for it.
Finally, the workflow should be repeatable by someone who was not present for the first request. If another teammate can follow the same notes and produce a similar result for how to crop a gif, you have a working process rather than a one-off fix.
That repeatability is what separates a useful content operation from a collection of improvised exports. The goal is not to make every asset perfect. The goal is to make the next share clear, appropriately scoped, and easy to trust. When in doubt, choose the version that makes the recipient’s next action obvious.
Useful Zight workflows
- remove a GIF background
- turn a video into a GIF
- compress a GIF
- make a GIF
- record your screen
- create a video share link
Frequently asked questions
Can you crop a GIF without stopping the animation?
Yes. Use an editor that supports animated GIFs and applies the crop to every frame. Export as an animated GIF, then open the result in a browser to confirm it still moves.
Why did my cropped GIF become a still image?
The editor likely treated the GIF as a single image and saved only one frame. Reopen the original in a tool that shows the full timeline or playback preview before exporting.
Will cropping reduce GIF file size?
Usually, because the canvas has fewer pixels. File size also depends on duration, motion, colors, width, frame rate, and compression settings.
Should I crop or resize a GIF first?
Crop first when extra space is the problem. Resize after cropping if the final GIF is still too large or too wide for the place where it will be shared.
How much margin should I leave around the action?
Leave enough room for cursor movement, hover states, menus, and the final result. A small margin is usually better than a crop that clips context.
Next step
Crop only what the viewer needs, then share the clean version. For longer visual explanations, record and share with Zight instead of forcing the whole workflow into one GIF.