
At one time another, whether for a college writing assignment, to publish a groundbreaking research paper, or when working in a professional environment, you may be asked to write something in the MLA format.
Not sure what the MLA format is? Don’t worry, that’s what this article is about! Keep reading to learn all about this writing structure, how to use it successfully, and how Zight (formerly CloudApp) can help.
What is MLA Format?
The MLA format is a document organization structure that was developed and popularized by the Modern Language Association; a collection of American scholars that “promotes the study and teaching of literature.”
The MLA format was first introduced in 1951 as a way for all researchers, scholars, students, and others in the fields of language and literature to structure their research papers and assignments. By adopting one uniform approach to structure, the Modern Language Association hoped to make the consumption of information as easy and streamlined as possible.
The MLA format style guide was most recently updated in 2016. This is the eighth version published by the Modern Language Association since the format was first developed.
How to Do MLA Format
Now that we have a shared understanding of what the MLA format is, we can begin discussing how to use it. The following nine simple steps will teach you how to craft a document using this formatting structure — no matter which word processor you choose to use.
- Set your document’s page margins to one inch if they aren’t set to this figure already. One inch is standard for all MLA formatted documents.
- Choose “Double” for the line spacing of your document. This addition of white space is used to make the consumption of content easier.
- Select a clear and easily legible font such as Times New Roman and make sure to set it to size 12, the standard font size for all MLA formatted documents.
- Create an appropriate header that includes your full name, your instructor’s name (if applicable), the course name (if applicable), and the date. You’ll also want to ensure that each page is automatically numbered in the upper right-hand corner.
- Below the header, type the title of your document and center it. You should use sentence case, which means only the first word of your title and all proper nouns are capitalized.
- As you write, be sure to indent each new paragraph ½ inch, leave one space after periods and other punctuation points, and only use italics when absolutely necessary. Do not use bold letters or underline your words.
- You should also know that MLA format in text citation is” done via parenthetical citations and is the same regardless of container (i.g. book or article.)” Each MLA format citation should include the author’s name and the page number.
- The Modern Language Association also has strict guidelines when it comes to works cited. Fortunately, the good folks at bibme have created an extensive guide. We suggest viewing and following it to the letter.
- Finally, once your document is written and structured in the MLA format, you can distribute it. Depending on the purpose of your paper, you may be able to do this digitally. But if a hard copy is needed, use white paper (not off-white or ivory) and choose a high-quality, non-cardstock version for printing purposes.
There you have it! Follow these nine easy steps and you’ll be able to submit all of your research papers, class assignments, and other documents in a perfect MLA format.
MLA Format Examples
It can be difficult to grasp the MLA format without seeing it first hand. With that in mind, we’ve included a couple of MLA format examples for you to view below. Notice how each of the elements previously discussed is included.
Purdue University
Source: Purdue.edu
BibMe (Works Cited Page)
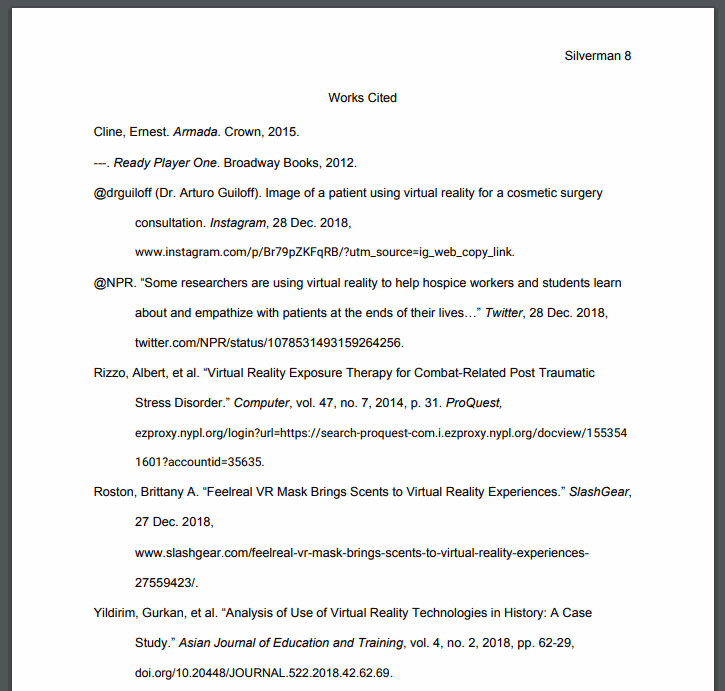
Source: bibme.org
These two examples clearly illustrate what documents in the MLA format should look like. If you’re new to this formatting style, we suggest comparing your final paper to them to ensure you’ve formatted your work in the correct way.
MLA Format Annotations
Now, let’s switch gears a little bit and talk specifically about MLA format annotations. Annotations are important elements of many research papers and other documents that regularly use the MLA format.
In the next few sections, we’ll explain what annotations are, how to use them in the MLA format, and a handy annotation tool you can use to make the entire process smooth and painless.
What is Annotation?
Before we get too far ahead of ourselves, we’ll take a quick minute to define what an annotation is. According to ThoughtCo., an annotation is:
“A note, comment, or concise statement of the key ideas in a text or a portion of a text and is commonly used in reading instruction and in research.”
There are many different ways to annotate a document and different best-practices depending on the kind of document being annotated. In the next section, we’ll cover how to annotate in the MLA format that we discussed earlier in this article.
Annotation in MLA Format
The MLA format, unsurprisingly, has specific requirements for annotation. In most cases, these annotations will occur in the bibliography section of any research paper or report you happen to be working on and will be used to cite books, articles, and other resources necessary for research purposes.
There are two types of annotations to be aware of:
- Summary Annotations: A summary annotation is exactly what it sounds like: an annotation that summarizes the source cited. These annotations should include the author and topic of the document, its purpose, the date is was published, and how it was made available for public consumption.
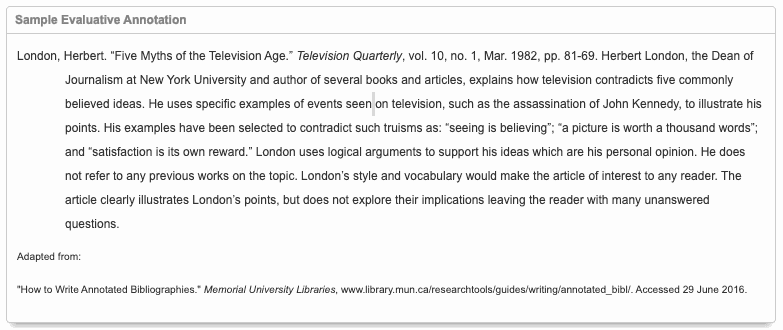
- Evaluative Annotations: An evaluative annotation includes all the aspects of the summary annotation but also includes an assessment of the work’s accuracy, its relevance to the report, and its overall quality. These kinds of annotations help readers learn whether the document will be useful to them or not.
When writing annotations in the MLA format, there are a few things you’ll want to keep in mind, beyond the type of annotation you’re creating.
- Annotations should be written in the third person, double spaced, and about three to six sentences long, or 150 – 250 words.
- If the paper in question required a large amount of research and there are many works that need to be cited, feel free to organize them by topic.
- Be as objective as possible. If you must share an opinion, explain it. That way the reader can understand where you are coming from.
Here’s one of our favorite annotation techniques examples from Columbia College:
Follow these basic rules and guidelines and you’ll be able to easily write annotations in the MLA format and properly cite the works you used to craft your paper or report.
Annotation For the Future of Work:
Zight (formerly CloudApp)
Before we let you go, we want to address one more thing. Namely, how Zight (formerly CloudApp) can make the crafting of annotations in the MLA format much more convenient.
If you’re not familiar with Zight (formerly CloudApp), it’s a revolutionary visual communication tool that combines a webcam and a screen recorder, GIF creation, and image annotation features in one powerful and easy to use package that’s sure to boost your productivity. Plus, it’s free to use!
When it comes to modern annotation methods — especially as they pertain to the MLA format — there isn’t a better tool than Zight (formerly CloudApp). Keep reading to learn how our tool can be used.
How to Annotate With Zight (formerly CloudApp)
Annotating your work with Zight (formerly CloudApp) couldn’t be simpler. Just follow these directions and you’ll be up and running in no time!
For Mac Users
Are you part of the Apple faithful? The following four steps will allow you to easily annotate just about anything — images, reports, research papers… the list goes on!
- Download Zight (formerly CloudApp) and create your free account. Then navigate to the upper right-hand corner of your screen (in the menu bar) and click the Zight (formerly CloudApp) icon.
- In the drop-down menu that appears, select the “Annotation” option. Then, either take a screenshot of your screen, or upload the document you want to add annotations to.
- Next, choose the type of annotation you’d like to add. Zight (formerly CloudApp) has arrows, lines, circles, and emojis available. But to adhere to MLA format guidelines, you’ll want to stick with the text box option.
- Annotate your image or document to perfection. When you’re done, click the blue “Save” button and your work will be uploaded to the cloud automatically . From there, you’ll have the ability to email it, send it in Slack chats, attach it to Trello cards, and more.
For Windows Users
If you’re a windows PC user, you can use Zight (formerly CloudApp) also. The process is largely the same as described above. But we’ve included a separate set of instructions for clarity:
- Download Zight (formerly CloudApp) and create your free account. Then navigate to the lower right-hand corner of your screen (in the Quick Launch icon tray) and click the Zight (formerly CloudApp) icon.
- In the drop-down menu that appears, select the “Annotation” option. Then, either take a screenshot of your screen, or upload the document you want to add annotations to.
- Next, choose the type of annotation you’d like to add. Zight (formerly CloudApp) has arrows, lines, circles, and emojis available. But to adhere to MLA format guidelines, you’ll want to stick with the text box option.
- Annotate your image or document to perfection. When you’re done, click the blue “Save” button and your work will automatically be uploaded to the cloud. From there, you’ll have the ability to email it, send it in Slack chats, attach it to Trello cards, and more!
And that’s it! Whether you use a Mac or Windows computer, you can use Zight (formerly CloudApp) to quickly annotate your work in the MLA format — or any other format you might like to use.
In Conclusion
The MLA format is an important writing structure to understand for anyone publishing research reports or completing class assignments. It’s even used in professional environments from time to time. Fortunately, you now know everything you need to know to use MLA successfully.


