Want to explain complex processes quickly and effectively? Annotated screenshots are your solution. By adding arrows, text boxes, and highlights, you can turn simple images into visual guides that save time, reduce confusion, and improve understanding. Whether you’re creating software tutorials, helping customers, or training employees, annotated screenshots are a practical tool for clear communication.
Why use them?
- Simplify instructions with visuals instead of long text.
- Improve retention – visuals boost memory by 42%.
- Support remote teams with clear asynchronous communication.
- Speed up customer support and onboarding.
How to create them:
- Plan: Know your audience and their needs.
- Prepare: Clean up your screen and focus on key details.
- Annotate: Use consistent styles for arrows, text boxes, and highlights.
- Organize: Save files with clear names and formats.
Tools like Zight streamline the process with features like built-in annotations, sharing options, and security tools. Ready to make your instructions clearer? Start annotating today.
What Annotated Screenshots Are and When to Use Them
What Are Annotated Screenshots?
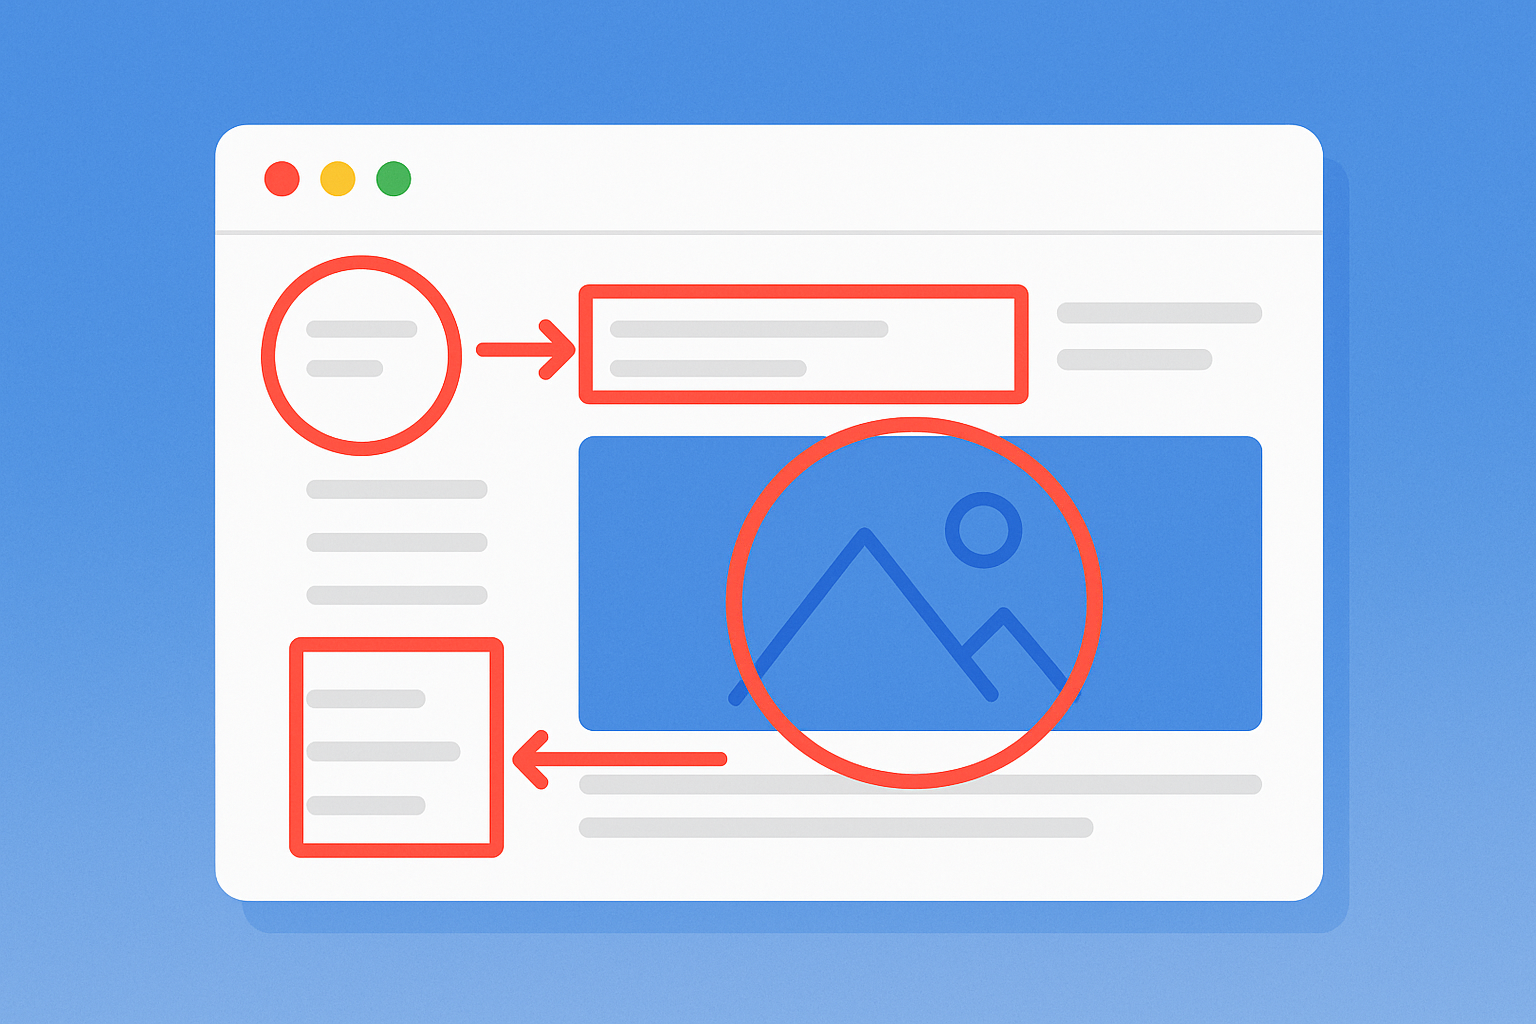
An annotated screenshot is just a regular screenshot that’s been enhanced with arrows, text boxes, highlights, circles, or callouts. These visual elements are added to draw attention to specific areas or provide extra context. Think of it as turning a simple image into a guided visual tool that makes instructions easier to follow.
For instance, a text box that says “Click here to save changes” placed next to a highlighted Save button immediately shows users what to do. The real strength of annotated screenshots is how they blend the clarity of written instructions with the visual impact of an image. Together, they create a more effective way to communicate than either could on its own.
Let’s dive into how these visual aids solve real-world communication challenges in different scenarios.
When and Why to Use Annotated Screenshots
Annotated screenshots are perfect for situations where clear and precise communication is a must. One common example is software tutorials. Instead of explaining where to find a menu item in a long paragraph, an annotated screenshot can instantly highlight it and explain its purpose in a single glance.
These visuals are also a go-to tool for customer support and QA teams. They make it easy to pinpoint issues and provide step-by-step solutions. This cuts down on endless back-and-forth emails, helping both customers and support staff while giving developers exactly the details they need to resolve problems.
For employee onboarding and training, annotated screenshots are invaluable. New hires can use them to quickly learn company-specific software, understand workflows, or complete administrative tasks. The visual format makes it easier to grasp processes, speeding up the time it takes for employees to get up to speed.
In documentation and process mapping, annotated screenshots play a key role. Whether you’re creating user manuals, outlining standard procedures, or sharing best practices, these visuals help ensure that everyone follows the same steps consistently and without confusion.
Remote teams, especially those working across time zones, benefit greatly from using annotated screenshots for asynchronous communication. Instead of scheduling meetings or writing lengthy explanations, a well-annotated screenshot can clearly convey complex ideas and instructions.
If you ever find yourself writing detailed directions about where to click, what to look for, or how to complete a multi-step process, chances are an annotated screenshot will communicate your message far more effectively than words alone.
HOW TO ANNOTATE: Screenshots, Images, PDF’s & Websites w/ Markup Hero
How to Prepare Before Creating Annotated Screenshots
To create effective annotated screenshots, preparation is key. A little planning upfront can save you time on revisions and ensure your visuals are clear and easy to follow. Start by understanding who you’re creating these screenshots for, tidying up your workspace, and sticking to a consistent style. Let’s break it down.
Know Your Audience and Goals
Before you even take a screenshot, think about the problem your annotated image is meant to solve. Are you helping new hires learn a software tool? Guiding customers through a checkout process? Or maybe showing your team how to use a new feature? Each situation calls for a unique approach and level of detail.
Start by identifying who will use your instructions. Consider their role, experience level, and what they need to accomplish. For instance, a tutorial for executives will look very different from one aimed at technical support staff. Define your audience by their familiarity with the process and their specific needs.
Experienced users might only need quick pointers, while beginners will likely require more detailed explanations. To better understand your audience, gather feedback through surveys, interviews, or casual chats. Use this input to ensure your annotations have a clear purpose and deliver value. Once you’ve nailed down your audience, you can move on to creating clean, focused screenshots.
Set Up Your Screen and Environment
A messy screen can make even the best instructions confusing. Start by closing unnecessary tabs and apps. Disable notifications from email or messaging apps to avoid interruptions. A clear, distraction-free screen ensures that your key information stands out.
Stick to one task at a time to avoid accidental distractions, like unrelated windows sneaking into your screenshot. If you often use apps that could interrupt your focus, consider setting screen time limits for those during your work.
When working with a web interface, pay extra attention to your browser settings. Browser extensions can help simplify your screen by hiding unnecessary elements or disabling infinite scrolling. Some users even prefer minimalist operating systems to keep their workspace clean and focused.
Keep Your Style Consistent
Consistency is what separates professional-looking screenshots from chaotic ones. Use the same color scheme, font, arrow style, and annotation format for all your images. For example, if you highlight actions with red arrows, stick with red arrows throughout your guide.
Text formatting should also follow a consistent pattern. Use the same font and size, and decide where to place text boxes – like always positioning them to the right of the element they explain. Similarly, use shapes like circles for clickable buttons and rectangles for text fields, and apply them consistently.
If you’re creating screenshots for a company, align your annotations with the brand’s guidelines. Use approved colors, fonts, and design elements to maintain a polished, professional look. To make this easier for future projects, document your style choices in a simple guide so others can replicate them.
Step-by-Step Guide to Creating Annotated Screenshots
With your workspace ready and your plan in place, it’s time to dive into creating annotated screenshots. This process boils down to three key phases: capturing the image, adding meaningful annotations, and organizing your final output. Let’s break it down.
Take the Screenshot
A great annotated screenshot starts with capturing the right image. Focus on highlighting the feature or process you’re explaining while providing enough context to help users orient themselves. Avoid capturing your entire screen if it makes the key feature hard to identify or forces users – especially those on mobile – to zoom in excessively.
Use built-in tools like macOS shortcuts (Shift + Command + 3 or Shift + Command + 5) to quickly grab the specific area you need. These tools are fast and don’t require any extra software. If you’re on a PC, check out our guide on taking screenshots on Windows for more options.
When framing your shot, include only the essential context for navigation. For example, if you’re explaining a small detail like text in a developer console, zoom in to make it clear and readable.
Protect sensitive information before taking the screenshot. Replace personal names, email addresses, and other private data with placeholders. This step ensures privacy and avoids accidental exposure of confidential details.
Skip screenshots for overly simple elements – like progress bars or basic confirmation pop-ups – as they rarely add value and can clutter your guide. Similarly, avoid capturing features that are still in development or frequently change. Constant updates can become a time sink.
Add Clear Annotations
Once your screenshot is ready, it’s time to enhance it with annotations that guide the viewer. Start with the most critical elements and then address supporting details. This keeps the focus on what matters most.
- Arrows: Use arrows to point directly at buttons, menus, or fields. Avoid vague placements – make sure the arrow lands precisely on the element you’re referencing.
- Text boxes: Use these for more detailed explanations. Keep their placement consistent throughout your guide. For example, if you place a text box to the right of an element in one step, stick to that format in the following steps.
- Highlights: Draw attention to key areas with colored boxes or circles, but don’t overdo it. Too many highlights can overwhelm the image.
- Step numbers: When explaining a sequence of actions, number the steps to make it easy for viewers to follow along.
- Color choices: Pick colors that contrast well with your screenshot’s background. Bright colors like red or yellow often work, but if your interface uses a dark theme, lighter colors like white or pale yellow might be better.
Keep your annotations short and actionable. Instead of writing, “You can click this button to save your work,” simplify it to “Click Save.” Your goal is to complement the visual, not overload it with text.
Organize and Save Your Work
Before saving your annotated screenshot, take a moment to review it carefully. Ensure that annotations don’t overlap or obscure important parts of the interface. The flow should feel logical, making it easy for someone unfamiliar with the process to follow along.
- Descriptive file names: Name your files clearly, like
login-process-step2.png, and group them by project or feature. This helps keep your work organized and easy to find later. - Choose the right format: Save in a format that preserves quality. PNG is ideal for screenshots with text and sharp lines, while JPEG works for images with gradients or many colors. Be mindful of how your sharing platform handles image compression.
Finally, test your annotations. Share your screenshots with someone unfamiliar with the process and gather feedback. They’ll quickly point out any confusing areas or missing details, helping you refine your work for maximum clarity.
sbb-itb-5d91f01
Tools and Features for Annotating Screenshots
When it comes to creating clear and effective visual instructions, having the right tools can make all the difference. While basic screenshot tools are fine for capturing images, dedicated annotation platforms take things a step further, turning simple screenshots into detailed, easy-to-follow guides. Choosing the right tool not only saves time but also ensures your visuals communicate effectively.
Why Use Zight for Annotating Screenshots
Zight simplifies the entire process – capture, annotate, and share – all in one place. No need to jump between multiple programs; Zight streamlines everything for you.
If you’re focused on creating step-by-step guides, Zight excels. It allows you to combine multiple annotated screenshots into a seamless tutorial, making even the most complicated processes easier to grasp. Forget about juggling separate files or presentations – Zight keeps everything unified.
Seamless integration with team tools means you can instantly share your annotated screenshots within your existing workflows. Whether it’s dropping a screenshot into a Slack channel or attaching it to a Jira ticket, it’s just a click away.
Cross-platform accessibility ensures you can use Zight on Mac, Windows, or Chrome. Your tools and saved work are always available, no matter what device or operating system your team prefers.
These features make Zight a standout choice for anyone serious about creating clear and professional visual instructions.
Key Features of Zight for Efficient Annotation
AI-powered transcription and summaries can be a game-changer when dealing with complex software. For instance, if you record a quick video walkthrough, Zight can generate a text summary that you can refine into annotations for your screenshots.
Unlimited recording time and uploads (available on paid plans) mean you can document even the lengthiest processes without worrying about hitting limits. Whether you’re creating detailed instructions or covering extensive workflows, Zight’s screen recorder has you covered.
4K high-resolution recording ensures that your screenshots remain sharp and easy to read, even when zoomed in. This is especially important for annotating intricate tools like developer interfaces, spreadsheets, or applications with small text.
Advanced sharing options give you control over how your annotated screenshots are distributed. You can set permissions, track views, and update your screenshots without breaking links – a lifesaver when processes change and documentation needs updating.
Custom branding allows you to maintain a professional look when sharing screenshots with clients. Add your company’s logo and match the annotations to your brand’s color scheme for a polished, cohesive appearance.
Enterprise-grade security with SSO ensures compliance with your organization’s security standards. Whether you’re sharing internal guides or external instructions, Zight helps you keep everything secure while meeting business requirements.
These features make Zight not just a tool, but a comprehensive solution for creating, sharing, and managing annotated screenshots with ease and professionalism.
Best Practices for Sharing Annotated Screenshots
Clear annotation practices are just the first step; how you share and organize these visuals plays a huge role in keeping communication smooth and effective. Here’s how to manage and share your annotated screenshots efficiently.
Name and Organize Files Clearly
A descriptive filename can save you from endless searching. For example, a name like “ClientPortal-LoginInstructions-09-02-2025.png” tells you exactly what the file contains and when it was created. Using the MM-DD-YYYY date format helps keep files in chronological order. If you’re updating instructions, adding a version number – like “PayrollSetup-NewHires-09-02-2025-v2.png” – makes it obvious that this is the latest version.
Organizing files by project or client is another time-saver. Create folders for different clients, projects, or workflow stages, so team members (especially new ones) can find what they need without digging through a chaotic file structure.
For instance, in software development, teams that stick to standardized naming conventions, like “BugReport-CheckoutError-09-02-2025.png”, report spending less time finding the right screenshots during sprint reviews. Similarly, marketing teams that organize visuals by campaign and date experience faster onboarding and fewer mix-ups over which version to use.
Once your files are named and organized, make sure everyone has access to the latest versions by using cloud-sharing tools.
Use Cloud Sharing or Collaboration Tools
Cloud-based sharing tools make version control much easier than relying on email attachments. With email, it’s easy to lose track of who has the most up-to-date file or whether everyone who needs it has received it.
Platforms like Zight simplify this process by centralizing screenshots into a single link. That way, any updates are automatically visible to everyone with access, eliminating confusion during team discussions.
Zight also integrates with tools like Slack, Microsoft Teams, and Jira, so you can share an annotated screenshot directly in a Slack channel or attach it to a Jira ticket without leaving your workflow. These integrations save time and keep everything in one place.
Another bonus? Analytics features. You can track who’s viewed your screenshots, how often they’re accessed, and even identify areas where instructions might need clarification based on user engagement.
By using a centralized, cloud-based repository with clear folder structures and access controls, you ensure that annotated screenshots stay up-to-date and accessible to everyone who needs them. Regularly reviewing and updating these visuals keeps your information accurate, while version control features help teams stay aligned.
Before sharing, though, it’s essential to ensure sensitive information is protected.
Protect Sensitive Information When Sharing
Screenshots often capture more than you realize – usernames, email addresses, account numbers, or other private details can slip through unnoticed. Failing to catch these can lead to privacy breaches, loss of trust, or even compliance violations.
Before sharing, carefully review your screenshots for any sensitive information that might have been captured accidentally. Pay attention to email notifications, usernames in account settings, or confidential client data in forms or dashboards.
Tools like Zight make this process easier with built-in redaction and blur features. You can obscure sensitive areas or completely redact text while maintaining the instructional value of the screenshot. This is especially useful for creating visuals meant for external clients or shared company repositories.
To minimize risks, establish clear guidelines for sharing screenshots. These might include mandatory reviews before sharing, using redaction tools for personal data, and limiting distribution to only the necessary parties. Such measures ensure that team members handle information responsibly.
In the U.S., privacy regulations like HIPAA for healthcare organizations or other industry-specific rules often apply. Make sure your organization’s compliance needs are met to avoid legal or regulatory complications.
It’s also a good idea to set different sharing permissions for internal and external audiences. Internal screenshots can include detailed system information, while client-facing versions should focus only on what’s necessary for the audience to understand. This keeps your communication professional and secure.
Conclusion: Key Takeaways
Annotated screenshots play a crucial role in simplifying communication, making it easier to convey complex ideas. Visual aids like these can boost information retention by up to 42% – a significant advantage when clarity matters most. The secret to making them effective? Consistency and simplicity. Sticking to uniform colors, fonts, and shapes ensures faster processing while keeping visuals clean and uncluttered.
Tools like Zight make this process easier. With features like built-in redaction, cloud-based sharing to avoid version control headaches, and integrations with platforms like Slack, Microsoft Teams, and Jira, Zight transforms what could be a tedious, multi-step task into a smooth, efficient workflow.
But the benefits go beyond just making instructions look better. Companies such as ChartHop and CallerDesk have demonstrated how well-executed annotations can drastically improve user comprehension. These tools also help cut down on meeting fatigue and speed up issue resolution by offering immediate context, especially in asynchronous work environments.
FAQs
What are the best practices for keeping your screenshot annotations consistent?
To make your screenshot annotations clear and visually appealing, stick to the same colors, fonts, and shapes throughout your documentation. Keeping things uniform not only looks professional but also makes your instructions easier to follow.
It’s also important to be consistent with how you position annotations. For example, align text boxes or arrows in a similar way across all screenshots. Consistent placement helps readers focus on the content without being distracted.
By following these practices, you can create visual instructions that are easy to understand and genuinely helpful for your audience.
How do annotated screenshots improve communication in remote or asynchronous work settings?
Annotated screenshots are a powerful tool for remote or asynchronous work. They provide clear, visual context that makes complex information easier to grasp. By highlighting key details, they allow team members and clients to quickly understand instructions or resolve issues without needing lengthy explanations.
This visual method cuts down on misunderstandings, speeds up decision-making, and reduces the need for back-and-forth communication. By making information easier to interpret and act on, annotated screenshots help teams work together more smoothly and efficiently, no matter where they’re located.
How can I protect sensitive information when sharing annotated screenshots?
To protect sensitive information in annotated screenshots, it’s crucial to use trustworthy redaction tools. These tools allow you to permanently obscure private details by blurring or masking specific areas. Adding watermarks is another smart approach, as they clearly identify the image as proprietary and discourage unauthorized use or sharing.
Another tip: keep your screenshots focused. Only include the essential elements needed to convey your message. Avoid capturing unnecessary windows or data, and if you’re in a controlled environment, disable features like clipboard sharing. These practices help maintain the security and professionalism of your screenshots while ensuring they effectively communicate your point.


