How to Insert a GIF into a Google Doc
Follow these quick steps to add a GIF to your Google Doc. Keep your documents more engaging and dynamic by uploading animated images directly from your computer.
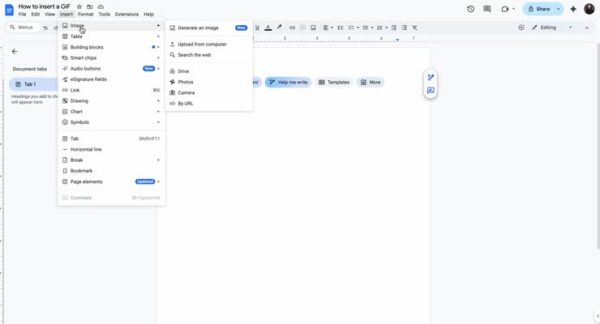
Step 1: Go to the top menu of your Google Doc and click on “Insert”.
Step 2: Navigate down to “Image” and select “Upload from computer”.
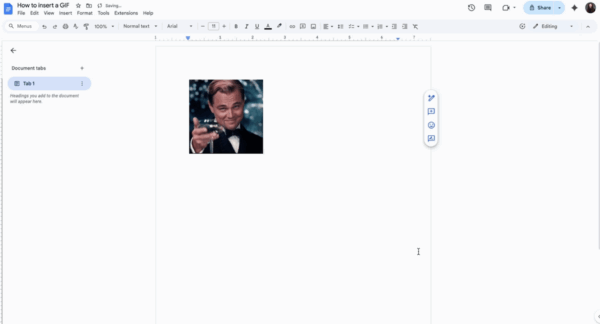
Step 3: Locate the GIF file on your computer. Ensure it is saved and select it.

Step 4: Click on “Open” to insert the GIF into your document.

Step 5: Watch Your GIF
The Ultimate Guide to Inserting a GIF into a Google Doc
Adding a GIF to your Google Doc is a great way to make your content more dynamic and engaging. Whether you’re creating a report, a class handout, or a collaborative project, animated images can add personality and help communicate your ideas in a fun, visual way.
Unlike before, Google Docs now supports animated GIFs that play directly within your document. That means you can see the animation loop right in the editor without needing to export or preview it elsewhere. It’s a simple upgrade that makes your documents feel more modern and interactive.
Why add a GIF to a Google Doc
GIFs can instantly bring energy and clarity to your content. They help capture attention, illustrate points, and add a bit of character to otherwise static text.
For teachers, GIFs can demonstrate concepts visually for students. For teams, they make presentations or internal documents feel more conversational and approachable. Even in professional settings, a tasteful animation can make a document stand out and feel more human.
If you’re creating guides, proposals, or tutorials, GIFs are perfect for showing quick examples, demonstrating workflows, or highlighting design elements.
Uploading your GIF
Inserting a GIF in Google Docs is as simple as adding an image. You just upload it from your computer, and it will automatically display and play within the document.
Once it’s inserted, the GIF animates on a continuous loop. You can click on it to resize, align, or reposition it wherever it fits best. The animation remains visible while editing and when others view the document through a shared link.
Since the animation runs natively, you don’t need any extensions or add-ons to make it work.
Choosing the right GIF for your document
The type of GIF you include depends on the tone and purpose of your document. For professional documents, subtle, brand-aligned animations often work best. For team updates or casual collaboration, you can use fun, expressive GIFs to show personality or celebrate milestones.
Make sure your chosen GIF complements your message instead of distracting from it. A small, looping animation can be more effective than a long, busy one.
Optimizing file size and performance
While Google Docs handles GIFs efficiently, very large files can affect how smoothly your document loads or scrolls. Before inserting, it’s smart to optimize your GIF to reduce file size without losing too much quality.
Tools like EZGIF, Adobe Express, or TinyGIF let you compress files quickly. Aim for short, looping animations under a few megabytes whenever possible.
Smaller GIFs not only perform better but also make collaboration smoother for your teammates when sharing large documents.
Making your documents visually appealing
GIFs can serve more than just entertainment. You can use them strategically to support visual storytelling, illustrate motion in a design, or emphasize key parts of your text.
For example, in a tutorial, you could add a GIF showing how to complete a process instead of describing each step. This helps readers understand faster and keeps them engaged.
When placed thoughtfully, GIFs can make your document feel both polished and interactive.
Maintaining a balanced layout
As with any visual element, balance is important. Too many GIFs can overwhelm your reader or make your document harder to navigate. Stick to one or two animations per page or section for the best visual impact.
You can also adjust alignment and text wrapping so the GIF blends naturally into your layout. Experiment with positioning to make sure it enhances your message without cluttering the page.
Conclusion
GIFs are a simple yet effective way to make your Google Docs more visually interesting and expressive. Now that animations play directly inside your document, adding one is easier and more rewarding than ever.
Whether you’re building a presentation, writing an instructional guide, or collaborating on a creative project, GIFs help bring your content to life. They add movement, emotion, and clarity that plain text alone can’t achieve.
So next time you open a new Doc, try adding a GIF; it might be just the spark your content needs.
Frequently Asked Questions
Yes. Google Docs supports animated GIFs, and they will play automatically once inserted.
Yes. The animation runs directly in Google Docs, both while editing and in view mode.
Yes. You can click on the image and drag the corners to resize it or use image options for precise control.
You can upload GIF, PNG, and JPEG files, but only GIFs include animation.
Yes. You can insert GIFs from your computer, Google Drive, or by URL using the “Insert image” menu.
Yes. Anyone with access to the document will see the GIF play automatically.
Use free tools like EZGIF or Adobe Express to compress the file before uploading.
Yes, but use them sparingly. Too many GIFs can affect performance or distract from your main content.


