
How to Annotate a Screenshot: The Complete Step-by-Step Guide (2026)
You just captured the perfect screenshot — a bug in your app, a design mockup that needs feedback, or a workflow you want to document for a new hire. But a bare screenshot without context is like sending someone a map with no markings. They’ll stare at it and ask, “What am I supposed to be looking at?” Learning how to annotate a screenshot — adding arrows, text labels, highlights, and boxes — transforms a flat image into a crystal-clear visual instruction that eliminates follow-up questions and saves everyone time.
⚡ Quick Answer
To annotate a screenshot, capture your screen using a tool like Zight, then use the built-in annotation editor to add arrows, text, boxes, highlights, and blur effects directly onto the image. Zight is a screenshot, screen recording, and async video tool that lets you capture, annotate, and share screenshots with a single keyboard shortcut — generating an instant shareable link without ever leaving your workflow. The entire process takes under 30 seconds.
In this guide, you’ll learn exactly how to annotate a screenshot on Mac, Windows, and Chrome — plus best practices that make your annotations genuinely useful rather than a cluttered mess. Whether you’re a developer documenting a bug, a product manager sharing feedback, or a customer success rep walking a client through a new feature, this guide covers every annotation type and when to use each one.
Why You Need to Annotate Screenshots (Not Just Capture Them)
A raw screenshot only shows what’s on screen. An annotated screenshot tells the viewer what matters and why. The difference is the gap between a five-second glance and a ten-email thread.
Here’s what screenshot annotation solves in practice:
- Bug reports that actually get fixed: Instead of writing “the button is broken,” you circle the button, arrow to the error message, and add a text note with the browser version. Engineers spend zero time reproducing your steps.
- Design feedback without meetings: Highlight the spacing issue, draw a box around the misaligned element, and type your suggestion. The designer gets precise, async feedback they can act on immediately.
- Customer onboarding at scale: Annotated screenshots in help docs reduce support tickets. A well-annotated screenshot for clear instructions replaces paragraphs of text.
- Remote team communication: When you can’t tap someone on the shoulder, a marked-up screenshot shared via link is the next best thing — often better, because it’s documented.
Studies on visual communication consistently show that people process images 60,000 times faster than text. Annotations bridge the gap between “here’s a picture” and “here’s what I need you to understand.”
What You Need: Choosing a Screenshot Annotation Tool
Before diving into the how-to steps, you need the right screenshot annotation tool. Not all tools are equal — some capture screenshots but force you into a separate app to annotate, which kills your flow. Others annotate but make sharing a pain. Here’s how the major options compare:
| Feature | Zight | Native OS Tools (Snipping Tool / Preview) | Snagit | Browser Extensions (Nimbus, Awesome Screenshot) |
|---|---|---|---|---|
| One-click capture + annotate | ✅ Single shortcut | ⚠️ Capture then open editor separately | ✅ Integrated | ⚠️ Browser-only captures |
| Arrows, text, boxes, highlights | ✅ Full set | ⚠️ Limited (varies by OS) | ✅ Full set | ⚠️ Varies by extension |
| Blur / redact sensitive info | ✅ Built-in | ❌ Not available | ✅ Built-in | ⚠️ Some support |
| Instant shareable link | ✅ Auto-generated | ❌ Manual upload required | ⚠️ Via Screencast.com | ⚠️ Varies |
| Works on Mac, Windows, Chrome | ✅ All three | ⚠️ OS-specific only | ✅ Mac & Windows | ⚠️ Chrome only |
| Screen recording + GIFs | ✅ Built-in | ❌ Separate tools | ✅ Built-in | ⚠️ Limited |
| Free plan available | ✅ Yes | ✅ Pre-installed | ❌ Paid only ($63/yr) | ✅ Most have free tiers |
| Team sharing & collections | ✅ Built for teams | ❌ No | ⚠️ Limited | ⚠️ Limited |
Zight stands out because it collapses the capture → annotate → share workflow into a single tool. There’s no “save the file, open it in another app, annotate it, export it, upload it, paste the link” dance. You press a shortcut, annotate in the editor, and a link is already on your clipboard. For teams that communicate visually dozens of times per day, that friction reduction adds up fast.
How to Annotate a Screenshot with Zight: Step-by-Step
Here’s the complete walkthrough. These steps work on Mac, Windows, and the Chrome extension. The entire process — from capture to shared annotated screenshot — takes less than 30 seconds once you’ve done it a couple of times.
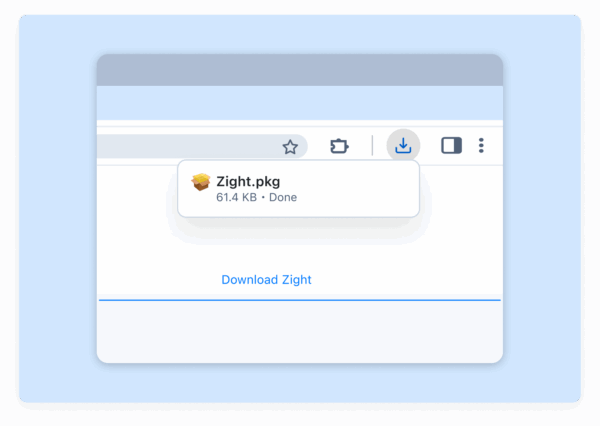
Step 1: Install Zight and Set Up Your Shortcut
Download the Zight screenshot app for your platform — Mac, Windows, or Chrome. Installation takes under a minute. Once installed, Zight lives in your menu bar (Mac) or system tray (Windows), ready to capture at any moment.
The default screenshot shortcut is:
- Mac:
Cmd + Shift + 5(or customize in Zight Preferences) - Windows:
Alt + Shift + 5(or customize in Zight Settings) - Chrome Extension: Click the Zight icon in your browser toolbar
You can customize these shortcuts to whatever feels natural. The key is building muscle memory so capturing a screenshot becomes as automatic as copying text.
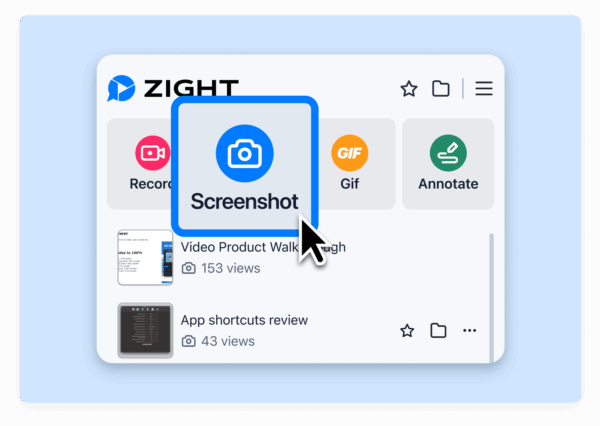
Step 2: Capture Your Screenshot
Trigger the capture shortcut and select the area of your screen you want to capture. Zight gives you three capture options:
- Region capture: Click and drag to select a specific area — ideal for focusing on a UI element, error message, or section of a page.
- Full screen: Capture everything on your display — useful for documenting full layouts or showing context.
- Window capture: Grab a specific application window cleanly, without desktop clutter in the background.
After you make your selection, Zight immediately opens the annotation editor. There’s no file saving, no separate app launch — you go straight from capture to annotation.
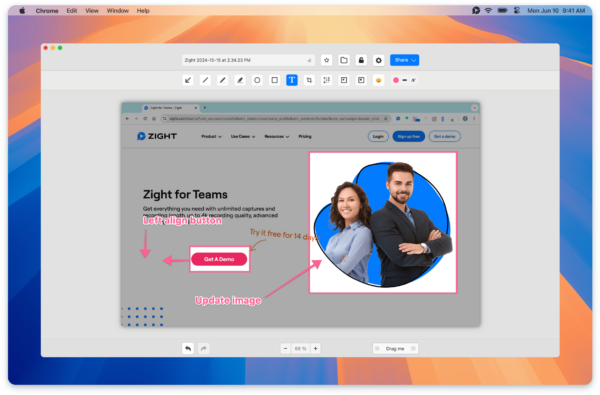
Step 3: Add Arrows to Your Screenshot
Arrows are the most essential annotation. They answer the viewer’s first question: “Where should I look?” Here’s how to add arrows to a screenshot in Zight:
- In the annotation toolbar, click the Arrow tool (or press the keyboard shortcut).
- Click on your screenshot where you want the arrow to start.
- Drag to where you want it to point and release.
- Adjust the color (red is high-visibility, but match your use case) and thickness using the toolbar options.
Pro tip: Use arrows sparingly. One or two well-placed arrows guide the eye. Five arrows in different directions create chaos. If you need to highlight multiple elements, combine arrows with numbered text labels (covered in the next step).

Step 4: Add Text Labels and Callouts
Text annotations provide the “why” that arrows alone can’t communicate. Use them to explain what the viewer should notice, what action to take, or what’s wrong.
- Select the Text tool from the annotation toolbar.
- Click anywhere on the screenshot to place a text box.
- Type your annotation — keep it concise (5–10 words is ideal).
- Adjust font size, color, and style. Use a contrasting color against the background so text is legible.
Best practices for text annotations:
- Use numbered labels (“1. Click here first”, “2. Then select this”) for sequential instructions.
- Keep text outside the UI element you’re referencing, connected by an arrow, so you don’t obscure the interface.
- Use bold or larger text for the most critical annotation if you have multiple labels.
Step 5: Draw Boxes and Rectangles to Highlight Areas
Boxes (rectangles) are perfect for saying “look at this entire area” — broader than an arrow’s pinpoint focus. They’re especially useful for highlighting sections of a dashboard, form fields, or navigation menus.
- Select the Rectangle / Box tool from the toolbar.
- Click and drag over the area you want to highlight.
- Choose between a filled box (semi-transparent overlay) or an outline-only box depending on whether you want to tint the area or just frame it.
- Set the border color — red or orange draws the most attention.
When to use boxes vs. arrows: Use a box when the important element is an area (a paragraph of text, a table, a group of buttons). Use an arrow when it’s a specific point (a single button, a particular value, an icon).
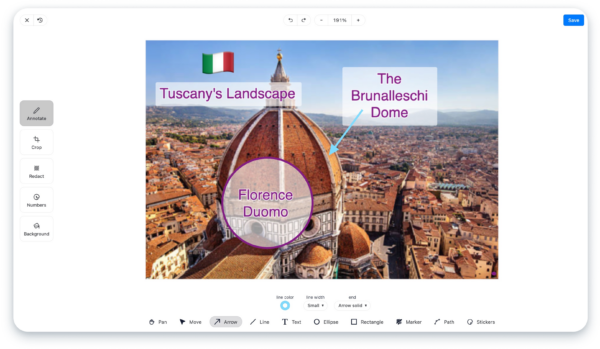
Step 6: Use Highlights to Emphasize Text or Data
The highlight tool works like a digital highlighter pen — it draws a semi-transparent colored overlay that makes specific text or data pop without obscuring it.
- Select the Highlight tool from the toolbar.
- Click and drag over the text, number, or area you want to emphasize.
- Choose a highlight color — yellow mimics the familiar highlighter pen feel, but green or pink can differentiate multiple highlights.
Highlights are ideal for marking specific values in a spreadsheet, key phrases in an error log, or important settings in a configuration panel.
Step 7: Blur or Redact Sensitive Information
Before sharing a screenshot — especially externally — you may need to hide personal data, API keys, email addresses, or customer information. Zight’s built-in annotation features include a blur/redact tool specifically for this.
- Select the Blur tool from the annotation toolbar.
- Click and drag over the sensitive area.
- The selected region is pixelated or blurred, making the underlying content unreadable.
Important: Always blur before sharing. Once you generate a shareable link, the blurred version is what gets shared — the original data isn’t recoverable from the shared image. This makes Zight’s blur tool safe for compliance-sensitive workflows.
Step 8: Share Your Annotated Screenshot Instantly
This is where Zight’s workflow shines compared to other tools. Once you’ve finished annotating:
- Click Save (or press Enter / the save shortcut).
- Zight automatically uploads the annotated screenshot to the cloud and copies a shareable link to your clipboard.
- Paste the link into Slack, Jira, Notion, email, a GitHub issue — anywhere that accepts a URL.
No file attachments. No “let me upload this to Google Drive first.” No image compression from email. Just a clean link that anyone can open in a browser. Recipients see your fully annotated screenshot without needing to install anything.
Annotation Best Practices: What Separates Good from Great
Knowing how to use the tools is half the equation. Knowing when and how much to annotate is what makes your screenshots genuinely effective.
Less Is More — Annotate with Purpose
Every annotation should serve a clear purpose. Before adding a mark, ask: “Does this help the viewer understand faster?” If the answer is no, leave it out. An over-annotated screenshot is just as confusing as an unannotated one.
Use Consistent Colors and Styles
If you’re creating screenshots for documentation or a team, establish a simple system:
- Red for errors, warnings, or “don’t do this”
- Green for correct actions or “do this”
- Yellow highlights for “pay attention here”
- Blue for neutral labels and step numbers
Consistency means viewers learn your visual language and can parse annotated screenshots faster over time.
Combine Annotation Types Strategically
The most effective annotated screenshots layer 2–3 annotation types together:
- Arrow + text label: “Click this button” with an arrow pointing to it
- Box + numbered labels: Box around a form section with “Step 1” and “Step 2” labels
- Highlight + arrow + text: Highlight an error message, arrow pointing to it, text saying “This error occurs when the API key expires”
Always Blur Sensitive Data Before Sharing
This one is non-negotiable. Check every screenshot for:
- Email addresses
- API keys and tokens
- Customer names or account details
- Internal URLs or IP addresses
- Financial data
It takes three seconds to blur. It takes weeks to deal with the fallout of accidentally sharing sensitive data.
How to Annotate a Screenshot on Different Platforms
While Zight works across Mac, Windows, and Chrome (giving you a consistent experience everywhere), here’s a quick overview of the native options and where they fall short:
Mac: Preview and Markup
macOS lets you take screenshots with Cmd + Shift + 4 and annotate using Preview’s Markup toolbar. You get basic shapes, text, and arrows. However, there’s no blur tool, no instant link sharing, and no cloud storage — you’re managing files manually and attaching them to messages.
Windows: Snipping Tool and Snip & Sketch
Windows 11’s Snipping Tool has improved, offering a pen, highlighter, and ruler. But annotation options remain basic — no arrows, no text boxes, no blur. You’ll need to open the capture in Paint or a third-party tool for real annotation, which fragments your workflow.
Chrome: Browser Extensions
Extensions like Awesome Screenshot and Nimbus offer in-browser capture and annotation. They work well for web content but can’t capture anything outside the browser — desktop apps, native menus, or multi-monitor setups are out of reach.
Cross-Platform with Zight
Zight eliminates the platform-specific workarounds. Whether you’re on a Mac at home, Windows at the office, or using Chrome on a shared machine, the screenshot annotation tool experience is identical: same shortcuts, same annotation features, same instant sharing. Your annotated screenshots live in the cloud and are searchable across devices.
Real-World Use Cases for Annotated Screenshots
Theory is great, but here’s how teams actually use screenshot annotations day-to-day:
Developers: Bug Reports That Don’t Waste Time
Instead of writing “the dropdown menu is broken on the settings page,” a developer captures the screen, draws an arrow to the malformed dropdown, adds a text label with the browser version and OS, boxes the console error in DevTools, and shares the link in the Jira ticket. The engineer on the other end has everything they need to start fixing — zero back-and-forth.
Product Managers: Async Design Feedback
A PM reviews a Figma prototype, captures three screens, annotates each with specific feedback (highlight the padding that looks off, arrow to the CTA that needs a color change, text note about copy updates), and drops all three links in a Slack thread. The designer gets actionable feedback without scheduling a 30-minute meeting.
Customer Success: Guiding Clients Without Screen Shares
A CS rep captures the client’s dashboard (via a screen they’ve been sent or their own demo account), annotates a step-by-step walkthrough with numbered labels, and emails the link. The client follows the visual guide on their own time. No scheduling conflicts, no timezone gymnastics.
Remote Teams: Onboarding Documentation
Instead of writing a 2,000-word onboarding doc about “how to set up your development environment,” a senior engineer captures five annotated screenshots of each setup step and organizes them in a Zight collection. New hires follow the visual guide and are productive on day one instead of day three.
Frequently Asked Questions
What is the best free tool to annotate a screenshot?
Zight offers a free plan that includes screenshot capture, annotation (arrows, text, boxes, highlights, blur), and instant link sharing — making it the most complete free screenshot annotation tool available in 2026. Native OS tools like macOS Preview and Windows Snipping Tool are free but lack key features like blur, instant sharing, and cross-platform sync.
How do I add arrows to a screenshot on Mac or Windows?
To add arrows to a screenshot, use a dedicated annotation tool like Zight. After capturing your screenshot, select the Arrow tool from the annotation toolbar, click where you want the arrow to start, and drag to the target. Adjust the color and thickness for visibility. macOS Preview also offers a basic arrow tool in its Markup toolbar, but Windows Snipping Tool does not include arrow annotations natively.
Can I annotate a screenshot and share it without saving a file?
Yes. Zight automatically uploads your annotated screenshot to the cloud and copies a shareable link to your clipboard the moment you save. You never need to manually save a file, upload it to a hosting service, or attach it to an email. Just paste the link wherever you need to share it — Slack, Jira, email, Notion, or any other tool.
How do I blur sensitive information on a screenshot before sharing?
In Zight’s annotation editor, select the Blur tool from the toolbar, then click and drag over any sensitive information — email addresses, API keys, customer data, or internal URLs. The selected area is pixelated and the original content cannot be recovered from the shared image. Always apply blur before clicking Save to ensure the shared version is safe.
What types of annotations can I add to a screenshot?
Modern screenshot annotation tools like Zight support: arrows (point to specific elements), text labels (explain what the viewer is seeing), rectangles/boxes (highlight areas), highlights (semi-transparent overlays for emphasis), blur/redact (hide sensitive data), lines and shapes (circles, freeform drawing), and numbered steps (sequential instructions). The most effective annotations combine 2–3 of these types together.
Start Annotating Screenshots in Under a Minute
Every unannotated screenshot you send is a missed opportunity to communicate clearly, save someone a follow-up question, and move work forward faster. Now that you know how to annotate a screenshot — arrows, text, boxes, highlights, and blur — the only step left is to put it into practice.
Zight makes the entire capture → annotate → share workflow seamless across Mac, Windows, and Chrome. No file management. No app-switching. No waiting for uploads. Just a keyboard shortcut, a few annotations, and an instant link.
Download Zight for free and start annotating your first screenshot in under 60 seconds. Your teammates — and your future self — will thank you.


Leave a Reply