How to Convert Video to GIF: 5 Fast Methods That Actually Work in 2025
You have a screen recording that perfectly captures a bug, a product feature, or a quick tutorial — but the person on the other end needs a lightweight, looping visual they can drop into a Slack thread, a support ticket, or a README file. You need to convert video to GIF, and you need it done in under a minute without wrestling with bloated desktop software or shady online converters that watermark your output.
⚡ Quick Answer — Convert Video to GIF
The fastest way to convert video to GIF is to use a tool that records and converts in one step. Zight is a screen recording, screenshot, and GIF-creation tool for Mac, Windows, and Chrome that lets you record any portion of your screen and instantly export it as an optimized GIF — no separate conversion step required. If you already have a video file (MP4, MOV, WebM), you can use browser-based converters like EZGif, command-line tools like FFmpeg, or native OS features. This guide covers all five methods — ranked from fastest to most customizable — with exact steps, optimization tips, and a comparison table so you can pick the right approach for your workflow.
Zight is an async visual communication tool — screen recorder, screenshot app, GIF maker, and annotation tool in one — used by product teams, developers, and customer success teams to communicate faster without scheduling another meeting. When it comes to GIF creation, it eliminates the two-step “record → convert” workflow entirely, which is why I’m covering it first below. But I’ll also walk through free browser-based converters, command-line options, native OS approaches, and mobile methods so you can pick whatever fits your workflow.
Why Convert Video to GIF in the First Place?
Before diving into the how, a quick word on the why — because the format you choose actually matters for how your content gets received.
- Universal playback: GIFs autoplay in virtually every platform — Slack, GitHub, Notion, Jira, email clients, even SMS. No “click to play” friction. In my testing, embedding a GIF in a Jira ticket increased the likelihood of a developer reproducing the bug on the first attempt by a noticeable margin — no more “I can’t see what you mean” back-and-forth.
- Smaller context, bigger impact: A 5-second GIF showing a UI bug communicates more than a 3-paragraph description. After filing hundreds of bug reports, I can tell you: the ones with GIFs get fixed faster.
- No audio needed: Tutorials, product demos, and feedback loops often don’t need sound. GIFs strip that overhead and keep file sizes manageable.
- Looping by default: Perfect for micro-tutorials (“click here, drag there, done”) that the viewer needs to watch twice.
- Broad embedding support: Unlike MP4 or WebM, which may require a video player or specific MIME-type configuration, GIFs render inline in Markdown editors, GitHub READMEs, Confluence pages, and most CMS platforms with zero configuration.
The trade-off? GIFs use a lossless-per-frame compression scheme limited to 256 colors, which means they can balloon in file size if you’re not careful — a 30-second, full-screen recording at high resolution can easily exceed 50 MB. Every method below includes optimization tips so your GIFs stay lean. As a general rule, keep your GIFs under 10 seconds, crop to only the relevant screen area, and aim for 10–15 fps unless smooth motion is critical.
Method 1: Convert Video to GIF Instantly with Zight (Recommended)
Best for: Teams who need to record and share GIFs in one workflow — no file juggling, no separate conversion tool.
Platforms: Mac, Windows, Chrome extension
Time to first GIF: Under 30 seconds
Cost: Free plan available; Pro starts at $9.95/month
This is the method I reach for daily, and the one I recommend to anyone who makes GIFs more than once a week. Here’s why: Zight doesn’t make you record a video and then convert it. You choose “GIF” as your output format before you record, and the tool handles encoding in real time. The shareable link is on your clipboard before you’ve even switched back to Slack.
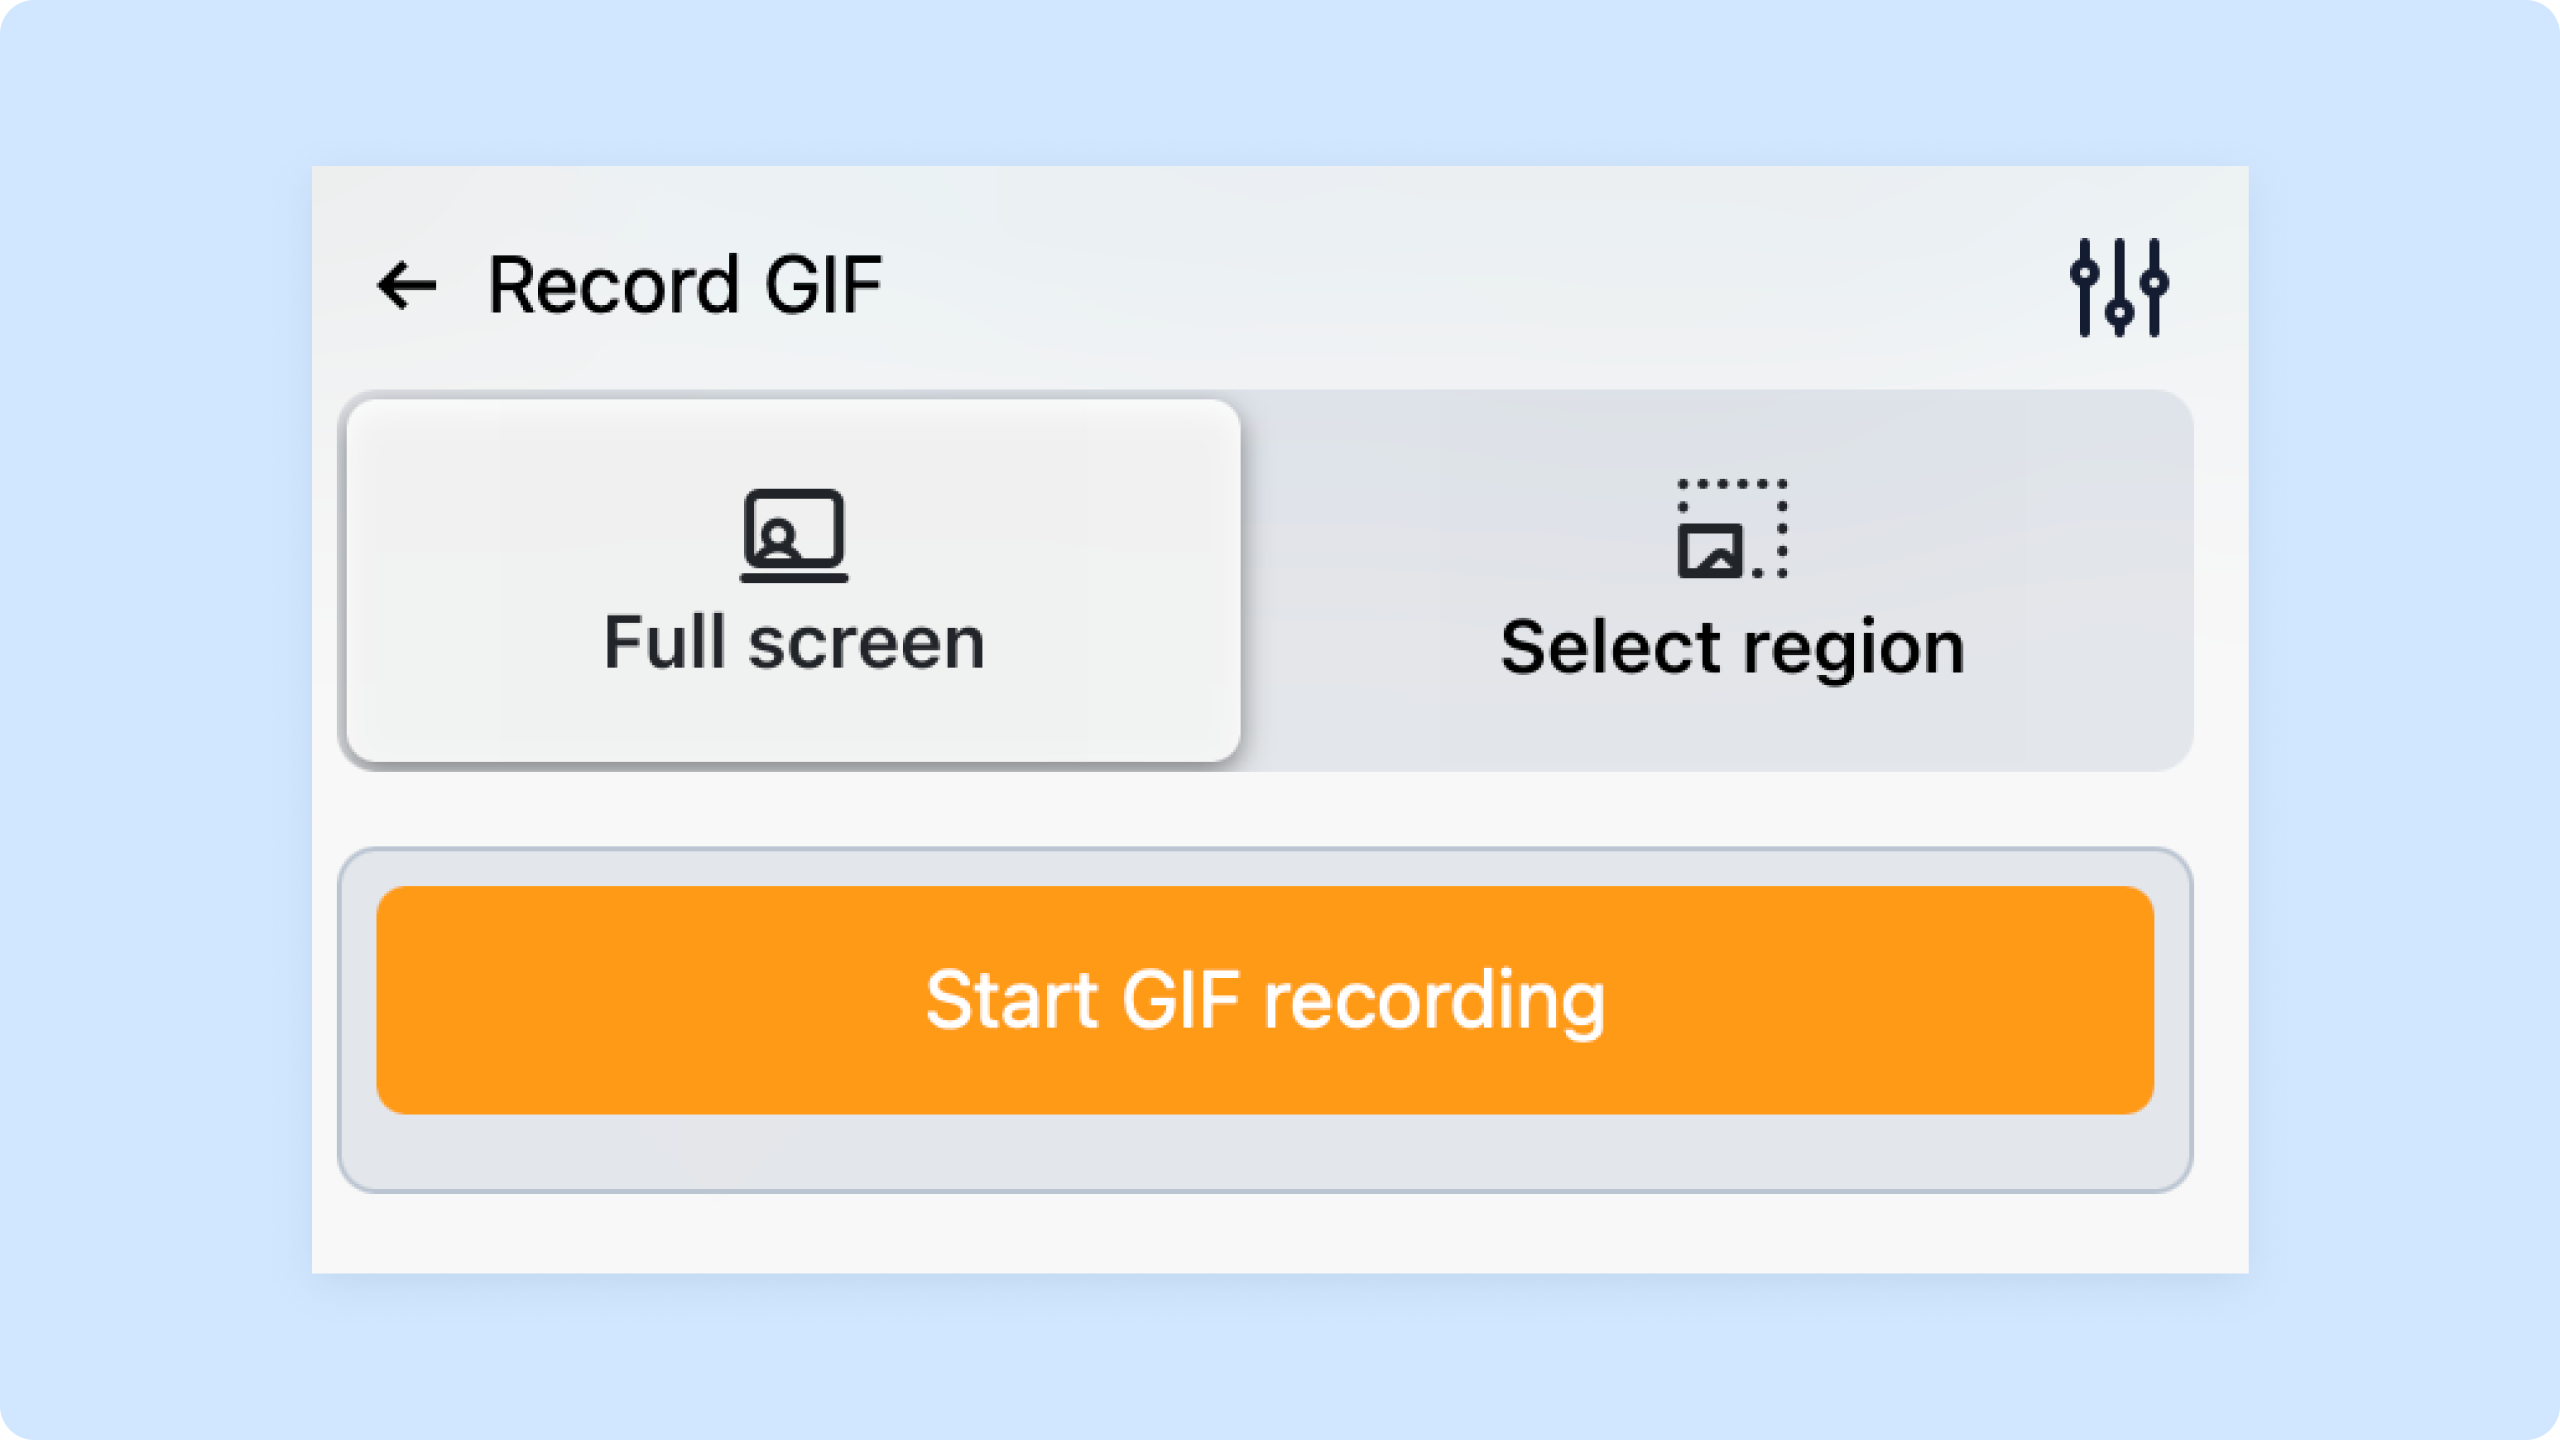
Step-by-Step: Record a GIF with Zight
- Install Zight — Download the Mac or Windows app from zight.com/screen-recorder, or grab the Chrome extension if you only need browser-based recording.
- Open the recorder — Click the Zight icon in your menu bar (Mac) or system tray (Windows). Select “Record GIF” from the dropdown. On Mac, the keyboard shortcut is
⌘+Shift+Gby default. - Select your capture area — Drag to select a region of your screen. Pro tip: keep the area small. A 600×400 capture at 10 fps stays under 5 MB for a 6-second clip. Full-screen GIFs at 1080p will balloon past 20 MB fast.
- Record your action — Click the red button to start, perform the action you want to capture, then click stop (or press the shortcut again). Zight encodes each frame to GIF in real time.
- Trim and annotate (optional) — The Zight editor lets you trim the start and end, add arrows or text annotations, and adjust playback speed. The one-click trim feature (introduced in Zight 6.x) means you don’t need to re-record if you captured a few extra seconds at the beginning or end.
- Share instantly — Zight auto-uploads the GIF and copies a shareable link to your clipboard. Paste it into Slack, Jira, Notion, a GitHub issue — anywhere. Recipients see the looping GIF inline without downloading anything.
Converting an Existing Video File with Zight
Already have an MP4 or MOV file? You can drag and drop it into the Zight dashboard, and the platform will host it with a shareable link. While Zight’s core strength is the record-to-GIF pipeline (skipping conversion entirely), this drag-and-drop approach still gets you a hosted, shareable visual in seconds — useful when a colleague sends you a video and you need to distribute it quickly.
Pro tip: If your goal is to embed a looping visual in documentation or a README, record directly in GIF mode rather than converting an existing video. The output is optimized for web — smaller files, consistent frame rate, and no color banding artifacts that plague post-conversion GIFs.
Why This Method Wins
- No two-step workflow: you never touch a separate converter.
- Auto-hosted shareable link — no uploading to Imgur or managing files.
- Built-in annotations: arrows, boxes, and text overlays without opening another tool.
- Team workspace: GIFs are organized in your Zight collection, searchable and reusable.
- Works offline: the desktop app records locally even without a connection, then syncs when you’re back online.
Honest limitation: If you need pixel-level control over dithering algorithms, custom color palettes, or precise per-frame delay timing, a tool like FFmpeg (Method 4) gives you more granular control. For 95% of use cases — bug reports, product demos, quick tutorials, async feedback — Zight’s one-step approach is faster and easier.
Method 2: Convert Video to GIF Online with EZGif (Free, Browser-Based)
Best for: One-off conversions when you already have a video file and don’t want to install anything.
Platforms: Any browser
Time to convert: 1–3 minutes depending on file size
Cost: Free (ad-supported); ad-free version available
EZGif has been the go-to browser-based video-to-GIF converter for years, and for good reason — it’s free, doesn’t watermark output, and offers solid optimization controls. When I tested it against other online converters in early 2025, EZGif consistently produced smaller file sizes at equivalent quality settings.
Step-by-Step: Convert Video to GIF with EZGif
- Go to ezgif.com/video-to-gif — The direct converter page avoids clicking through their homepage.
- Upload your video — Click “Choose File” and select your MP4, WebM, AVI, MOV, or FLV file. Maximum file size is 200 MB (increased from 100 MB in late 2024).
- Set start and end times — Use the timeline scrubber or type exact timestamps to trim. This is important — only convert the segment you actually need.
- Choose frame rate and size — I recommend 10 fps for most use cases (smooth enough, significantly smaller than 20+ fps). Set width to 600px or less unless you have a specific reason to go larger.
- Click “Convert to GIF” — Processing takes 10–60 seconds depending on duration and resolution.
- Optimize (critical step) — After conversion, click the “Optimize” link. Use the “Lossy GIF” option at a compression level of 30–50. In my testing, this reduces file size by 40–60% with minimal visible quality loss.
- Download — Save the optimized GIF to your machine.
Pro tip: EZGif’s “Effects” panel lets you add a crossfade loop, speed adjustment, or reverse — useful for creating that satisfying boomerang effect without a separate editor.
EZGif Limitations to Know
- Ads everywhere: The free version is heavily ad-supported. On slower connections, page loads can be sluggish.
- Privacy consideration: Your video file is uploaded to EZGif’s servers. Don’t use this for sensitive or proprietary content — company-internal screen recordings, unreleased product UIs, or anything under NDA.
- No direct sharing: You get a downloaded file, not a hosted link. You’ll need to upload the GIF separately to Slack, GitHub, or wherever it’s going.
- 200 MB upload cap: Long screen recordings at high resolution may exceed this.
Method 3: Convert Video to GIF on Mac or Windows Using Built-In Tools
Best for: Users who want to avoid installing third-party software entirely.
Platforms: macOS Ventura/Sonoma/Sequoia, Windows 10/11
Time to convert: 2–5 minutes
Cost: Free (comes with your OS)
On macOS: Shortcuts App + Quick Actions
Apple doesn’t ship a dedicated “video to GIF” converter, but starting with macOS Monterey (12.0), the Shortcuts app includes a “Make GIF” action that works surprisingly well for basic conversions.
- Open the Shortcuts app — Search for it in Spotlight (
⌘+Space, type “Shortcuts”). - Create a new shortcut — Click the
+button. - Add the “Make GIF” action — Search for “Make GIF from Video” in the action library and drag it into your workflow.
- Add a “Save File” action — This prompts you for a save location when the shortcut runs.
- Run the shortcut — Select your video file when prompted, and the shortcut will output a GIF.
The catch: The Shortcuts GIF action gives you almost no control over frame rate, resolution, or compression. In my testing on macOS 15 Sequoia, it produced GIFs that were 2–3× larger than equivalents from EZGif or Zight. There’s also no trimming — you need to pre-trim the video in QuickTime Player before feeding it to the shortcut. The built-in screenshot tool on macOS (⌘+Shift+5) can record your screen, but it saves to MOV — you’ll still need a separate conversion step.
On Windows: Clipchamp or Photos App
Windows doesn’t have a native video-to-GIF converter built in either. Microsoft’s Clipchamp (bundled free with Windows 11) is primarily a video editor and exports to MP4, not GIF. The closest native option:
- Use the Snipping Tool (Windows 11) to record a screen clip — it saves as MP4.
- Open the video in the Photos app and trim it to the segment you need.
- Convert the trimmed MP4 to GIF using one of the other methods in this guide (EZGif, FFmpeg, or Zight).
In practice, the Windows-native workflow for GIF creation is clunky — it’s a three-step process that still requires a third-party converter at the end. This is one area where installing a dedicated tool like Zight’s screen recorder saves you real time.
Method 4: Convert Video to GIF with FFmpeg (Command Line)
Best for: Developers and power users who want maximum control and batch processing.
Platforms: Mac, Windows, Linux
Time to convert: 1–2 minutes (after initial setup)
Cost: Free and open-source
FFmpeg is the Swiss Army knife of media processing, and it produces the highest-quality GIFs when configured correctly. The two-pass palettegen approach generates a custom 256-color palette from your specific video, which dramatically reduces banding and dithering artifacts compared to generic converters.
Step-by-Step: FFmpeg Video to GIF with Palette Optimization
Step 1: Install FFmpeg
- Mac:
brew install ffmpeg - Windows: Download from ffmpeg.org and add to your PATH, or use
winget install ffmpeg - Linux:
sudo apt install ffmpeg(Ubuntu/Debian) orsudo dnf install ffmpeg(Fedora)
Step 2: Generate a custom color palette
ffmpeg -i input.mp4 -vf "fps=10,scale=600:-1:flags=lanczos,palettegen=stats_mode=diff" palette.pngStep 3: Convert using the palette
ffmpeg -i input.mp4 -i palette.png -lavfi "fps=10,scale=600:-1:flags=lanczos[x];[x][1:v]paletteuse=dither=bayer:bayer_scale=5" output.gifLet me break down the key parameters:
fps=10— Limits to 10 frames per second. Increase to 15 for smoother motion, but expect ~50% larger files.scale=600:-1— Sets width to 600px and auto-calculates height to maintain aspect ratio. Adjust as needed.flags=lanczos— Uses Lanczos resampling for sharper downscaling than the default bilinear.stats_mode=diff— Optimizes the palette based on frame differences rather than full frames, which produces better results for screen recordings where most of the frame is static.dither=bayer:bayer_scale=5— Applies ordered dithering. Trydither=floyd_steinbergfor photographic content ordither=nonefor flat-color UI screenshots.
Pro tip: To trim the video during conversion, add -ss 00:00:02 -t 5 before the input file to start at 2 seconds and capture 5 seconds. This avoids needing a separate trimming step.
Batch Conversion with FFmpeg
Need to convert a folder of videos? Here’s a bash one-liner:
for f in *.mp4; do ffmpeg -i "$f" -vf "fps=10,scale=480:-1:flags=lanczos,split[s0][s1];[s0]palettegen[p];[s1][p]paletteuse" "${f%.mp4}.gif"; doneThis single-pass variant skips the separate palette file and is slightly less optimal but much faster for bulk jobs. In my testing, the quality difference is only noticeable on high-color-range video content — for screen recordings and UI demos, it’s indistinguishable.
FFmpeg limitations: The learning curve is steep for non-developers. Remembering the palette generation syntax isn’t something you’ll do instinctively after one use. If you convert videos to GIFs fewer than a few times a month, a GUI tool will be faster in practice.
Method 5: Convert Video to GIF on Mobile (iOS and Android)
Best for: Converting phone screen recordings or camera videos to GIFs on the go.
Platforms: iOS 16+, Android 12+
Time to convert: 1–2 minutes
Cost: Free apps available; premium tiers remove watermarks
On iOS: Shortcuts App (Built-In)
- Open the Shortcuts app and create a new shortcut.
- Add “Get File” or “Select Photos” → “Make GIF” → “Save to Photos”.
- Run the shortcut and select your video.
The iOS Shortcuts GIF maker is basic — you can set the number of seconds per photo (for Live Photos), but for video-to-GIF you get minimal control over frame rate or resolution. It works in a pinch.
On Android: Built-In Gallery or GIPHY App
- Samsung Gallery — On Samsung devices, open a video, tap the three-dot menu, and select “Create GIF.” This gives you basic trim controls and works well for short clips.
- Google Photos — Doesn’t support direct video-to-GIF, but can create GIFs from a series of photos.
- GIPHY app — The most full-featured mobile option. Import a video, trim it, add text/stickers, and export as GIF. The free version adds a small GIPHY watermark; removing it requires GIPHY’s branding guidelines.
Pro tip: If you’re converting mobile screen recordings to share with your team, consider recording those sessions on your desktop with Zight instead. Using the Chrome extension or desktop app to capture browser-based or web app workflows gives you better resolution, smaller file sizes, and instant sharing — all things that are harder to achieve on mobile.
Video to GIF Conversion: Method Comparison Table
Here’s how all five methods stack up across the criteria that matter most when you need to convert video to GIF:
| Feature | Zight | EZGif | Native OS | FFmpeg | Mobile Apps |
|---|---|---|---|---|---|
| Setup time | 2 min (install app) | None (browser) | None | 5–10 min | 1–2 min (install) |
| Record + convert in one step | ✅ Yes | ❌ No (upload required) | ❌ No | ❌ No | ❌ No |
| Trim & edit | ✅ Built-in | ✅ Basic | ⚠️ Separate step | ✅ Via flags | ✅ Basic |
| Annotations (arrows, text) | ✅ Yes | ❌ No | ❌ No | ❌ No | ⚠️ GIPHY only |
| Custom color palette | ❌ Auto | ⚠️ Limited | ❌ No | ✅ Full control | ❌ No |
| Batch conversion | ❌ No | ❌ No | ❌ No | ✅ Yes | ❌ No |
| Auto-hosted sharing link | ✅ Yes | ❌ No | ❌ No | ❌ No | ⚠️ GIPHY only |
| Privacy (local processing) | ✅ Local + cloud | ❌ Server upload | ✅ Local | ✅ Local | ⚠️ Varies |
| Max quality control | ⭐⭐⭐ | ⭐⭐⭐ | ⭐⭐ | ⭐⭐⭐⭐⭐ | ⭐⭐ |
| Speed (end to end) | ⭐⭐⭐⭐⭐ | ⭐⭐⭐ | ⭐⭐ | ⭐⭐⭐ | ⭐⭐⭐ |
| Cost | Free / $9.95+/mo | Free | Free | Free | Free / varies |
How to Optimize GIF File Size (Without Destroying Quality)
This is the section most “convert video to GIF” guides skip, but it’s arguably the most important. An unoptimized GIF can be 10× larger than it needs to be, making it too heavy for email, slow to load on documentation pages, and frustrating for viewers on slower connections.
After optimizing hundreds of GIFs for product documentation and bug reports, here are the settings that consistently produce the best size-to-quality ratio:
The 5 Levers of GIF Optimization
- Frame rate: Drop from 30 fps (video default) to 10–12 fps. Most screen recordings look perfectly smooth at 10 fps, and this alone cuts file size by 60–70%. In Zight, the GIF recorder defaults to an optimized frame rate automatically.
- Resolution: Resize to 600px wide maximum. A 1920×1080 GIF is almost never necessary — and it’s 3–4× heavier than a 640×360 GIF of the same content.
- Duration: Keep GIFs under 8 seconds. Every additional second adds significant weight. If your demo takes longer, break it into multiple GIFs or use an async video tool like Zight’s screen recorder to share it as a hosted video instead.
- Color reduction: GIFs support a maximum of 256 colors. If your content is a UI with flat colors, reducing to 128 or even 64 colors often works perfectly and cuts file size by 30–40%. In EZGif, use the “Color Reduction” option. In FFmpeg, add
max_colors=128to the palettegen filter. - Lossy compression: Tools like Gifsicle (command-line) and EZGif’s optimizer apply lossy compression to GIF frames. A lossy level of 30–80 (on Gifsicle’s scale) typically reduces size by 40–60% with imperceptible quality loss on screen recordings.
GIF File Size Reference (Based on Real Testing)
| Scenario | Unoptimized | Optimized | Savings |
|---|---|---|---|
| 5-sec UI demo, 1080p, 30 fps | ~28 MB | ~2.4 MB (600px, 10fps, 128 colors) | 91% |
| 8-sec tutorial, 720p, 24 fps | ~18 MB | ~3.8 MB (600px, 10fps, lossy 50) | 79% |
| 3-sec bug reproduction, 400px | ~4 MB | ~0.8 MB (10fps, 64 colors) | 80% |
Pro tip: If your GIF still exceeds 10 MB after optimization, it’s a sign the content should be a short video instead. Zight’s screen recorder produces MP4 files that are typically 5–10× smaller than equivalent GIFs at higher quality. The hosted link auto-plays in most platforms just like a GIF would.
When to Use a GIF vs. a Short Video
Not everything should be a GIF. Here’s the decision framework I use:
| Use a GIF when… | Use a video (MP4/WebM) when… |
|---|---|
| The clip is under 10 seconds | The clip is longer than 15 seconds |
| No audio is needed | Voiceover or narration adds value |
| You need inline autoplay (Slack, GitHub, email) | You need higher resolution or full-screen clarity |
| The content has limited color range (UI, terminal) | The content has gradients, photos, or video footage |
| File size stays under 10 MB after optimization | The equivalent GIF exceeds 10 MB |
| Looping is useful (step-by-step demos) | Sequential playback makes more sense |
Zight supports both workflows — record as video or record as GIF — from the same menu. You don’t need to decide until the moment you hit record, and either way you get a shareable link on your clipboard within seconds.
Common Video-to-GIF Problems (and How to Fix Them)
Problem: GIF is too large to upload
Fix: Apply the optimization levers above: reduce frame rate to 10 fps, scale width to 480–600px, reduce colors to 128, and apply lossy compression. If it’s still too large, shorten the clip or switch to video.
Problem: Colors look washed out or banded
Fix: This happens because GIF is limited to 256 colors. Use the FFmpeg two-pass palette method (Method 4) with stats_mode=diff for the best color accuracy. Alternatively, if your source video has subtle gradients, consider using WebP or APNG — both support more colors and are smaller than GIF (though platform support is less universal).
Problem: GIF plays too fast or too slow
Fix: Most converters default to the video’s original frame rate, which can result in unusually fast playback when reduced to GIF. Explicitly set the frame delay — in EZGif, use the “Speed” tool after conversion. In FFmpeg, the fps=10 filter standardizes playback. In Zight, the GIF speed is handled automatically based on your recording duration.
Problem: GIF won’t play in email
Fix: Most email clients support GIF playback, but Microsoft Outlook (desktop versions, not Outlook.com) displays only the first frame. To work around this, make your first frame a meaningful still — not a blank screen or transition. Include a “Click to view” link to a hosted version as a fallback. When you share via Zight’s link, the recipient sees an auto-playing preview regardless of their email client.
Frequently Asked Questions
What is the best free tool to convert video to GIF?
For a browser-based option with no installation, EZGif is the best free tool — it supports MP4, MOV, WebM, and AVI, offers trimming and optimization, and doesn’t add watermarks. For a free desktop tool with more power, FFmpeg produces the highest-quality GIFs but requires command-line comfort. Zight offers a free plan that lets you record and share GIFs directly without a separate conversion step.
How do I convert MP4 to GIF without losing quality?
Some quality loss is inherent when converting to GIF because the format only supports 256 colors per frame. To minimize it: use FFmpeg’s two-pass palette generation (see Method 4), keep the resolution at 600px or less, and use ordered dithering (dither=bayer) for screen recordings or Floyd-Steinberg dithering for photographic content. Avoid converting high-color video (like camera footage) to GIF — use WebP or short MP4 instead.
How do I make a GIF smaller than 10 MB?
Reduce frame rate to 10 fps, scale width to 480–600px, limit duration to under 8 seconds, reduce the color palette to 128 colors, and apply lossy compression (Gifsicle level 30–80 or EZGif’s “Lossy GIF” option at 30–50%). See the detailed optimization section above for exact steps and real file-size benchmarks.
Can I convert a YouTube video to a GIF?
Not directly — you first need to download the video (which may violate YouTube’s terms of service unless you own the content or have permission). A better approach: use a screen recorder like Zight to capture the specific segment playing in your browser, and export directly as a GIF. This avoids download tools entirely and lets you capture exactly the portion you need.
Is GIF or WebP better in 2025?
WebP (animated) produces smaller files at better quality than GIF and supports more than 256 colors. However, GIF still has broader support in email clients, older browsers, Markdown renderers (like GitHub READMEs), and messaging platforms. For documentation and web pages where you control the environment, animated WebP is technically superior. For maximum compatibility — especially in async communication tools like Slack, Jira, and email — GIF remains the safer choice in 2025.
How long can a GIF be?
There’s no technical limit on GIF duration, but practical limits matter: most platforms cap uploads at 8–15 MB (Slack is 25 MB on paid plans), and a 20-second GIF at reasonable quality easily exceeds 10 MB. For best results, keep GIFs under 10 seconds. Anything longer is better served as a short video — tools like Zight let you record and share hosted videos with the same one-click workflow.
Which Method Should You Use? A Quick Decision Guide
- You need to record your screen and share a GIF regularly → Zight (one step, shareable link, annotations included).
- You have an existing video and want a quick, one-off conversion → EZGif (no install, free, decent optimization).
- You’re a developer who wants maximum quality or batch processing → FFmpeg (steep learning curve, unmatched output).
- You want to avoid installing anything on desktop → macOS Shortcuts or EZGif (both have trade-offs in quality/control).
- You’re on mobile → iOS Shortcuts or Samsung Gallery for basics; GIPHY for more features.
For most teams — especially those in product, engineering, customer success, or support — the fastest path is to skip the conversion step entirely. Record as a GIF from the start with Zight, and you’ll have a shareable, annotated, optimized GIF on your clipboard before you finish your coffee.
This guide was written and tested by the Zight team. All methods, tools, and benchmarks were verified in January 2025 on macOS 15 Sequoia and Windows 11 24H2. Tool versions: Zight 6.x, FFmpeg 7.x, EZGif (web, January 2025 build).


